


I've written before about my burgeoning love of German food, so it should be no surprise that Spätzle/Spaetzle was become a popular dinner in the Cleaver household.
I'll admit that I've yet to find a way of making Spätzle that doesn't make a huge mess (the noodle dough is super sticky!), but I find the end result worth it. The recipe makes a generous amount of noodles (four adult-sized portions) and can be easily doubled.
Not in garlic scape season? Try substituting in chives, wild garlic leaves, spring/baby garlic or basically anything in the edible allium family like scallions, shallots, or leeks. No fresh asparagus around? Substitute with frozen*, or try green beans, sugar or snow peas, broccoli stems - anything green with a snap.
*Frozen veggies beat out of season veggies any day in my book.
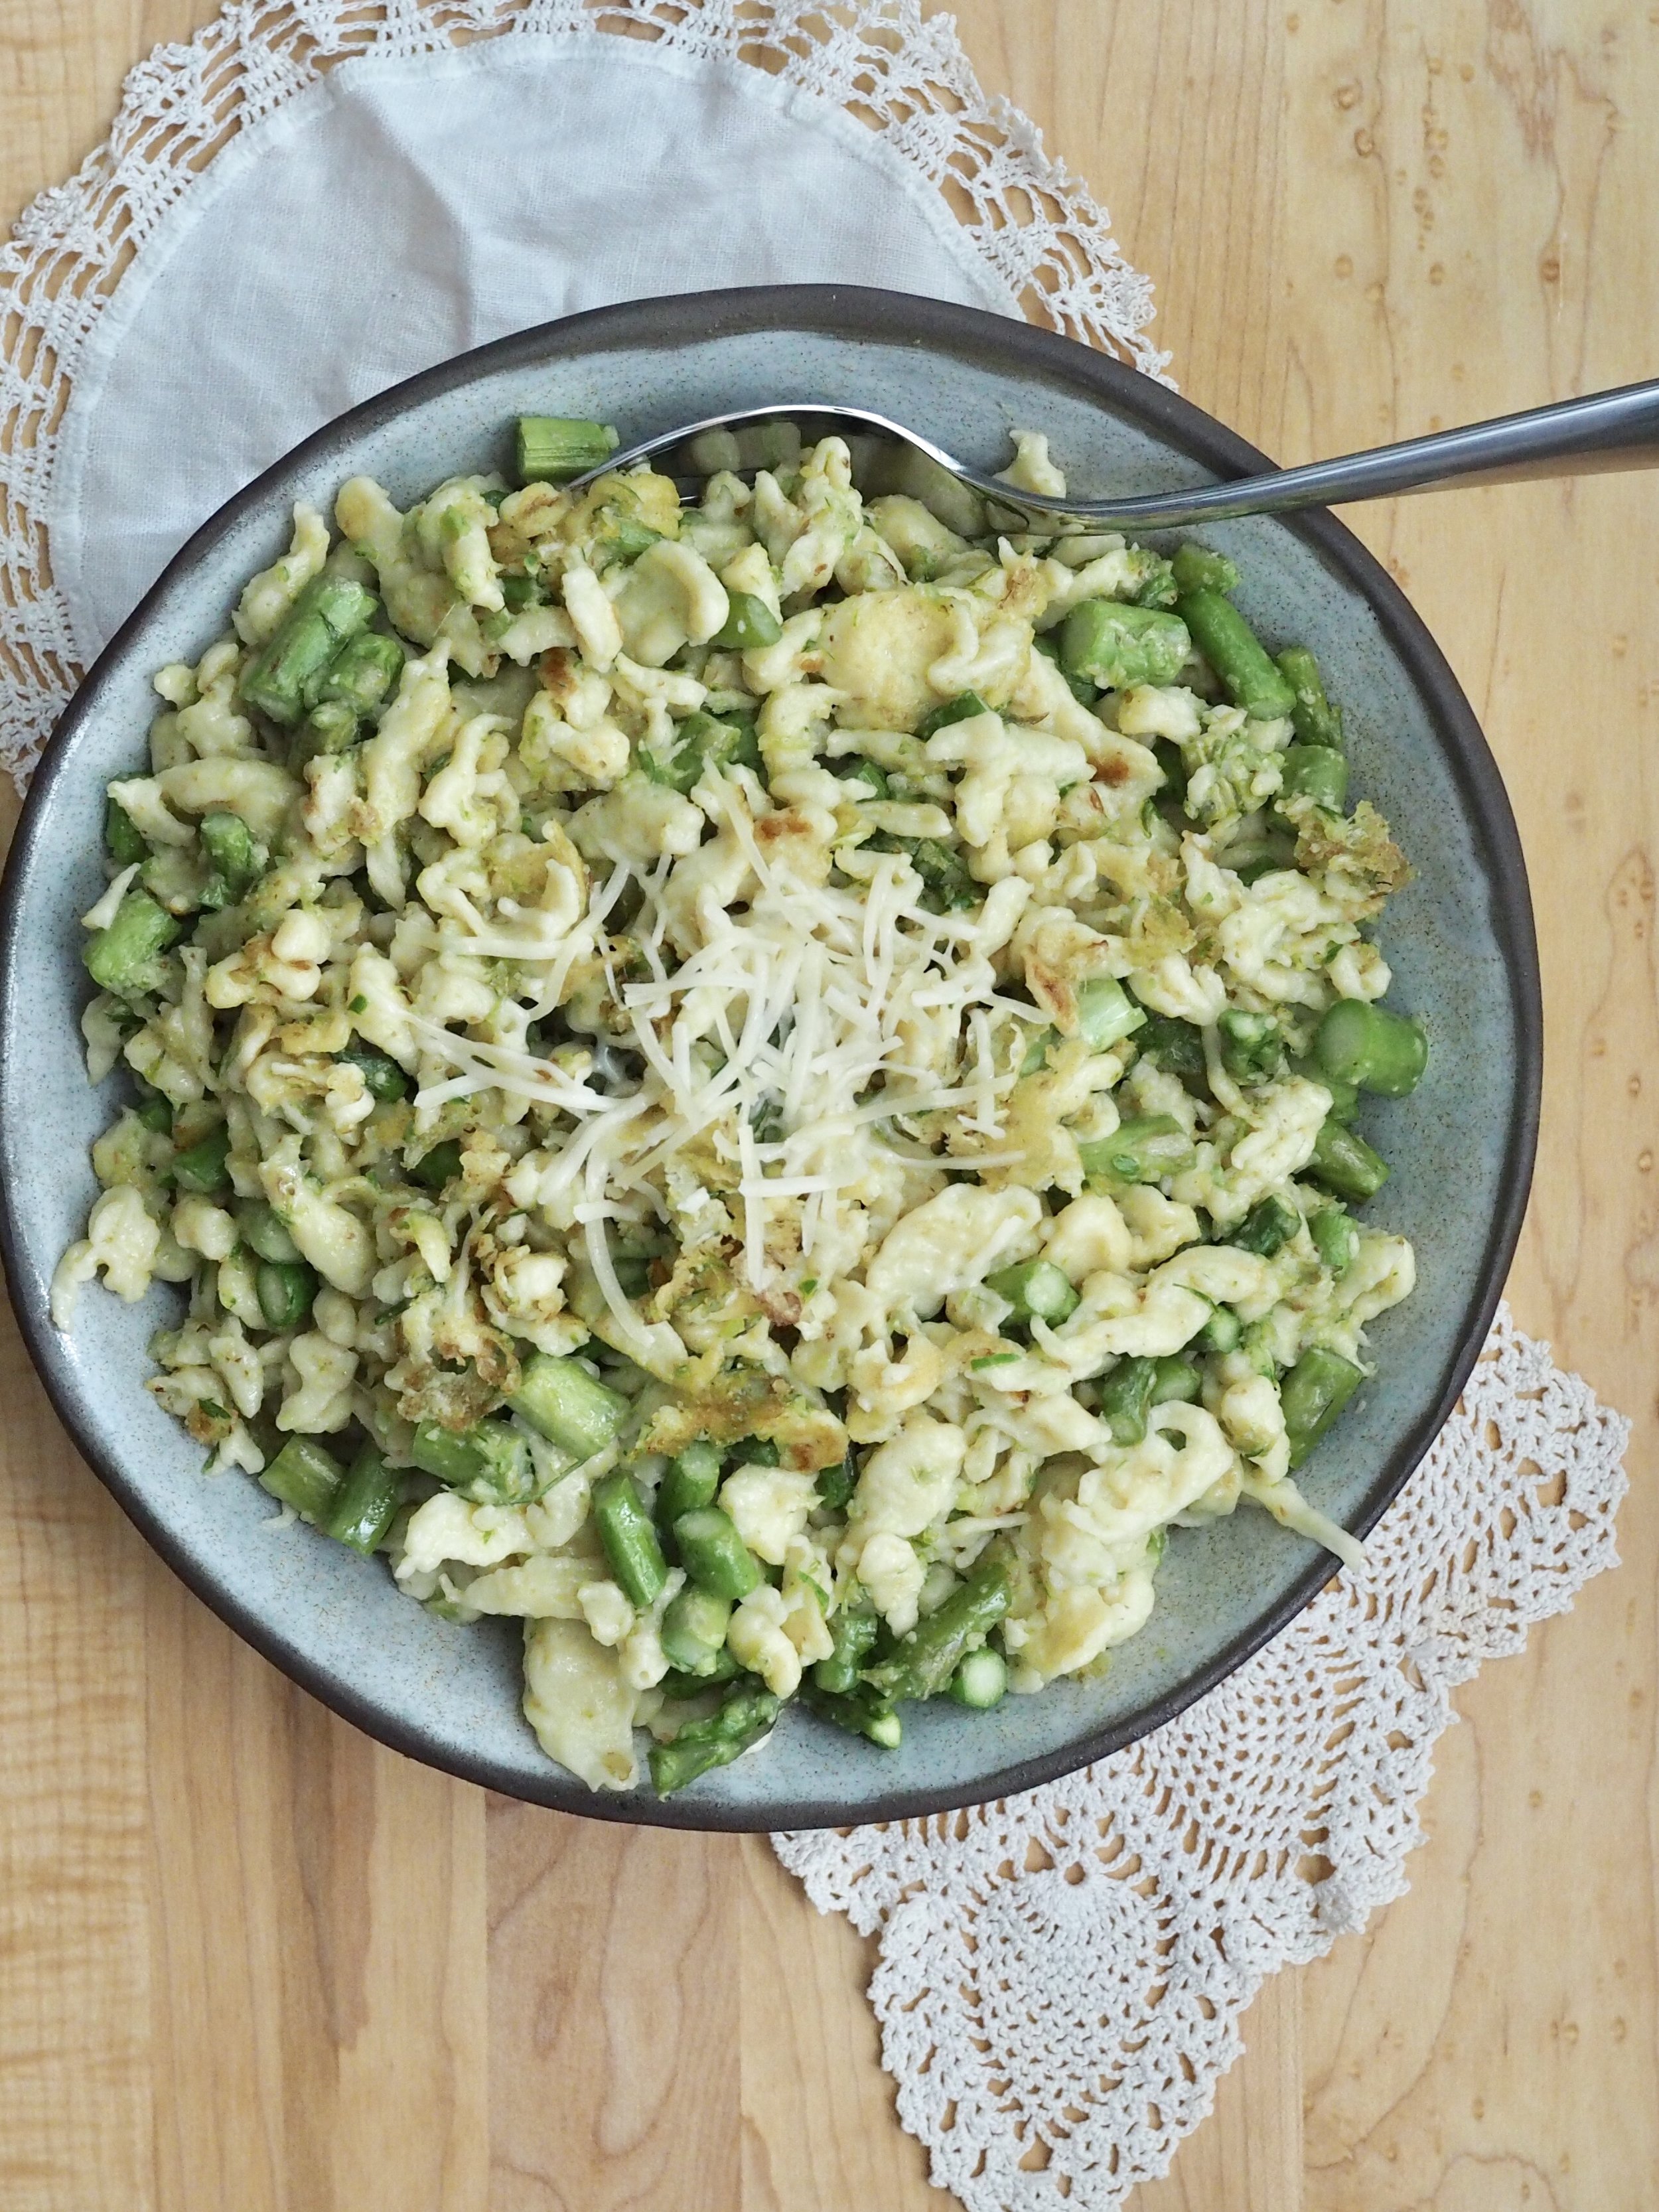
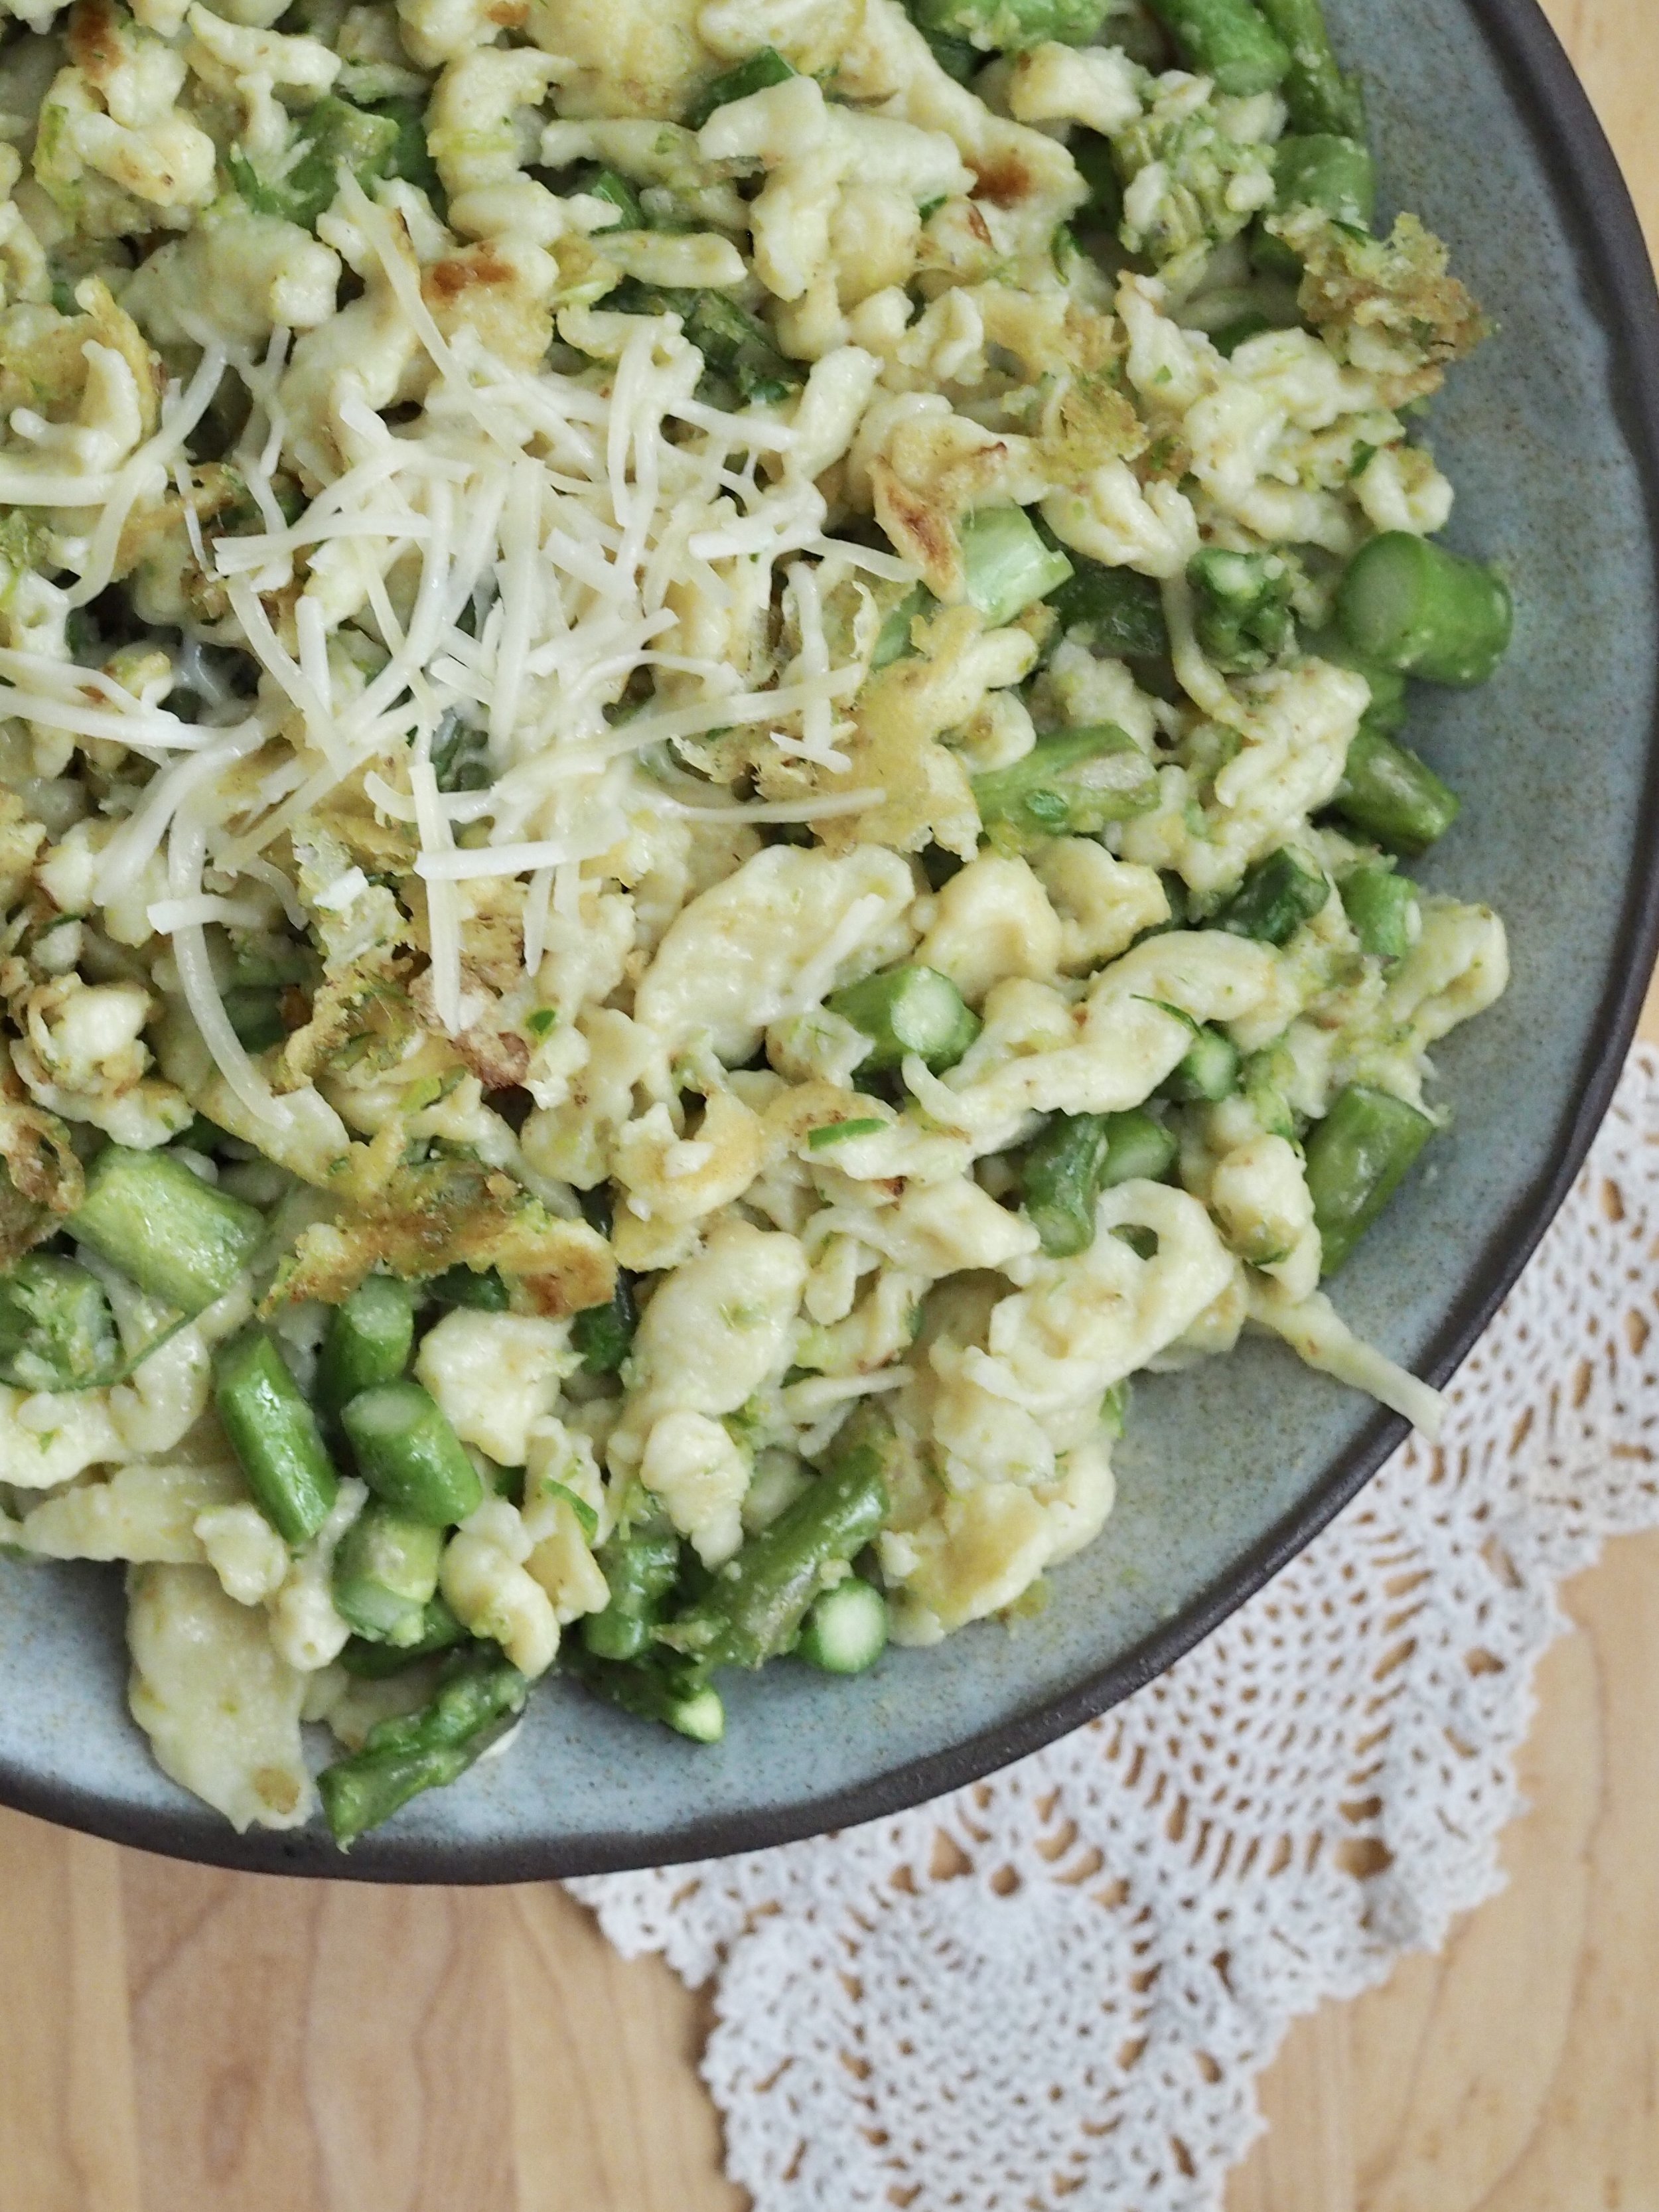
Garlic Scape Pesto and Asparagus Summer Spätzle
This bright and delicious combination of German-style spätzle noodles, asparagus, and fresh pesto stands as a light summer meal on its own, or pairs beautifully with sausage, chicken or pork (especially Schnitzel!) for a heartier meal.
Spätzle Dough
- 2 cups all-purpose flour
- 4 eggs
- 1/2 cup milk
- pinch of salt
Garlic Scape Pesto
- 6-8 garlic scapes
- 1/4 cup walnuts
- 1/4 cup grated parmesan cheese, plus more for garnish
- 1/4 cup olive oil, plus some for the pan
- salt to taste
Note: The pesto can be made in advance, if desired.
Vegetables
- 1 bunch fresh asparagus, chopped into 1-inch pieces, (about 2-2.5 cups)
Note: There are several methods to "pressing" Spätzle into it's shape. There's a Spätzle press if you have one (I don't). You can also use a potato ricer on the largest holes, "cutting" it from a board, squeezing it from a bag, or my most frequently used method, using a spatula to press it through a large-holed colander.
On/next to your stovetop, prepare the following: a large pot of water set to a rolling boil, a large frying pan oiled with approximately a 2 Tablespoons of olive oil (don't heat it yet), and a large bowl filled with ice water.
Make dough: In a large mixing bowl, combine dough ingredients and let sit for about 15 minutes.
Make pesto (can be done in advance and refrigerated): In food processor, combine scapes and walnuts, pulsing until finely chopped. Add cheese and pulse to mix. Slowly add olive oil until desired consistency is achieved. Add salt to taste.
Using the method of your choice, press dough into the pot of boiling water in batches. Once the noodles begin to float (about 2 minutes) removed with a slotted spoon and place in the ice water. Make the rest of the noodles in the same fashion. Drain the noodles.
Heat frying pan. If using frozen vegetables, saute them lightly first, then add the drained noodles. If using fresh vegetables, add both noodles and vegetables to the frying pan at the same time. Fry the noodles until golden brown, adding extra oil if it starts sticking to pan. Add the pesto and mix until well distributed. Remove from heat and transfer to serving bowl. Garnish with additional shredded cheese.
Enjoy!


Garlic Scape Pesto and Asparagus Summer Spatzle
Serves 4 Ingredients: 2 cups flour 4 eggs 1/2 cup milk salt to taste 6-8 garlic scapes 1/4 cup walnuts 1/4 cup parmesan cheese 1/4 cup olive oil 1 bunch asparagusCroque Monsieur Handpies


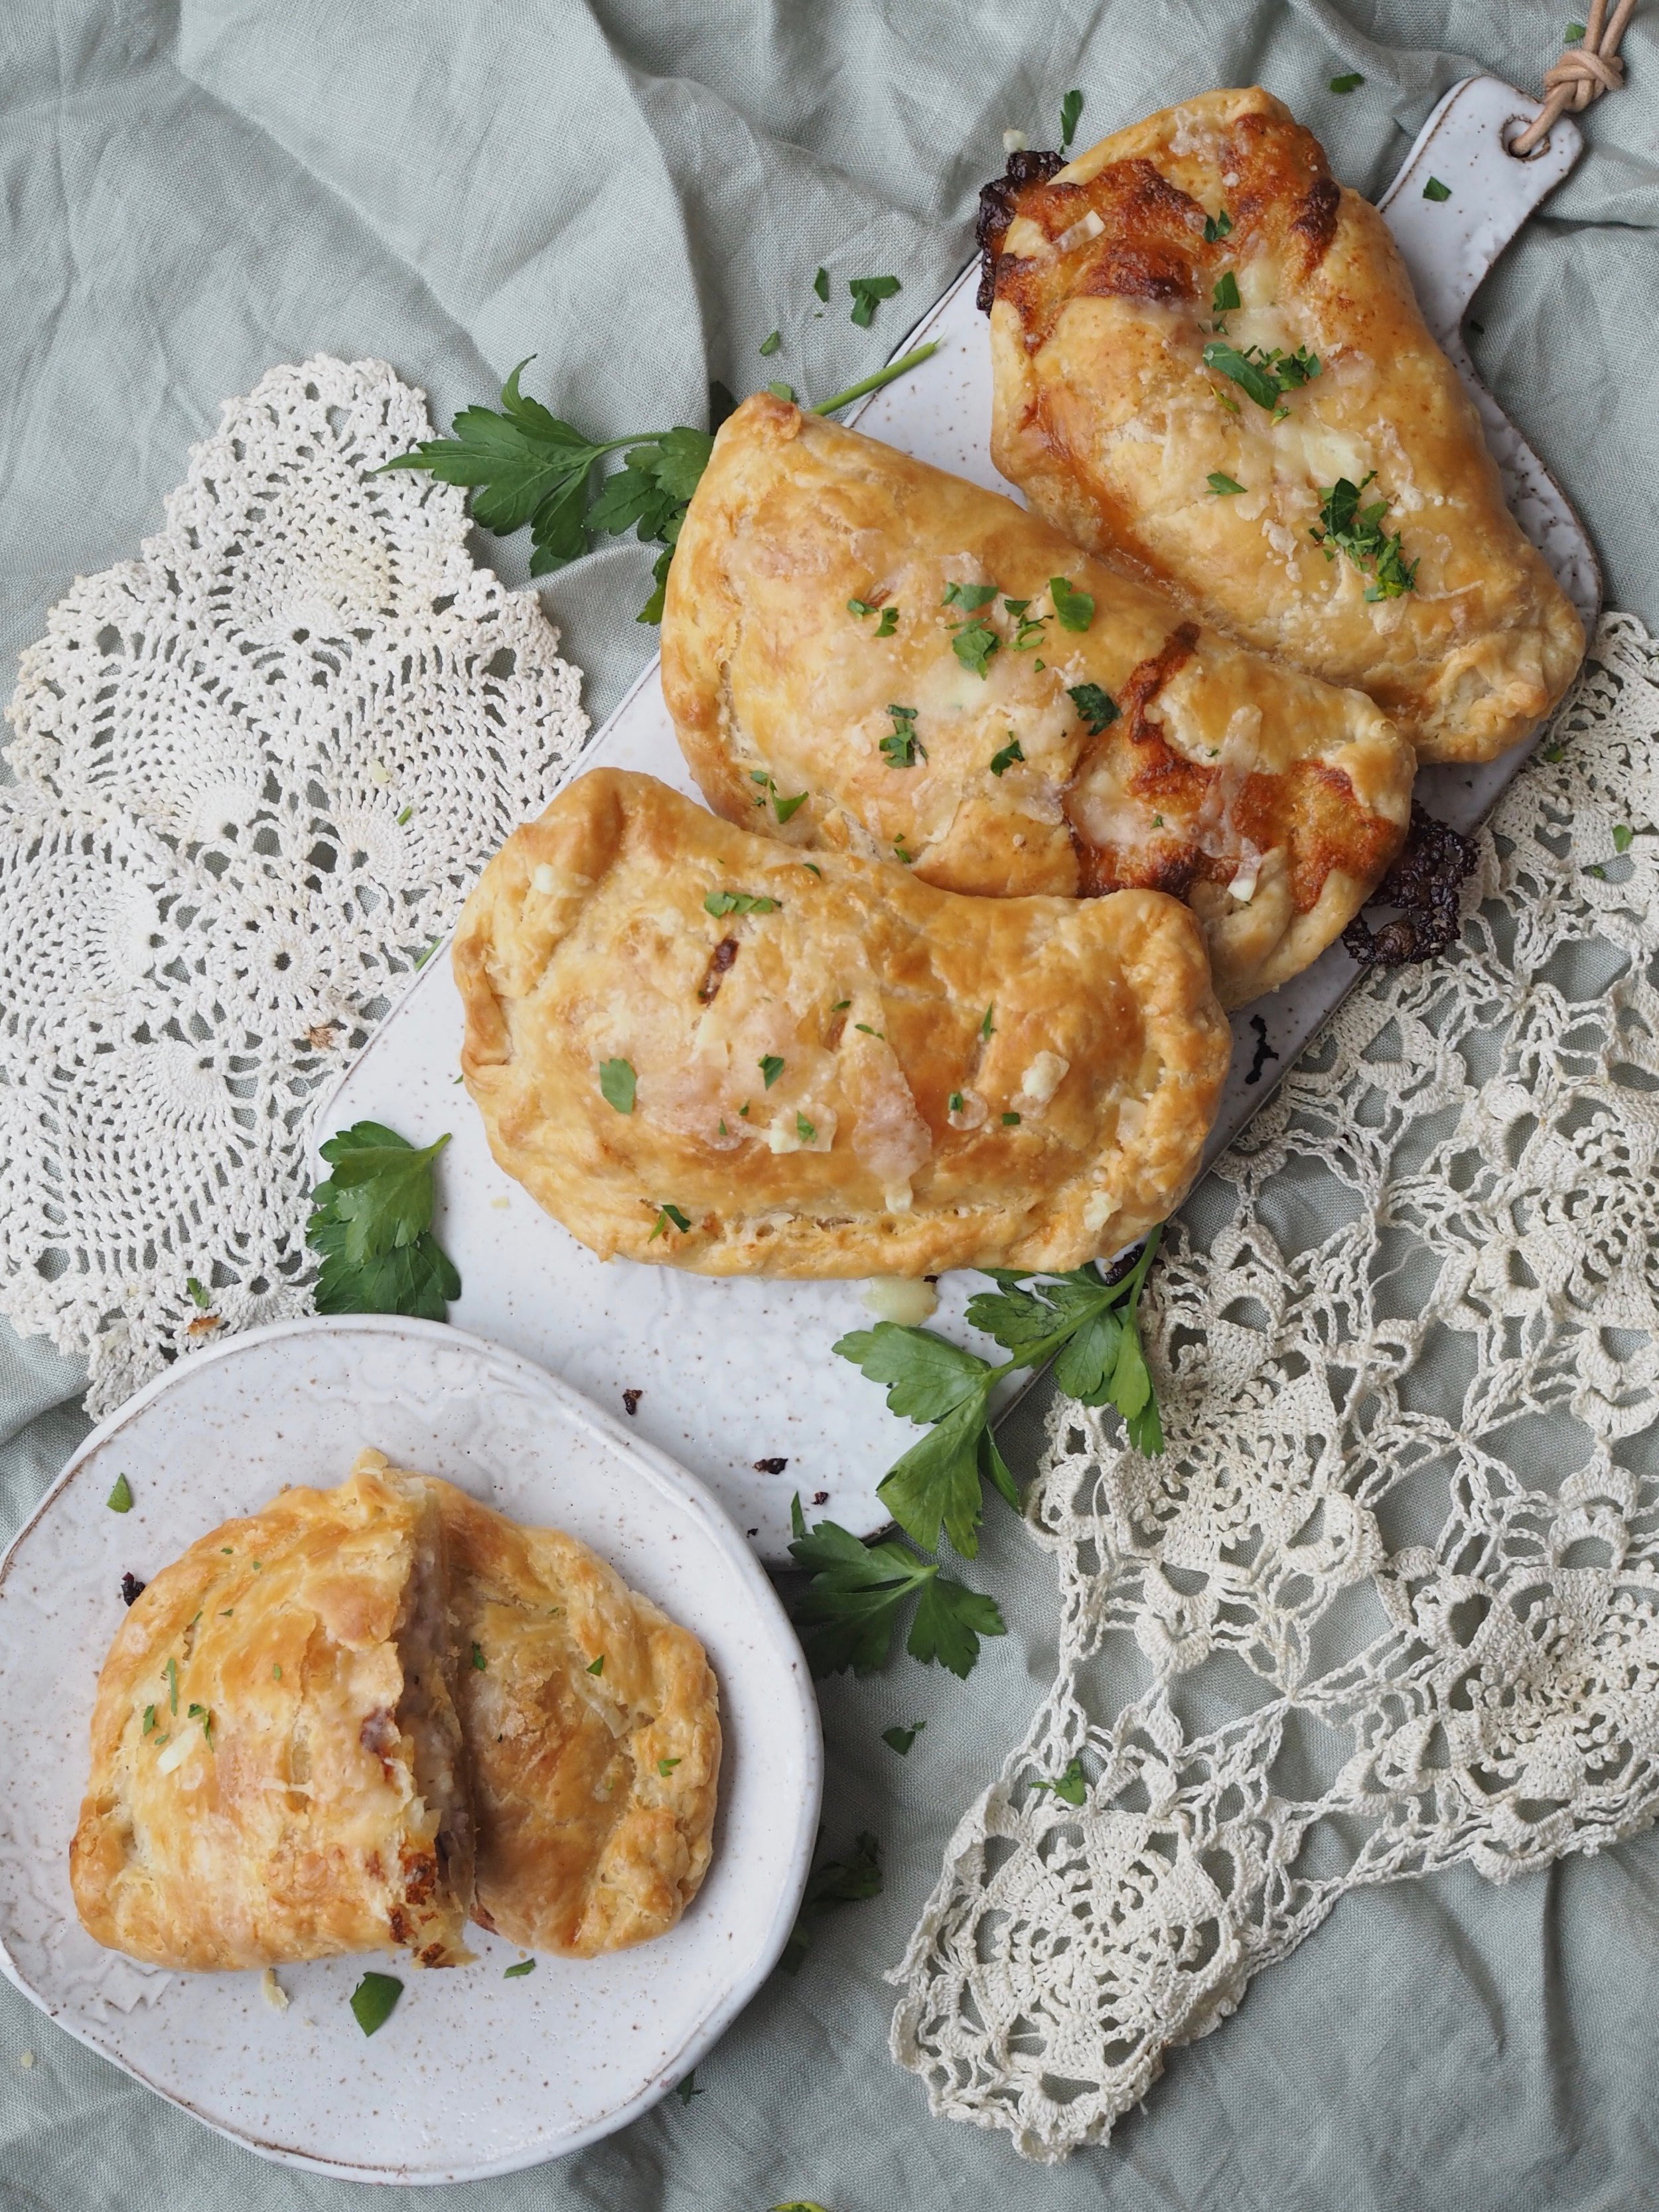

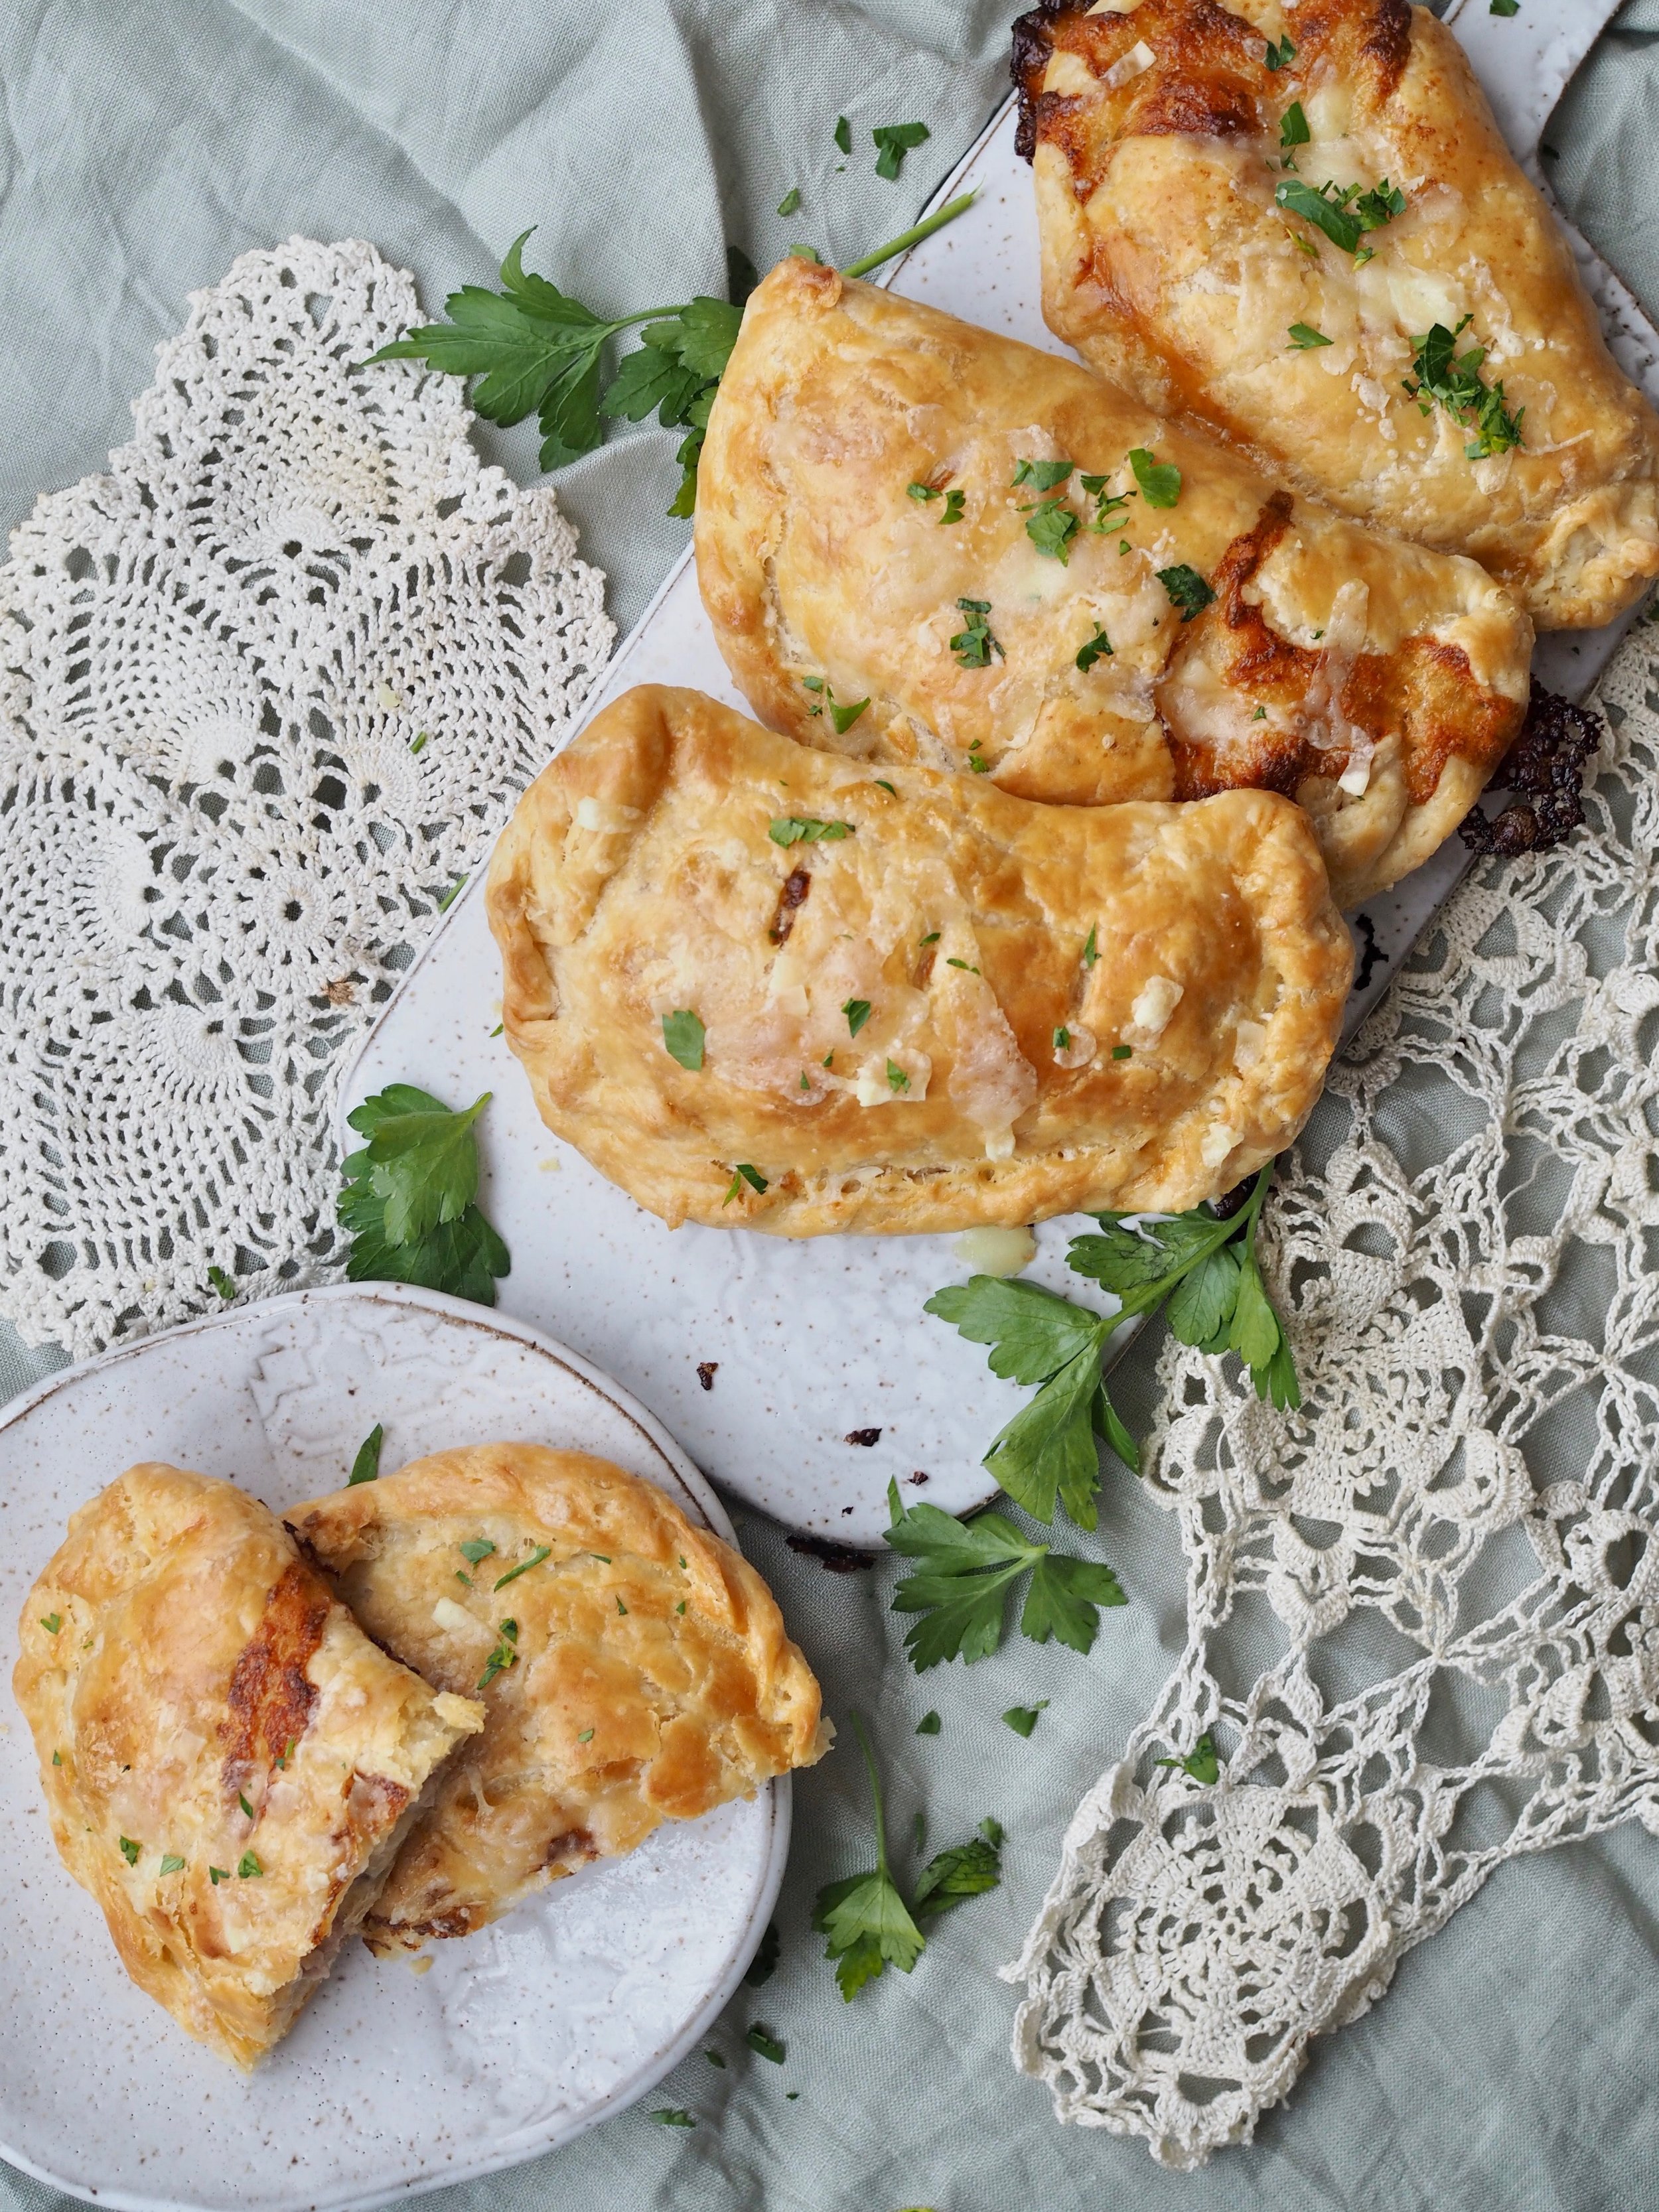
We've fallen in love with the croque monsieur in our household. The croque monsieur, a grilled sandwich featuring ham, Gruyere cheese and béchamel sauce originated in the brasseries of France as a hearty snack or light meal. You can turn the sandwich into a croque madame with the addition of a fired egg on top (health food, this is not). For the Cleaver family, the addition of ham and sauce take the grilled cheese to a dinner-worthy level, so when it came time to come up with a savory pie for my annual pie-luck, rec-creating this sandwich in pie form seemed like a no-brainer.
Typically, I use shortening in my pie crusts for it's ease of use, but for a French inspired recipe, I had to use butter. Instead of fully incorporating the butter into the dough ("the damp sand" look), I suggest leaving a few beads of butter intact, which, when rolled flat into the rounds, leaves pockets of butter to create an almost puff-pastry like crust. Make sure to chill the dough before rolling for maximum flakiness.
Since I originated this recipe for an event were there was 11 pies for 7 people, I went light on the filling. To use as a main dish, simply double the ham and cheese. The béchamel sauce should be sufficient to cover both amounts.
Croque Monsieur Handpies
Crust
- 3 cups all-purpose flour
- 1 1/2 teaspoons salt
- 2 sticks unsalted butter (cold)
- 2/3 to 3/4 cup cold water
Filling*
- 6 oz sliced ham, diced into small pieces*
- 6 oz Gruyere cheese, shredded*
- Fresh parsley (optional)
*filling sized for appetizer portions, for a meal-sized pie, double the filling
Béchamel Sauce
- 1 1/4 cup milk
- 3 Tablespoons all-purpose flour
- 2 Tablespoons butter
- 1 pinch nutmeg
- 1 pinch pepper
- salt to taste
Directions
Preheat oven to 350 Degrees F.
Make crust. In a large mixing bowl, combine flour and salt. Using a pastry cutter or food processor, cut in shortening until mixture mostly resembles damp sand, leaving a few small pea-sized chunks of butter. Add water, a little bit at a time, until dough sticks together. You will want it slightly more elastic than crust for a pan pie. Break dough into two evenly sized pieces, wrap in plastic wrap, and place in refrigerator up to a day in advance.
Make béchamel sauce. Melt butter in a saucepan over medium heat. When butter starts to bubble, add flour and whisk until combined, mixture will be clumpy. Cook flour mixture (roux) for 2 minutes. Slowly add milk, whisking constantly to break up any clumps and prevent scalding for approximately 8 minutes, or until sauce is a thick consistency. Pour into a bowl and set aside to cool.
Make filling. IN a bowl, combine 3/4 of the shredded cheese, the diced ham, and enough béchamel sauce to thoroughly coat the filling.
Line two rimmed cookie sheets with parchment paper.
Remove crust from refrigerator. Cut each ball of dough into four equal pieces. On a well-floured surface, roll each piece of dough into a 7 to 8 inch square. Place dough on cookie sheet. Scoop filling into the center of the square making sure to avoid the edges.
Fold dough over filling, so top portion of crust is about 1/4 inch shy of the edge of the bottom. Fold up bottom crust to meet top crust and pinch/crimp to seal. Slice a few holes in the top to let steam escape. Repeat for remaining pies.
Whisk together 1 egg with 1 Tablespoon water. Brush egg wash generously over pies.
Place cookie sheets in oven and bake for 45-50 minutes, until filling bubbles and crust is golden brown, rotating pans halfway through cooking time.
To serve, sprinkle on remaining shredded cheese. Broil briefly to melt cheese. Sprinkle finely chopped parsley on top (optional) and eat warm.
To store, cool completely on a wire rack, wrap in tin foil and place in refrigerator for up to one week. To reheat for 10-15 minutes in a 350 degree F oven.
To print, see button at bottom of post.

Croque Monsieur Handpies
Serves 8 Ingredients: 3 cups all-purpose flour, melted 1 1/2 teaspoons salt, 2 sticks unsalted butter, 6 oz sliced ham, 6 ox gruyere cheese, 1 1/4 cup milk, 2 tablespoons flour 2 tablespoons butter nutmeg pepper parsley


Marryin' Mac 'n' Cheese
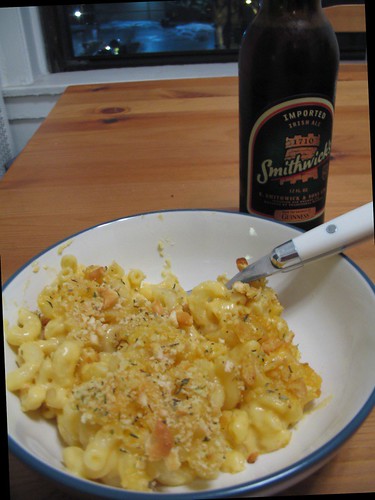
So good, if we weren't already married, my husband would marry me for it.
Like pretty much all of America, I grew up on the Kraft "Blue Box" Mac 'n' Cheese. My first taste of the homemade stuff was when my brother attempted to make some while I was in high school. I not sure what happened, but it was notthe best, shall we say. I retrospect, I think it needed salt.
Years later, I came across this recipe in Real Simple Magazine and thought I'd give it ago, but I was a little put off by the called for 6 cups (!) of milk, and using the full quarter cup of oil on the bread make my crackers waaaay too greasy, so I did a few mild changes, as listed below.
And its really good. This is maybe one of Mr. Cleaver's favorite things I cook, and every so often (as with the Cherry Pie), he'll just "happen" to the buy the ingredients and if I just "happen" to want to make it, it would "happen" to be swell. I love it too, so it's not too hard to convince me.
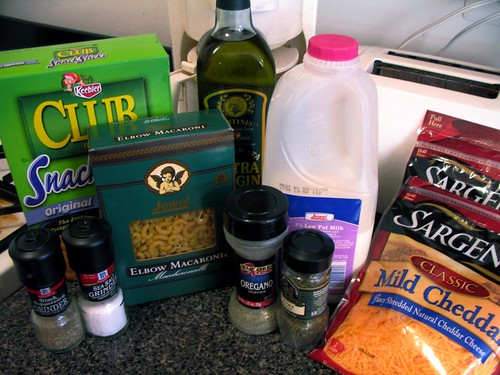
Mac 'n' Cheese, adapted from Real Simple, Nov. 200.
- 1 pound elbow macaroni
- 5 Tablespoons unsalted butter (plus some to grease dish)
- ½ cup all-purpose flour
- 3-4 cups whole or low-fat milk (I use 1% it turns out plenty rich and creamy)
- 14 oz.-16oz. cheese of choice (I like cheddar or you could do a mix.)
- 2 teaspoons sea salt
Herbed-Crumb Topping
- 1 cup or about ½ a sleeve of your favorite butter crackers (Ritz, Keebler Club) smashed
- 3 Tablespoons olive oil
- oregano and thyme to taste
- 1 teaspoon salt
- ¼ teaspoon black pepper
Heat oven to 400°F and grease a 9x13 baking dish.
Cook the macaroni for slightly less time than the package says, so it's still a little firm. Drain and rinse.
While the mac is boiling, combine cracker crumbs, oil, herbs, salt and pepper. The oil should be just enough to coat and make the crumbs slightly stick together.
In a saucepan, melt butter. While whisking constantly, add the flour and cook for about 3 minutes. The mixture will clump. Still stirring, add the milk and cook for another 7 minutes, the mixture will start to get thick. Add the cheese and salt and stir until all the cheese is evenly melted.
Mix together the mac and the cheese, pour into the prepared dish and sprinkle with the crumbs.
Bake for about 25 minutes or until golden and delicious.
It'll sit like the brick of cheese and pasta it is in your stomach, but it'll be so worth it.
Reheats really well in the oven too!
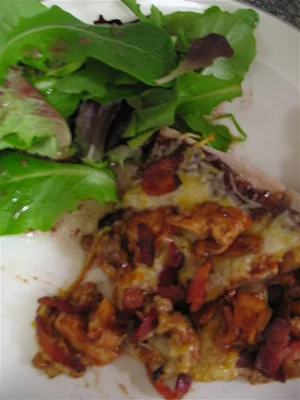
Barbeque Chicken Pizza
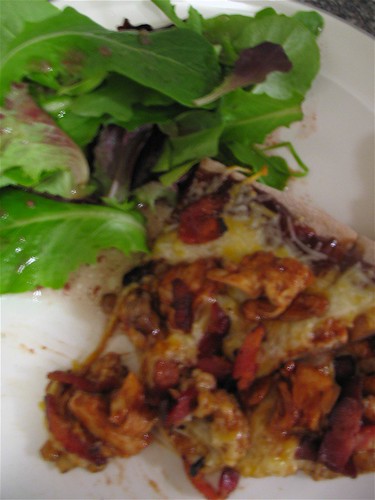
A bit blurry, but you get the idea...
Back in the day, when I was interning at the Goodman Theatre, I brought in a slice of my BBQ chicken pizza for lunch. I was walking from the microwave to the room where we were having a lunch meeting and several other interns started hovering over my lunch, as hungry interns are often wont to do.
Now, I like to think the admiration of my pizza was due to the pizza and not just the noon-time hunger striking, but the world may never know. Unless, that is, you try out the recipe!
This is another one of those I-kinda-stole-this-from-a-Portland-restaurant recipes. For backing when I was interning in Maine (Yeah, I've done a lot of internships, five in fact. Six, if you count the two seperate summers at NVSF), my roommates and I fell in love with a pizza called the "Harbor Master" at Portland Pie. I'd never been much for chicken on pizza before, but man - this one was good. And now that I'm approximately 1,086 miles away from a Portland Pie, I had to start making them on my own. My biggest change is the removal of a standard pizza sauce for straight-up BBQ sauce goodness.
Depending on what I have around the house this shifts around a little: sometimes they'll be bacon, sometimes basil, sometimes just chicken and cheese. Pizza's good that way.
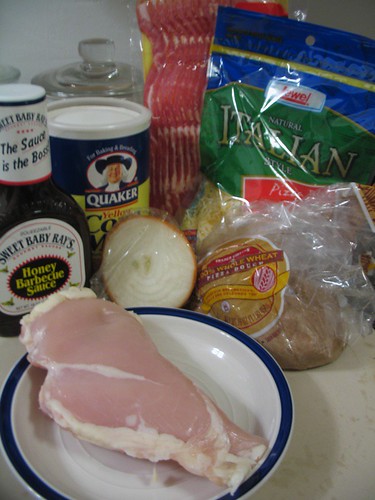
BBQ Chicken Pizza (adapted from Portland Pie Co.)
- 1 large boneless, skinless chicken boob cut into small pieces.
- 1 package of pizza dough (mine's wheat and from Trader Joes, I've used the Pillsbury in a can quite often, and of course, you could always make your own if you're feeling fancy)
- corn meal for the pan/stone
- barbeque sauce - my ultimate favorite is the Chicago-based Sweet Baby Ray's, but as Mr. Cleaver and I learned when we tried to bring some to his mom as a gift, it's available all over the USA now.
- ½ white onion, diced (optional)
- 3 strips bacon, chopped (optional)
- basil (fresh or dried or optional)
- cheese (so not optional) I usually use a whole bag of the italian mix, but again, you could get all fancy and grate you own.
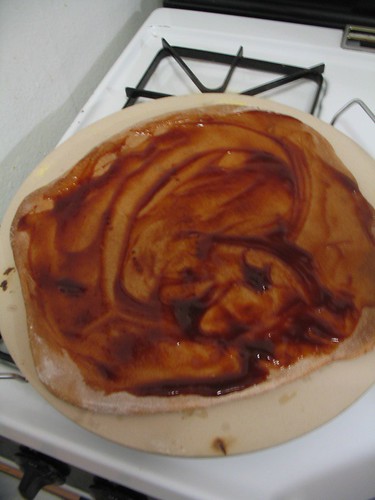
Preheat the oven to 400-425°F. Sprinkle your pizza pan/stone/cookie sheet with some cornmeal to prevent sticking and place rolled out dough on top.
If using, brown the diced onions in a little butter, just enough to the the raw taste off. Remove onions and cook bacon in same pan.
At this point, I usually put the crust (sans anything) into the oven to pre-bake for about 5 minutes.
After the bacon is cooked, remove and drain any fat. Cook the chicken bits until throughly cooked through. Shred any large chicken pieces with a fork. Coat the shreed chicken with BBQ sauce.
Take your pre-baked crust and cover with BBQ sauce like you would any thin pizza sauce. (see below).
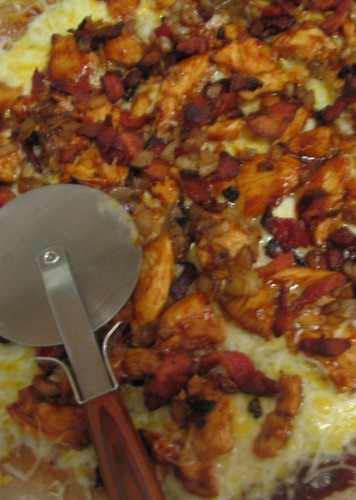
Once you're all sauced up, add the cheese. Then top with the chicken, bacon, onion, and basil, and maybe a little more cheese (I never said this was healthy). Put it all back in the oven and cook for another 5-7 minutes or until the cheese is all good and melty.
Let cool a tad (I'm notoriously bad for burning my mouth on food), slice and serve.
And see if a couple of interns don't start sniffing their way over :)
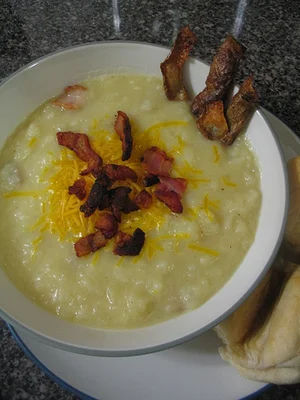
I don't have a stick blender, so that makes it "Rustic"

See that texture? It's "rustic." And making me hungry.
As in, "Rustic Potato Soup."
When it comes to cooking, I have a number of solid family-inherited recipes that I use (many posted here) and as I get more adventurous I've begun to add some of my own, like the Chicken Satay. My process for making up new recipes, pretty much always follows the same pattern.
- I eat something in a restaurant, see something on tv, or read about something that seems super-tasty
- I pull out my trusty copy of The Joy of Cooking and see if they have anything similar.
- I roam over to ye olde internet and look at epicurious.com and then search for recipes on blogs.
- I write down the ingredients that seem to make sense or overlap from these sources and go shopping.
- I cook using memory and whatever ingredients I have purchased.
- I fiddle.
- I enjoy.
And that's pretty much the process. A month or so ago I decided that I needed to try my hand at making soup. Mr. Cleaver makes a lovely chicken/turkey soup/stew whenever we roast a bird, but I had yet to delve into this food category myself. I decided to start with one of my favorites, potato soup.
Here's what I came up with, please note that it owes a lot, like a lot a lot to this recipe from Nook & Pantry.
I love it when there are so few ingredients, it's like that 5-or-fewer episode of Everyday Food. I also love cooking shows on PBS.
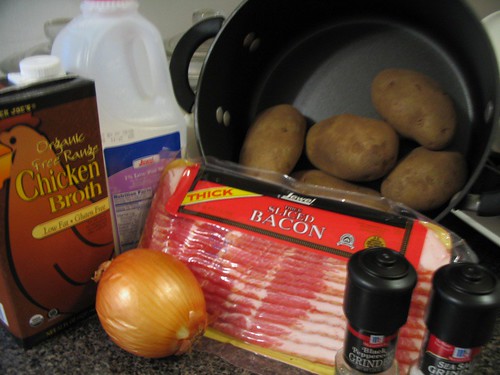
Rustic Potato Soup (serves 4-6)
- 5-6 potatoes, washed and peeled (keep the peels)
- 4 slices of bacon, chopped in to bits
- ½ onion, diced
- 1½-2 cups chicken broth
- 2 cups milk
- salt and pepper
- shredded cheese of choice for garnish (I like cheddar)
In a large stockpot, cook the bacon bits. At this point you can either cook the potato peels in the bacon fat for crunchy potato skins or you can drain the fat.
Chop the potatoes into about 1-inch cubes. Toss the potatoes, diced onion and half the bacon bits into stockpot and add the chicken broth. Add enough broth so it just covers the potatoes. Boil the potatoes until soft about 6-7 minutes. I usually test the potatoes by sticking a fork into the largest potato piece and if it slides off it's good.
Mash the potatoes with a whisk or a potato masher. Add the milk, stir and boil until the soup thickens some. The potatoes are so starchy that it's totally unnecessary to use any thickener (ie flour).
Divide into bowl sand top with cheese and remaining bacon bits, or other garnish of choice.
This soup is rib-sticking good and Mr. Cleaver-approved!
Blue-Rimmed Plate Special
Meatloaf has a bad rap.
It is, for sure, a loaf of meat - something that doesn't quite sit well with our well-intentioned ideas of better modern eating (any reality aside). And like cheese balls and Jell-O molds, meatloaf has that aura of 1950's food that's trying a little too hard.
Of course, this being the Ms. Cleaver Chronicles, I'd be somewhat amiss if I didn't proclaim love for the meatloaf. I like meatloaf so much, it's what I ate on my second-first date with Mr. Cleaver. I can only think of one other person who truly appreciates this dish as much as I do (hi Winnie!). But if you haven't eaten meatloaf recently, you really should because it is tasty. And with a few minor modifications, better for you than a hamburger.
A few years ago, I decided to jettison beef from my diet, except for "when it really mattered," meaning I like a good steak every now and again, but by and large ground beef almost never makes it into my kitchen. And really, I don't miss it - most of the things I formerly made with hamburger (or hamburg as Mr. Cleaver says) like tacos, chili and this dish, have enough seasoning that it doesn't make much difference when I use ground turkey meat instead and I feel a little better about eating it. I do what I can.
And so, like the Chili I posted earlier this week, I make my meatloaf with turkey, but feel free to use beef if you want.
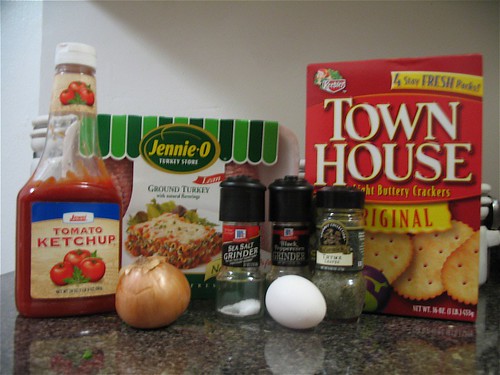
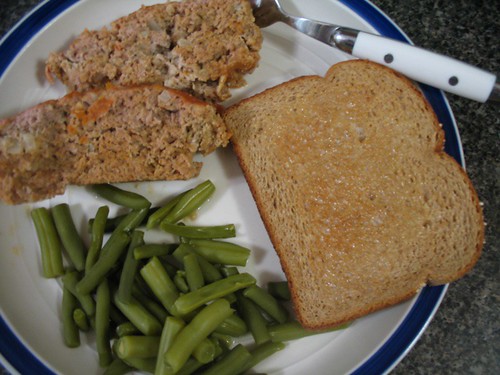
Mmm-mm Meatloaf : (Serves 3)
1- 1½lbs ground turkey meat (or beef)
½ onion, finely diced
1 tsp salt
1 tsp pepper
1 tsp thyme
½ sleeve of butter crackers (ie Townhouse or Ritz - not Saltines)
2/3 cup of ketchup
1 egg
Preheat oven to 350°F. If desired, lightly grease a loaf pan.
Mix all ingredients together in a large mixing bowl using a sturdy spoon or your hands. transfer to pan and make into a "loaf "shape. [Note: To really make a good sized, loaf you'd probably need at least 2 lbs of meat, but I'm only cooking for two here.]
Put in oven and cook for 45 min- 1 hour or until internal temperature reaches 160°F on a meat thermometer.
Chili Weather


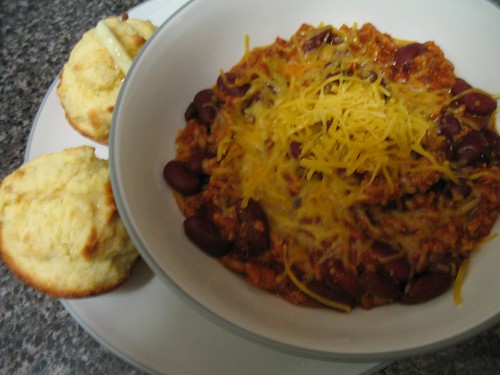
This chili is adapted from the one my mother always made growing up, but I substitute ground turkey meat for my mother's ground beef, a move she says, "just sounds wrong." I assure you that is tastes great either way.
This recipe is really simple and can pretty much be expanded or added to indefinitely. Mr. Cleaver particularly enjoys it for the chili dogs that come the next day. Best of all, it can be made in one pot and would work great for crock-pot loving people (Ignore the skillet in the above photo, I normally don't use it for this, I just needed to thaw my meat quickly).
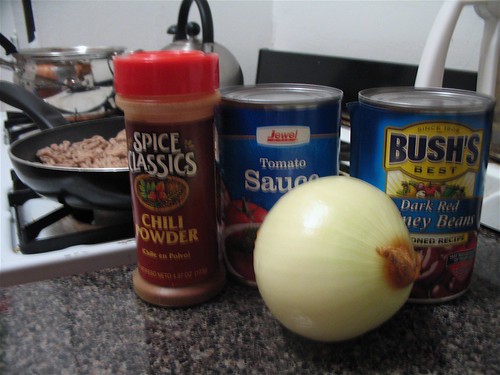
Simple Turkey Chili (serves 3-4)1 lb Ground turkey or beef1-2 cans red kidney beans, drained1 can tomato sauce2 Tbl Chili powder (or to taste)½ onion, diced (optional)bell pepper (optional)cheese (optional)If using onion, saute in pan with a small amount of butter in a large pot (3 qts or more). Add the meat, breaking it apart with a spoon and brown (Though I've always wondered why the phrase is "brown" since almost all meat turns more of a white or grey color).
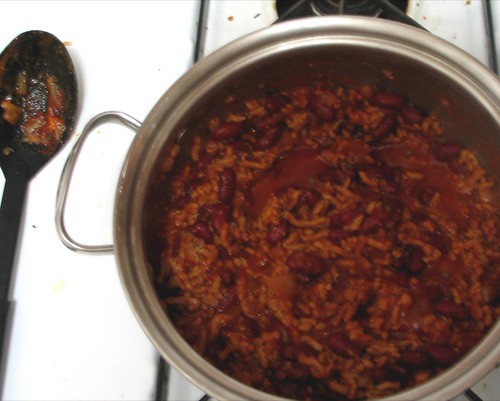
Once the meat is browned, stir in the tomato sauce, drained kidney beans and chili powder. Two tablespoons makes for a fairly mild chili, so feel free to punch it up as desired at any point in the cooking process. As I recall, my brother always liked to add about half a bottle.
At this point, turn the heat down as low as possible, and cover. It can sit for hours like this, with only occasional stirring. I usually make corn muffins or bread at this point and serve dinner when the muffins come out of the oven.
Serve leftovers the next day as chili dogs. Or try my personal favorite, the "tail-wagger:" chili on top on Fritos - the brain child of the folks at Mutt's, the Chicago-style hot dog place across from old high school.
My Favorite Leftover
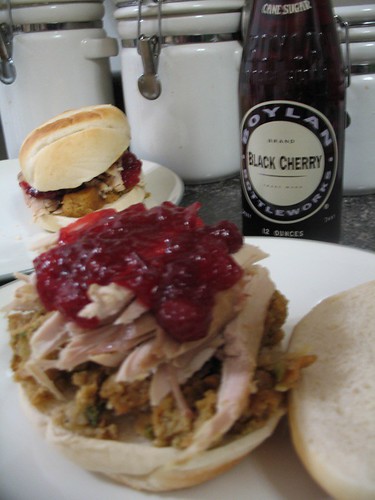
I am one of those holiday eaters who live for leftovers. Yes, Thanksgiving dinner takes way too much time to make for the amount of time it takes to eat it (especially when its just two people), but the food is so good and you hardly have to cook at all for about a week (especially when Mr. Cleaver makes an amazing turkey stew)!
My favorite use for leftover Thanksgiving food is something I like to call "The Portlander." I call it the Portlander because I totally stole it from a New England bagel chain and that's what they call it. It takes no skill and is totally tasty.
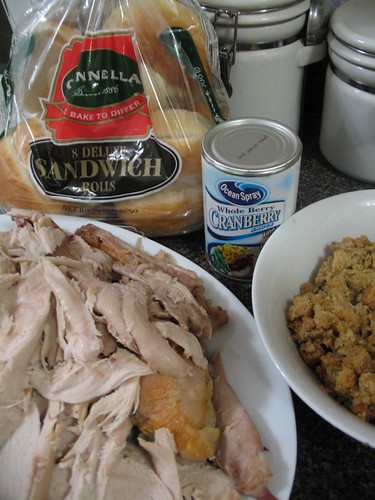
The Portlander
Ingredients: Leftover turkey Leftover stuffing Canned whole cranberry sauce (I preferred the canned because the slightly gelatinous nature holds together better) Bulkie rolls
Put the two halves of the roll in the toaster or under the broiler and heat until warm - not toasty.
Reheat the turkey and stuffing the microwave. Take your warm roll and add a thick layer of stuffing, topped by the turkey and the cranberry sauce, put on the top half of the roll and enjoy how the flavors blend so magically!
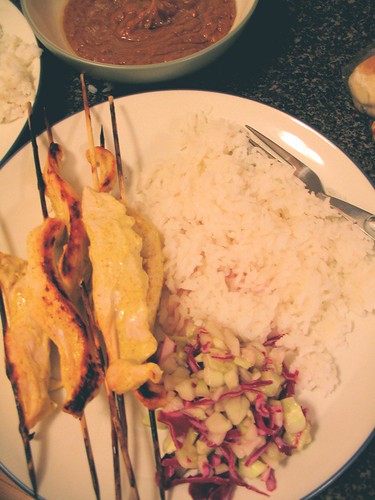
Chicken Satay with Peanut Sauce and Sweet Cucumber Salad
I came up with this recipe after a visit to a local Thai place with Mr. Cleaver about a year ago. I don't know if I've ever made it the same way twice, this is one version. As with most recipes I make. this oowes a heavy thanks to the joy of cooking and searches on Epicurious.com.
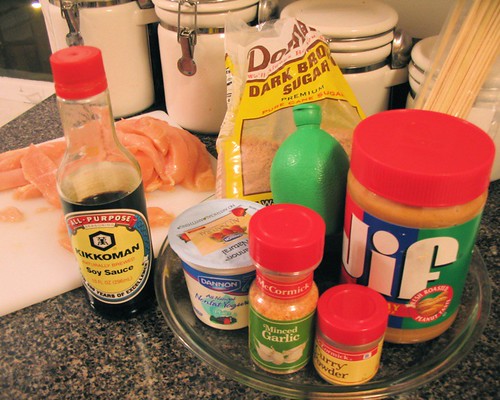
Chicken Satay: (serves 3-4) 2 Chicken Breasts 1 plain yogurt 1 tsp. minced garlic 1 tsp. curry powder (or to taste - this version is very mild) 1 tsp. lime juice ½ tsp. soy sauce bamboo skewers
Soak the skewers in water for about ten minutes, so they'll burn less. Turn on the broiler.
Slice the chicken into thin strips. In a shallow pan, mix together yogurt, garlic, curry powder, lime juice and soy sauce. Add chicken and stir until chicken is coated in sauce. Thread chicken unto the soaked skewers and place on a foil covered baking pan or cookie sheet. Place under the broiler and cook for about 25 minutes, turning halfway through, or until cooked completely.
While the chicken is cooking make the salad and sauce.

Sweet Cucumber Salad: (serves 2) 1 cucumber ½ cup shredded red cabbage 1/4 cup lime juice 1 Tbl sugar
Remove the skin of the cucumber and dice, avoiding the seedy center. Place in a medium bowl, add the cabbage, lime juice and sugar. Mix together and allow to sit. The juice will turn pink. Note: this does not keep, so serve immediately.
Peanut Dipping Sauce: (serves 3-4) ½ cup creamy peanut butter ½ cup (coconut) milk 2 Tbl brown sugar 1 Tbl soy sauce 1 tsp lime juice
Mix ingredients together in a small pot and warm over low heat. Whisk until smooth and serve warm.