Tried and True Review: Basic Black Ginger

IMGP5341

Basic Black Ginger

Made: May 2012, about 2 years old

Update: For something meant to fill a basics gap in my wardrobe, I wear it very rarely.

Fit: Looking back on the original post, I mentioned that even then, the waistband was too large. In general, it's just too big. I cut the waistband too large and I think I even graded out in the skirt, when I didn't need to. The shaped feature of the waistband means it needs to hit the waist on the right spot and sadly, this one is about an inch too low.

Style: I really wished this one worked better, as it does looks so cute with my saddle shoes.

Materials: More than the fit, the fabric is what kills this one for me. I love twills, but this one attracts lint like crazy and looks dingy from the second you put it on. Though I'm not sure what black bottom-weight fabric wouldn't be so linty - any suggestions?

Construction: I thought I did a great job on this one, with homemade bias binding on all the edges, but I didn't sew it on very well as it's pulled off in several places. I'd add pockets again though because everything's better with pockets.

Lesson(s) Learned: Even for basics, even more so for basics, fit and fabric really matter.

Final Verdict: I'll probably still wear it occasionally, until I finally get around to making a replacement (I still want a black Ginger in my wardrobe, just a better one). When I do get rid of it, I'd only reuse the fabric as stuffing for cushions or something, it's just awful.

Raspberry Picking and Pie

Picking Raspberries
Down the Path
Picking Raspberries
Picking Raspberries
Picking Raspberries
Snell Family Farm
Picking Raspberries
Checking for More
Tasting the Bounty
Picking Raspberries
Raspberry Pie
Raspberry Pie
Untitled
Raspberry Pie and Ice Cream
Eating Pie

What can I say? I love pick your own (PYO) farm adventures!

Last week at the farmer's market we discovered that Snell Family Farm did PYO raspberries (they do apples too). So on a sunny Saturday morning Mr. Cleaver, LMC and I loaded up the wagon (no pets allowed, unfortunately) and took the short drive out to Buxton/Bar Mills.

We had a fabulous picking experience. The raspberry fields are orderly and the picking rows are wide, so you don't have to worry about backing into thorns/stepping on fruit. There were plenty of ripe berries on the bushes, mostly down low, which meant that LMC could pick berries on her own (though she doesn't quite get the concept of ripe/not ripe yet).

I highly recommend bringing a picking assistant- twice the picking, half the fruit! I'm pretty sure LMC ate at least 1/2 pint of raspberries while we were picking, but as the kind cashier said, "I didn't weight her when she came in, I'm not weighing her on the way out." (We gave them some extra cash anyhow).  We were also able to pick up some carrots and green beans from the farm stand and they have huge greenhouses full of flowers. So if you're in the mood for picking fruit, I'd highly recommend our Snell experience.

Also, can I say that Mr. Cleaver did an awesome job as field-trip photographer? With the exception of the pie close-ups, he took all of these. And he says he doesn't know how to use my camera- ha!

We ended up with two full quarts of berries, half of which we're in the process of eating fresh and the other half made their way into a raspberry pie. While LMC has assisted in the baking portion before, this was her first slice of pie, of which she left no crumb uneaten, so I think I'm safe to say she liked it.

LMC-Approved Raspberry Pie

Preheat oven to 375 °F

Crust

  • 2 cups flour, plus more for rolling surface/rolling pin
  • 1 tsp salt
  • 2/3 cup shortening
  • 1/4 cup very cold water
  • Small amount of milk
  • Small amount of sugar

Mix together flour and salt then “cut in” shortening with a pastry cutter or knives.

Add up to 1/4 cup of very cold water a few Tablespoons at a time, until dough holds together.  Form into two equal-sized balls of dough and wrap in plastic wrap. Chill in the refrigerator (at least while you make the filling, preferably at least an hour). Flour working surface and roll out crusts, using half the dough for each. Makes one top and one bottom crust for a 9″ pie tin.

Filling

  • 4 cups fresh (or thawed frozen) raspberries
  • 3 Tbl cornstarch
  • 2/3 - 3/4 cup of sugar (to taste, based on the sweetness of your fruit)

Mix filling ingredients together, trying not to smush the berries too much.

Place lower crust into a 9-inch pie pan and pour in filling. Use a small amount of milk or water around the edge of the lower crust to help seal.  Cut vents in top crust and place over filling, cut off overhanging crust (save them for cinnaminninies!) and crimp the edges to the lower crust to seal.  Brush top crust with milk and sprinkle with a light dusting of cane sugar.

Place in center of oven and bake for approximately 55 minutes, or until filling bubbles and crust is golden brown. If needed, cover the edges of the crust with tinfoil during the final stages of baking to prevent scorching.

Cool on the windowsill of your choice (nothing burns like hot fruit!) and enjoy with ice cream.

Tried and True Review: The Sew U Ruffle Blouse

The ruffly shirt in 2014

As a craft-blogger, who reads a lot of craft bloggers,  it seems as if we'll often make something, take some photos, put together a blog post, and it's on to the next project with the previous one never to be seen or mentioned again in blogland. We share how the project turned out fresh off the needles or sewing machine, but we rarely take a look back at how it fits into ours lives. (Me-made months being the major exception).

Part of the reason I started blogging is because I wanted to share my creations with a like-minded community of makers. The excitement of showing off what I just made.  Heck - finished object  is my 2nd most frequently used tag and accounts for 25% of my posts here.

But this year I've been thinking a lot about sustainability of fashion in general and of my own closet in particular. Emma's post on wardrobe metabolism and the life cycle of clothes was one that really hit the nail on the head for me. One item in particular that should out from that piece was bullet #3 - "Keep tabs out what works & what doesn’t."

This isn't about reviewing the pattern, but the project. If you see someone (or multiple someones) making a the same pattern multiple times, you can get the hint that it's a keeper. But individual projects can vary so much, even out of the same pattern. I'm certainly guilty of getting caught up in shininess of a newly-completed project only to find out weeks, or months down the road that it just doesn't work - the fit was off, the fabric was a poor match, it just doesn't fit my lifestyle anymore (or never did).  Or perhaps I didn't care for it at first when I was being over-judgmental on my construction technique at the time, but I now wear it at least once a week.

So in an attempt to show how my projects have stood the test of time and/or to learn from the mistakes of my yesterdays, I'm going to better document the role of handmade items in my life in two-ways:

  1. I'll tag the post anytime something I made appears in a post, even if it isn't new. For my clothes, it's me-made; for LMC's stuff, mama-made; and for items I made for Mr. Cleaver, miz-made.
  2. The Tried and True Review, where I'll look back at old project and discuss how it's held up since I made it, both successes and closet rejects.

First up?

Ruffly Shirt

The Sew U  Ruffly Shirt

Made: August 2008, the last thing I made in Chicago, before I moved to Maine. Almost six years ago!

Update: I still wear this -  actually, I'm wearing it today. I wear it 2-3 times in a month in the summer then retire it for the cooler weather.

Fit: It was a relaxed fit to begin with, so this one had held up when weight changes pushed other shirts aside.

Style: It's cute, without being overly cutesy.  It's a little bit retro with the polka dots and it looks nice enough for work.  I need some more similar things in my closet.

Materials: For $2 fabric from a garage sale, this has held up surprisingly well. It's super-duper lightweight cotton, so I have to wear a camisole underneath, but it's great for summer. I do have to iron it after washing though.

Construction: In truth, this is not the greatest sewing job, but it hasn't effected it's wearability. The collar stand and bias binding on the sleeves were both new techniques to me at the time and are rather sloppy in places. I could still use work on collar stands. There are also multiple lines of stitching along the ruffle on one side where I had some trouble in attaching it. But it's all white on white, so unless you're unreasonably close, you wouldn't notice.

Lesson(s) Learned: Mistakes are most obvious to the maker and don't mean that it isn't still usable

Final Verdict: It's a keeper, and I'd make the whole thing over again, but better this time.

The Mainah Tee

The Mainah Tee The Mainah Tee

The Mainah Tee

The Mainah Tee

The Mainah Tee

The Mainah Tee

The Mainah Tee

I was recently introduced to the term Wahlheimat, a German word, like so many German words, that crams a lot of meaning into a few letters. In this case,  Wahlheimat means home of choice, which is a perfect way to describe my relationship with Maine.

All told, I've now lived in the state for about seven years total, but even when I've lived here for another 50 years, I'll still be considered "From Away," the title of Mainer forever out of my reach.

Fortunately, my From Away status doesn't taint Little Miss Cleaver's true-blue Mainah credentials (though if you talk to people Down East, living in the Greater Portland Area may).

So it only seemed fitting to make her a blue Maine tee, featuring our state mammal (the moose) and our most quintessential, but unofficial state phrase - ayuh, which dialect blog names America's oddest yes

It's made out of more of the sun-protective jersey from Rockywoods and of the tees I've made to date, this one is by far the best sewn.

I pulled out the (rather slim) manual for the Pfaff Select 3.0 and got more into the weeds on its stretch-stitch capabilities. By using a combination of the straight stretch stitch, the "closed overlock," and a double needle, I got what is a professional-looking and sturdy final product.

I don't know how prevalent these stitches are on non-Pfaff machines, but if there's any interest, I'd be happy to pull together a tutorial.  Let me know!

Introducing the Lamassu Shawl

Lamassu-3359
Lamassu
Lamassu-3389
Iran 2007 081 Persepolis Gate of all Nations
Lamassu-3424
Untitled

What is a Lamassu?

  1. A winged, human headed bull frequently seen in ancient Mesopotamian (modern Iraq & Syria) myth and art - most frequently as looming sentinels at the gates of major cities.
  2. My latest shawl design for Quince & Co. yarns

How does one morph into the other? Where that's where the fun of designing comes in!

Back when I was in college, I was a Theatre major and the midst of my Senior year, I decided to swap my English minor for one in Classical Studies, following my increasing interest in the topic. I had an excellent Latin professor (Ortwin Knorr), who got me interested in the subject beyond the language and introduced me to Roman Cookery and the Archaeological Institute of America (of which there are sadly, no Maine chapters).

I had taken a lot of Latin courses, but to complete my minor I took two additional classes: Introduction to the Old Testament/Hebrew Bible and Introduction to Ancient and Medieval Art History.

My textbook for the Art History class is the only one I regret selling back, but it was the Old Testament course that has had one of the longest lasting impacts of any of my school courses. Taught by professor and archaeologist David W. McCreery, this 100-level course was the hardest course I took in my college career. But, as they say, nothing worthwhile is easy.

One day while discussing Noah's flood in Genesis, Professor McCreery mentioned that there was an much earlier, but very similar, version of a Great Flood story that appeared in the Epic of Gilgamesh (c. 2100–2000 BCE). Following class that day, I stayed late to express my interest in the Gilgamesh tale, but as the professor was busy with another student at the time, I merely stated my interest and left conversation for another time.  It was to my surprise then, when at the next class session, he handed me one of his personal copies of the tale (Herbert Mason's verse narrative), with the following inscription:

October 2004 Dear Leah There is a lot to learn from this "oldest story ever told." Enjoy! Dave McCreery

I fell in love with the Gilgamesh story, particularly his adventures with the wild-man Enkidu, so much so that I wrote and produced a play about it. It's a story that's stuck with me ever since. So when I was talking to Quince about doing a new shawl design, it was Gilgamesh, and his Mesopotamian brethren that sprung to mind.

As is the way nowadays, I started collecting some images on Pinterest and I kept coming back to two things, the lamassu and king's beards. There was a distinct texture and style of the beards that the more I looked at it, the more knitterly they seemed. A stitch dictionary provided the trinity stitch that mirrored the curly portion of the beard by the mouth, and some time with swatches and graph paper yielded the banded columns and feathery bits I call Gilgamesh's Beard and Lamassu Feathers.

Since Mesopotamia was part of the fertile crescent, a gentle crescent shape  for the shawl seemed only natural and of course, when given the option to pick my yarn, I had to go with that ancient near-eastern fiber: linen.

----

And that is a long story behind a fairly simple shawl.

If you'd like to knit one for yourself, the pattern is available now in the shop or you can queue it up on Ravelry.

And to make the long stretches of trinity stitch go faster, I suggest you listen to the following while you knit (I did!).

http://www.youtube.com/watch?v=SVcvGxEZZwc

Photo Credits:

  1. Quince & Co.
  2. Lamassu  by Jasmine Ramig
  3. Quince & Co.
  4. Iran 2007 Persepolis Gate of all Nations by David Holt
  5. Quince & Co.
  6. Untitled by E.N.K

Sunny Days and Strawberries

Strawberries & Daisy Chains

Strawberries & Daisy Chains

Strawberries & Daisy Chains

Ripe Strawberry on the Vine

Sunny Day Shorts

Sunny Day Shorts

Irises

Sunny Day Shorts

Oh sweet summer, you are officially here and I waffle between trying to cram three days of activity into one weekend day and being completely lazy and just soaking it all in. Being lazy should win an awful lot more than it actually does.

I am amazed at how rapidly a garden can grow once you get your plants in. Some of my leaf lettuce is almost ready to start picking, I’ll likely be making some fresh basil pesto soon, and we’ve sampled the first sweet, sweet strawberries warm off the vine. This little girl of mine loves fruit. Any kind, all the time. So it was such a joy to see her eat that first strawberry and point at the plants looking for more and the heartbreak of having to wait another day for some more to be ripe. As these plants are young and small, I’ll be surprised if we get even two dozen berries off of them this year, but each one is worth it, so long as we can beat the critters to them.

Early last week, we had a visitor to the garden beds. My guess is either a woodchuck, which we’ve spotted in the neighborhood, or a skunk that our neighbors saw. Either way it gnawed the leaves off of three of my six broccoli plants. So it was off to the home improvement store and some quick installation of fencing. I’m using that green plastic hex mesh (chicken wire) and thus far we’ve had no additional midnight-snackers.  One of the broccolis seems to be recovering nicely, but I’ll likely have to swap out the other two. Live and learn.

In my efforts to supply LMC with some appropriate play clothes I sewed two pairs of the new Oliver + S freebie pattern, the Sunny Day Shorts. One in some Birch Fabrics Jay-Cyn fishy print I had in my stash and a second pair in some blue twill leftover from my Beignet skirt. I didn’t do anything fancy other than add top-stitching to both pairs. It’s a freebie pattern, so there’s not a lot to it and the drafting is a teensy bit off (one side of the legs seem to have a sharp point where you turn the hem, the other side is more of a curve, so it doesn’t exactly line up). Also, the rise isn’t quite long enough to cover the whole diapered bum, but for nice looking shorts that whip up quickly? They get the job done. Next up, I’ve got another t-shirt cut out and ready to go, after which I’ll probably take another selfish sewing break to try a go at making my first swimsuit. Because we just got LMC a kiddie pool and I’m gonna need something fabulous for splashing around in that! ;)

Love You S'more

Love You S'More TeeLove You S'More Tee

Stenciling

Love You S'More Tee

Love You S'More Tee

As much as I love sewing tiny dresses, my very active little girl needed some more items in the way of summer basics suitable for playing in the dirt and sitting on sidewalk chalk and generally being a toddler.  So I made my first of what shall certainly be many Flashback Skinny Tees. It's a great basic - I've already got a second one cut out and at least two more variations planned in my brain.

For this first go-around, I sewed it exactly to the pattern specifications (except for the short sleeves) in the 18-24 month size for my tall almost-15 month old.  For the next go around I'll to drop the front neck a bit to make it a bit easier to pull it over LMC's head, but other than that, I've no complaints. The shirt is made in a 100% cotton sun-protective fabric from Rockywoods, which feels like a very substantive interlock. It was a breeze to work with, but it's definitively a thick knit. This is a sturdy and not a breezy tee. I  imagine, that the fit will look a bit different in a regular jersey. That said, I'm hoping I have enough of this white leftover to make myself a tee from it, because fair-skinned mamas need sun-protection too.

While I'd make a plain white tee for myself, I thought LMC's needed to be a little more fun, so after surveying my collection of camp-themed Dear Charlotte stencils leftover from Ms. Maggie's baby shower, I came up with the s'more idea. I could have been a little straighter with the lettering, but all in all it turned out nicely. It's only been washed once thus far, so we'll see how it holds up over the long run, but I imagine it'll be fine for the length of time kid clothes last before they're outgrown.

Minoru Jacket and Cargo Pocket Tutorial

Minoru Jacket
Minoru Sleeve Mod
Minoru Jacket
Minoru Cargo Pocket Mod
Minoru Jacket
Minoru Jacket

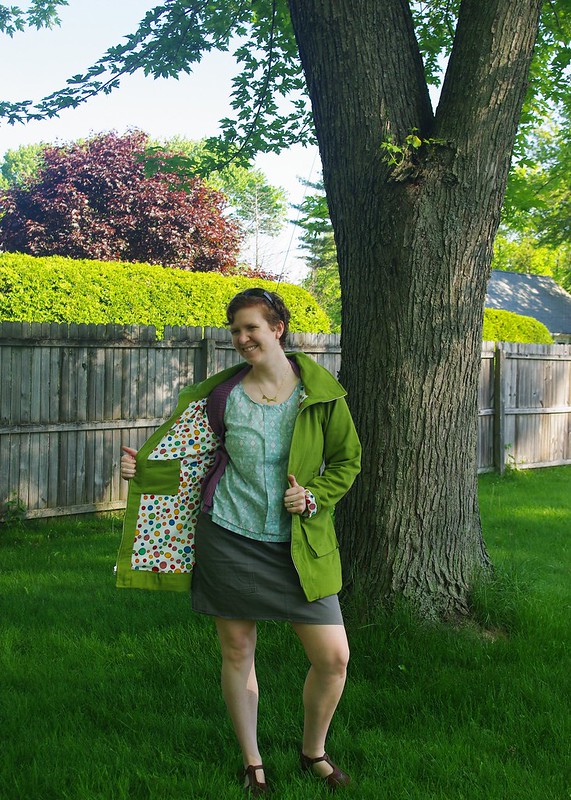
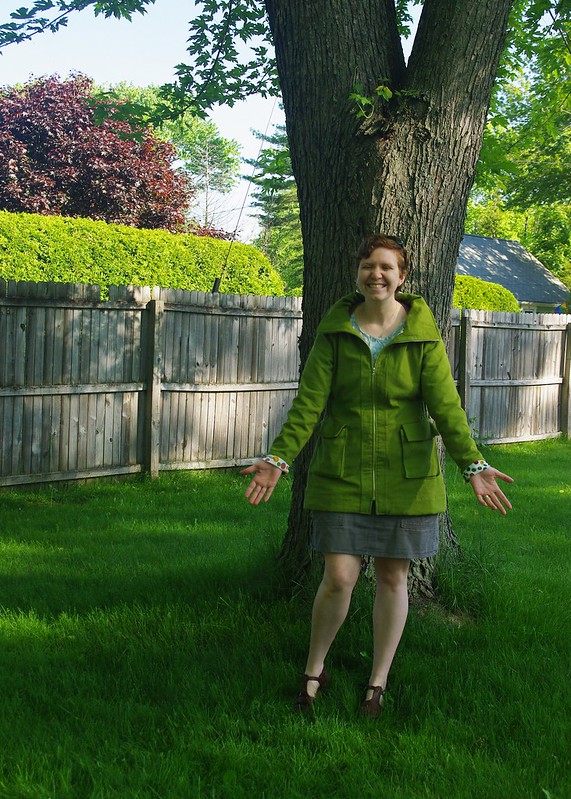
I finally made something for myself and it's a doozy! I loved the Minoru Jacket pattern from the moment it came out (back in late 2011), so much so that I bought the pattern, the fabric, the lining, and special ordered the zippers shortly after it came out.

Three years of sitting in my stash and five weekends of sewing later, I have a bright and beautiful new jacket that does some much-needed filling of a long-outstanding hole in my wardrobe. Of course I finished it just in time for summer, but being as I live in Maine with it's often cool nights and mornings, I'm sure it'll still get plenty of wear before getting a real workout in the Fall and Spring.

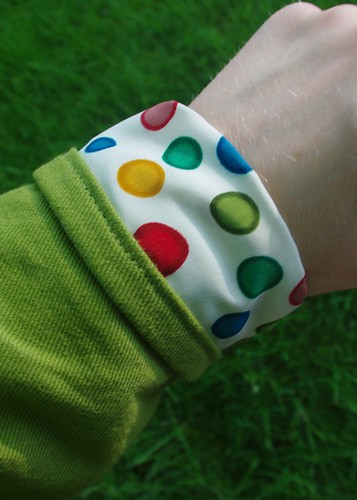
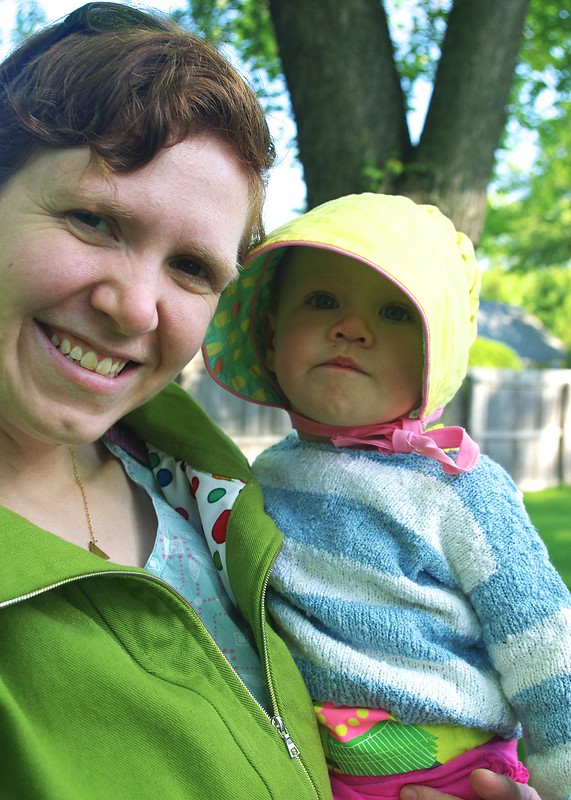
The jacket is a spring green twill of forgotten origins, lined with some silky polka dots purchased at JoAnn's, and riri metal zippers. I made the pattern in a straight size 14, which is a little bit roomy, but it means I can wear it over sweaters come Fall. It's comfy and the right amount of warm for the in-between seasons.  I found the instructions clear and concise (though missing a few metric to imperial measurement conversions in the text and there's something funky about the placket length/hem length). I pretty much made it exactly as described, with the exception of the following modifications:

  • Flat felled all the seams noted as top-stitched in the pattern - seam finishing and top-stitching in one!
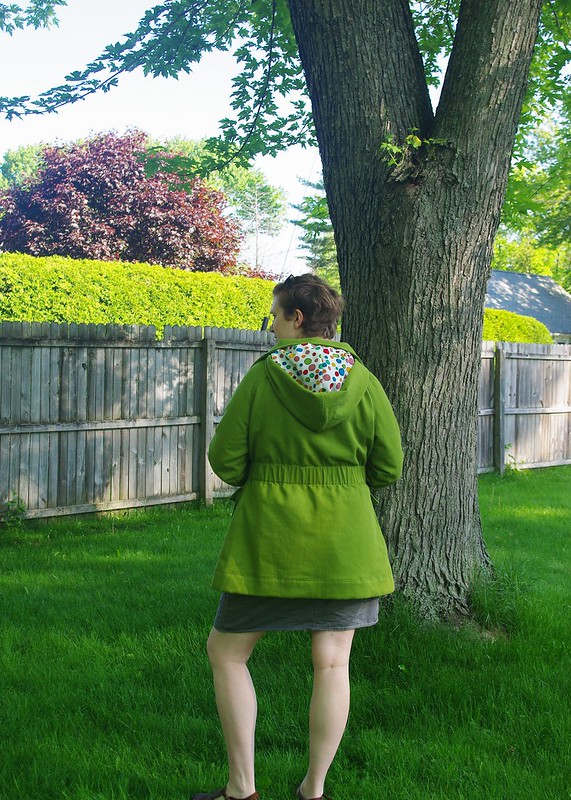
  • Lined the hood
  • Moved the waist elastic up 1"/2.5 cm from pattern marking
  • Removed the cuffs
  • Made the hood zipper opening shorter
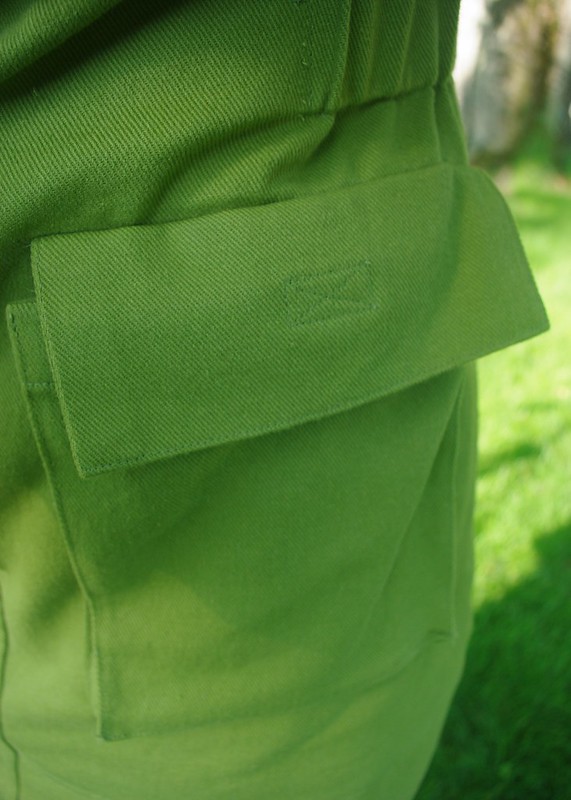
  • Added cargo pockets
  • Accidentally placed the interior pockets about 5/8 inch too low

One of the great things about sewing a pattern three years after it came out is that by then, a ton of other people have made it and you can steal their ideas and learn from their problems. About half these mods were inspired by other blogger. Case in point, I can no longer remember the blogger who mentioned it, but the hood zipper opening was indeed too long for my zipper, which I was able to check, before cutting it out. I do wish  I had headed the warnings to reduce the hood, as it is overly large. Some more direct copy-cats include borrowing Lladybird's idea to lose the cuffs (which were way long, even on me) and after I flat-felled my side seams before I inserted the side seam pockets I had planned on, I stole cutcutsew's cargo pockets idea.

The cargo pockets were a happy accident, as I love the way they turned out and they really make the jacket. I constructed my pockets largely based on this tutorial by 21 Wale. Should anyone want to copy me in my copy-catting, I've made up a PDF Cargo Pocket Pattern and Instruction Sheet  (tiled for US Letter-sized printing).

As with any coat/jacket, this was a time-consuming project. All said, it probably took me somewhere in the realm of 16 or so  hours to complete, but I love the outcome and consider it time well-spent as I can see myself wearing this coat all the time.

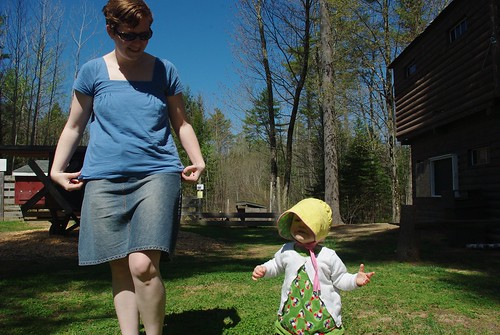
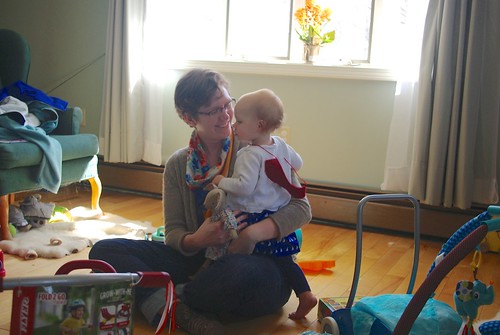
Speaking of wearing me-made things, I've completely missed Me-Made May, but I realized after I took the photos that everything in my outfit in these shots (not including underthings) was handmade either by me (cardigan, skirt, tank) or someone else (necklace, shoes). The fact that I didn't realize it until I took the photos is a nice nod to how the right handmade items can really become an intrinsic part of our wardrobes.

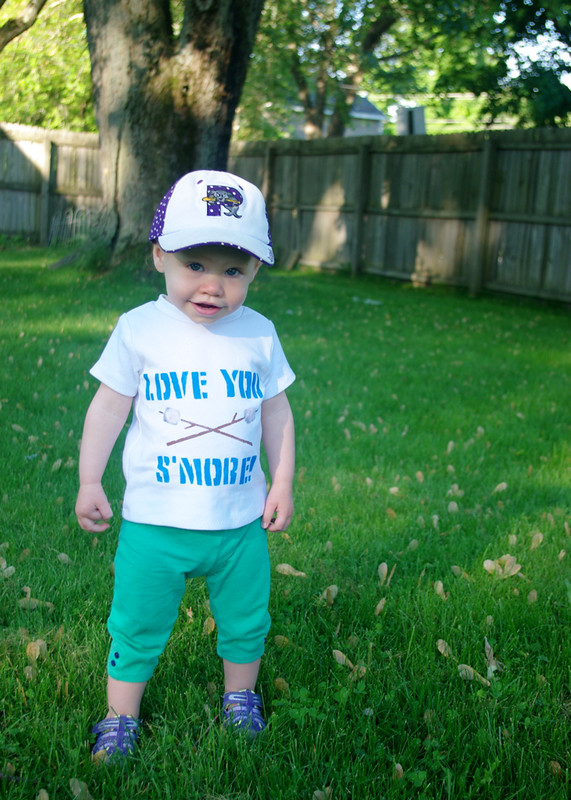
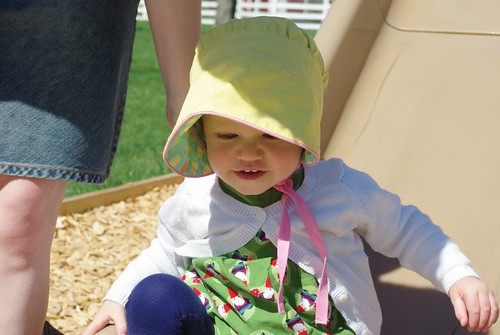
Continuing on the theme of handmade wardrobes, there's a neat little story behind the striped sweater LMC's wearing. When we first moved back to Maine, my mother-in-law gave me a bag with some random knitting stuff in it: a few sets of straight needles, some old yarn, and all the pieces to a blue and white striped baby sweater.  When I was pregnant, one of the first things I did was seam the otherwise complete sweater together, so now LMC has a Memere-made sweater, even though her Memere hasn't knit in years. The original yarn and ball bands (Reynolds Giselle) came with the sweater, but I've been unable to definitively date them and my MIL has no recollection of making the thing, so my best guess is that it was originally made for either one of her three sons, or my nephew - meaning it could be anywhere from 20 to 50 years old (quite the range, I know).  The best my google-fu can find is that the yarn was at a minimum available from 1981-1984. Doesn't look too shabby for some never-worn 30 year old yarn, does it?

Mother's Day on the Farm

Wee!

On the Slide

Saying hello to the goats

On the run

Mini Donkey

Who knew mulch was so fun?

Checking out the Chicks

Sheep noms

Pat the Goat

Got any nibbles?

Ice Cream!

For my second Mother's Day we celebrated with a delicious homemade brunch (french toast! strawberries! bacon! mimosas!) and followed it up with a late morning trip to the The Barnyard at Smiling Hill Farm and an afternoon of sewing for me while LMC napped.

We knew the Barnyard was going to be a hit as soon as she squealed with delight at the first animal she saw (a ferret). Little Miss is very much into animals these days - she knows dogs say woof woof and lions roar and snakes sssssssssss and she wanted to touch everything in sight. Of course the mulch was equally as interesting as all the furry creatures. Everything is new and interesting and it's such a joy to see LMC discover.

And she's moving and grooving now too, walking everywhere, and she's thankfully decided all of a sudden to accept shoes like it's no big deal, as if she wasn't turning into jelly legs and a pile of tears a few weeks ago. How quickly things change.

Of course, now that spring has finally arrived in Maine it means I'm working on perfecting my stealth sunscreen applying skills and that more accessories are required for my little red-headed girl. Which means time for another Peakaboo Bonnet. This one featured some solid yellow Kona Cotton and a Lisette ice cream print trimmed with pink piping, all from JoAnn's. I imagine it'll be showing up in photos from now through September. But is there ever really enough of babies in bonnets? In my book, never. And I've got enough left over fabric to make a matching dress, just as soon as I finish a little sewing project for me!

Hoppy Easter!

Little Miss Cleaver and Miss Maggie RabbitUntitled Untitled Untitled Untitled Untitled Untitled Untitled Miss Maggie Rabbit Untitled When the day starts so early, it’s hard to get non-blurry photos of an increasingly active (and expressive!) little one. She’s just on the cusp of toddler-hood these days – walking more than she crawls and understanding things and almost almost talking. But Easter started around 5:30 AM with opening the basket/bucket and a low-key egg hunt with 6 or so eggs placed in highly visible places filled with cereal puffs.

Having put my clothing-making energies into her birthday dress not that long ago, I turned my maker skills to toys this go around. The rabbit is Alicia Paulson’s Miss Maggie Rabbit kit, which was a joy to put together. I misplaced the yarn that came with the kit, so I made the capelet out of some Berroco Vintage DK I had left over from earlier projects. I also dyed a pair of playsilks with Kool-Aid (Mixed Berry blue and 2 packs of Lemon-Lime green), which was quick and fun. Of course, I got totally upstaged by her Memere who showed up with a tricycle! Not that her feet touch the pedals yet, but I imagine they will before too long.

Little Miss Cleaver has become obsessed with belly buttons of late, whether it’s spotting mine and poking and laughing or displaying her own upon request. Onesies are definitely out. So obviously she had to check her new bunny for a belly button.

After some unwelcome snow on Tuesday, the weather seems to be settling into spring. My daffodils are blooming, with tulips coming not too far behind. It means we can go to the park, try out slides for the first time and play in the yard. Now if only we could convince LMC to wear shoes. Right now it's like putting booties on a dog, with much awkwardness and whining.

We’ve already had one happy afternoon with a batch of neighbor kids in the driveway. We’ve got sidewalk chalk and digging tools at the ready.  I’m hoping to get together with our neighbor in the next few weeks to have a raised bed building day. It’s been so long since I’ve had a veggie garden  and I want to get out there and grow some things!