When a non-knitting colleague or friend sees me knitting with an open pattern in front of me, they’ll often take a quick glance and ask if I’m a) taking a multiple choice test or b) cracking a code.
I always get a good laugh because, in some ways, they’re absolutely right! If I’m knitting up a multi-sized pattern, and I’ve circled or highlighted the stitch counts for my size, that’s pretty much multiple choice and if you’re never come across the language and abbreviations for knitting before, it might as well be a foreign language.
The same goes for knitting charts - they are little boxes of code - but once you’ve cracked it (and have a few tricks up your sleeve) they’re a great tool!
Today, I’m going to walk you through reading a lace chart for soup to nuts. And all you need to do is ask yourself three simple questions.

THE KEY
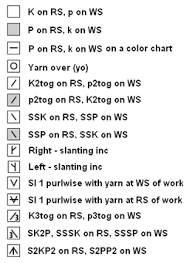
A lace chart comes with two pieces: the Chart and the Key. The Chart shows you the stitch pattern and the Key shows you what all those little symbols mean.
Before you do anything, look at the Key. Some knitting symbols are fairly standard (a blank box is a knit stitch, a dot or a dash is a purl, a circle is a yarn over), but how different increases and decreases are displayed can vary by designer and publisher.
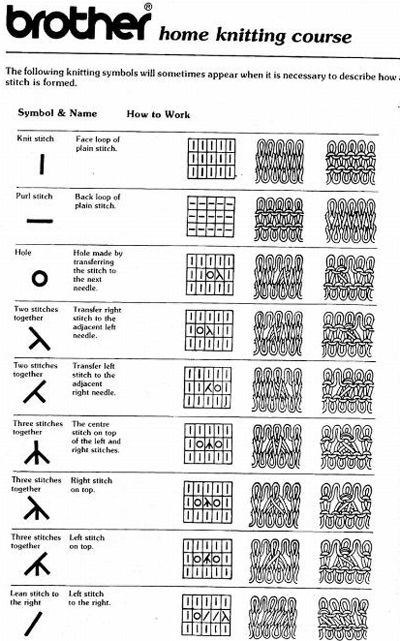
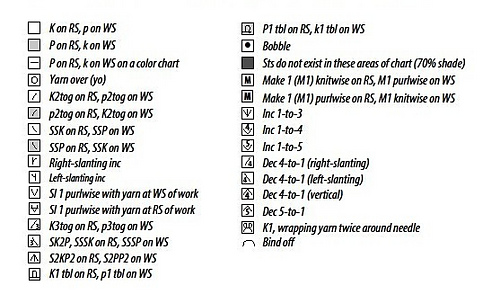

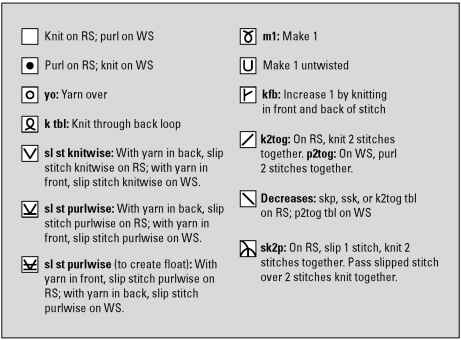
Generally, increases and decreases are going to lean in the direction that the knitting will eventually lean, so something more or less looking like this:
\
can be any kind of left leaning decrease. Slip, slip, knit is a common one; but it could also be slip 1, knit 1, pass the slipped st over; or k2tog through the back loop.
The designer will have made a choice in designing - so check the key and ask yourself our first question.
Question #1: What do these symbols mean for this pattern?
There’s a reason the designer chose that particular decrease - it could be that it plays to the design best, or it could simply be their personal knitting preference. If the design calls for a SSK but you prefer k2tog tbl - feel free to switch it up! It might result in a slightly different look, but it’s your knitting.
(Is the Key missing? It totally happens sometimes in the process of getting something to print. Your best bet is to email the designer/publisher or you can see if there is a written out version of the chart and extrapolate from there).

THE CHART
Now that you know what all the little symbols mean, you can start to read the chart. But before you get into the nitty-gritty (knitty-gritty?) of individual stitches, it’s best to look at some big-picture items first.
ORDER
First, unlike text, you read a lace chart in the direction you knit. That is, right to left, bottom to top (see red arrows above). The stitches and rows should be numbered in this direction to guide you.
ROWS/ROUNDS
A lot of lace patterns are designed so you don’t have deal with any yarn overs or increases/decreases on the wrong side of your knitting - you focus on all the “tricky stuff” on the front, then mindlessly purl your way across back.
Even if a lace pattern in worked in the round, you often alternate between a lace round and a non-lace round. (Fun fact: patterns with yarn overs on every round are called openwork).
But those “spacer rows/rounds” aren’t just nice from a mental break perspective, they make a big different in the way the lace looks - skip it and you’ll have a really squat-looking pattern. So they’re important to remember.
Knitting designers and publishers like to save space (especially magazines), so they often truncate charts to the most pertinent information. Which leads us to…
Question #2: Is this chart showing every row/round or every other row/round?
To tell, look at the numbers along the side the chart.
If it’s a chart for knitting flat, right side row numbers (usually odd numbers) are generally listed to the right hand side of the chart. Wrong side row numbers (usually even numbers) are generally listed to the left hand side of the chart.

The chart above is for openwork, there’s yarn overs on both right and wrong sides. All rows are shown, because you need to know what’s happening on every row.
But a lot of times, there’s nothing interesting happening on a wrong side row. So to save space, the chart will omit it.
On this chart, every wrong side row is purled, so the chart only shows the information on the right side. The numbers on the right read 1, 3, 5, etc, but instead of having a “spacer row” between them (as in the openwork above), they’re right next to each other.
The same rules go for lace worked in the round. If all you’re doing on an even-numbered round is knitting, the chart probably won’t take up space to show you that.

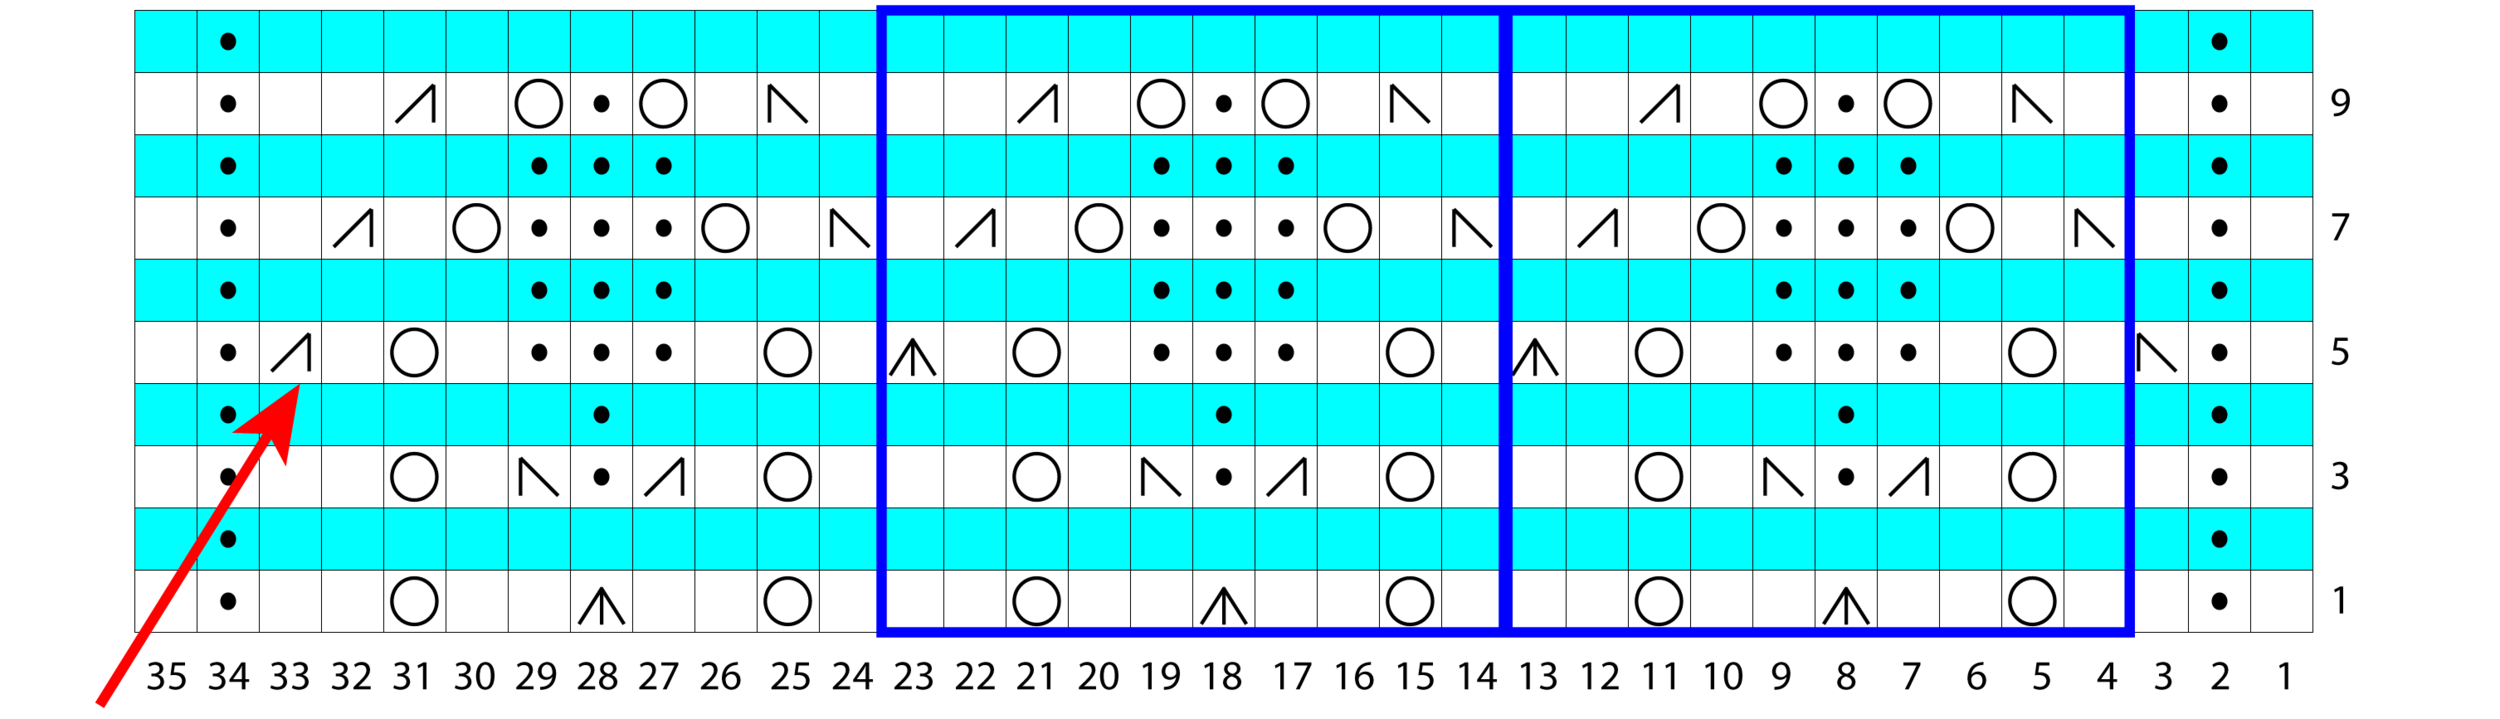
This chart is an example where every row/round is knitted, but there’s only lacework (i.e. yarn overs) done on the right side. So why bother with showing all the rows/rounds?
Take a closer look at those wrong-side rows (in blue). The pattern combines purl bumps with the lace, so to carry that pattern, the bumps need to be worked on every row/round.
REPEATS
The next big-picture thing to look at is repeats. If a shawl is 100+ stitches wide, showing all those stitches in impractical, and, honestly, not that helpful if the pattern repeats every 6 stitches. Repeats help break down the pattern into manageable chunks. So next you want to know:
Question #3: How does this pattern repeat?
Since they’re generally both horizontal and vertical, repeats are typically shown with a box that outlines the repeat area.

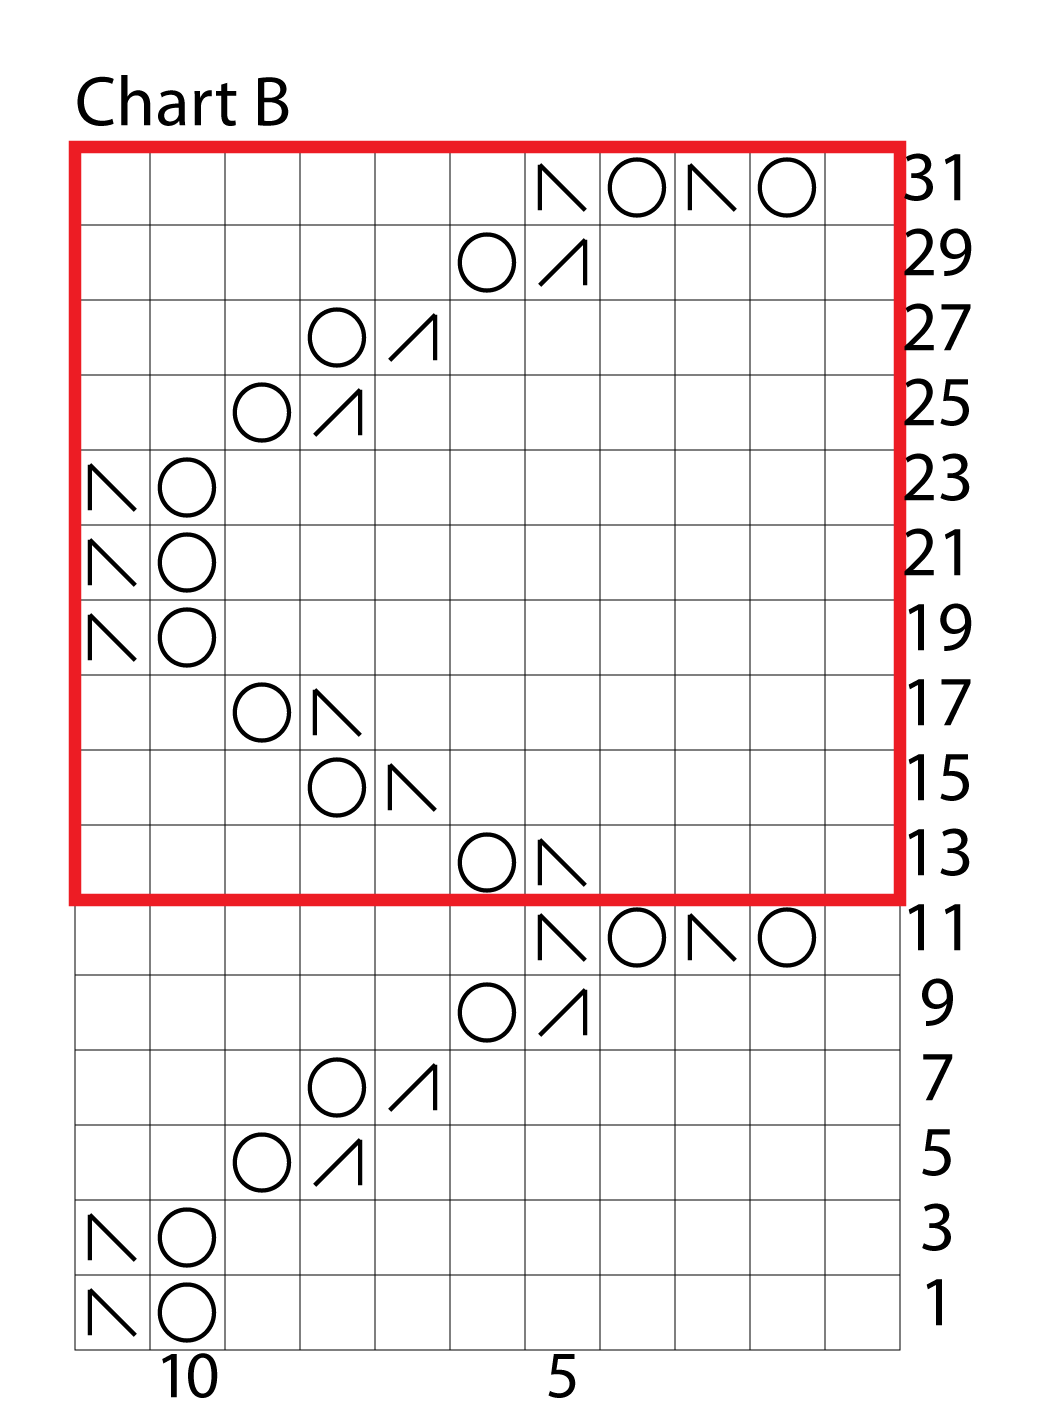
If we take another look at the chart above (which is designed for the top of the foot of a sock) - the full lace section (only 35 sts) is represented, but even with that there are repeats. Each repeat is 10 stitches wide and 9 rows high). But here’s where it can get tricky - you have a 10 stitch repeat over 35 stitches - there should be three full repeats, plus 5 extra stitches, right?
Not always.
If you look at the chart above, sts 24-33, they are almost exactly the same as sts 14-23 and 4-13. It acts like an additional repeat. But there's one important exception with stitch 33 on row 5. Instead of a double decrease, like the other repeats, it’s a single decrease. The other “half” of the double decrease is at stitch 3 on row 5. SO if you're marking out a repeat (on your page or in your mind) make sure it's a true repeat.
Now, assuming that the item this chart is for something taller than 10 rows/rounds high. When you get to row/round 11, just start back at row/round 1.

Here’s another chart (for a shawl), which shows only a portion of the lace section. Section A1 is worked across about 439 stitches, B1 across 411 stitches, and C1 across 387 stitches. But the charts for each section look about the same width.
This is possible because each section uses a 6 stitch wide/12 row high repeat. The stitches on the left and right of the repeat box are just to get to to that repeating section.
For example, to knit chart A1, row 1: you’d knit the first 11 sts to the right of the repeat box as charted (SSK, k4, yo, k2tog, k4) and then you’d repeat the section within the box as many times as you needed until you were 6 stitches from the end of the row (or marker, whatever the design dictates) and then you’d finish up with the last 6 stitches of the chart (yo, k2tog, k3, k2tog)
And that's basically how most lace charts work!
TIPS AND TRICKS
KEEPING YOUR PLACE
With a large lace (or colorwork) chart - the trickiest part is keeping your place. There are a lot of tools available to help.
You can purchase some pre-made items like magnetic boards or copy holders.
OR
You could also be a little more DIY and use highlighter tape, washi tape, post its notes (my go-to) or a ruler. Basically anything that’s straight, long enough and easy to move (but won’t slip when you’re in the middle of a row!)
If you are using something opaque (like a post-it), arrange it so the bottom of the marker is ABOVE the row you’re working on, so you can still see the rows you’ve already worked. That way you can continually check to see if everything is lining up appropriately.
LIFELINES
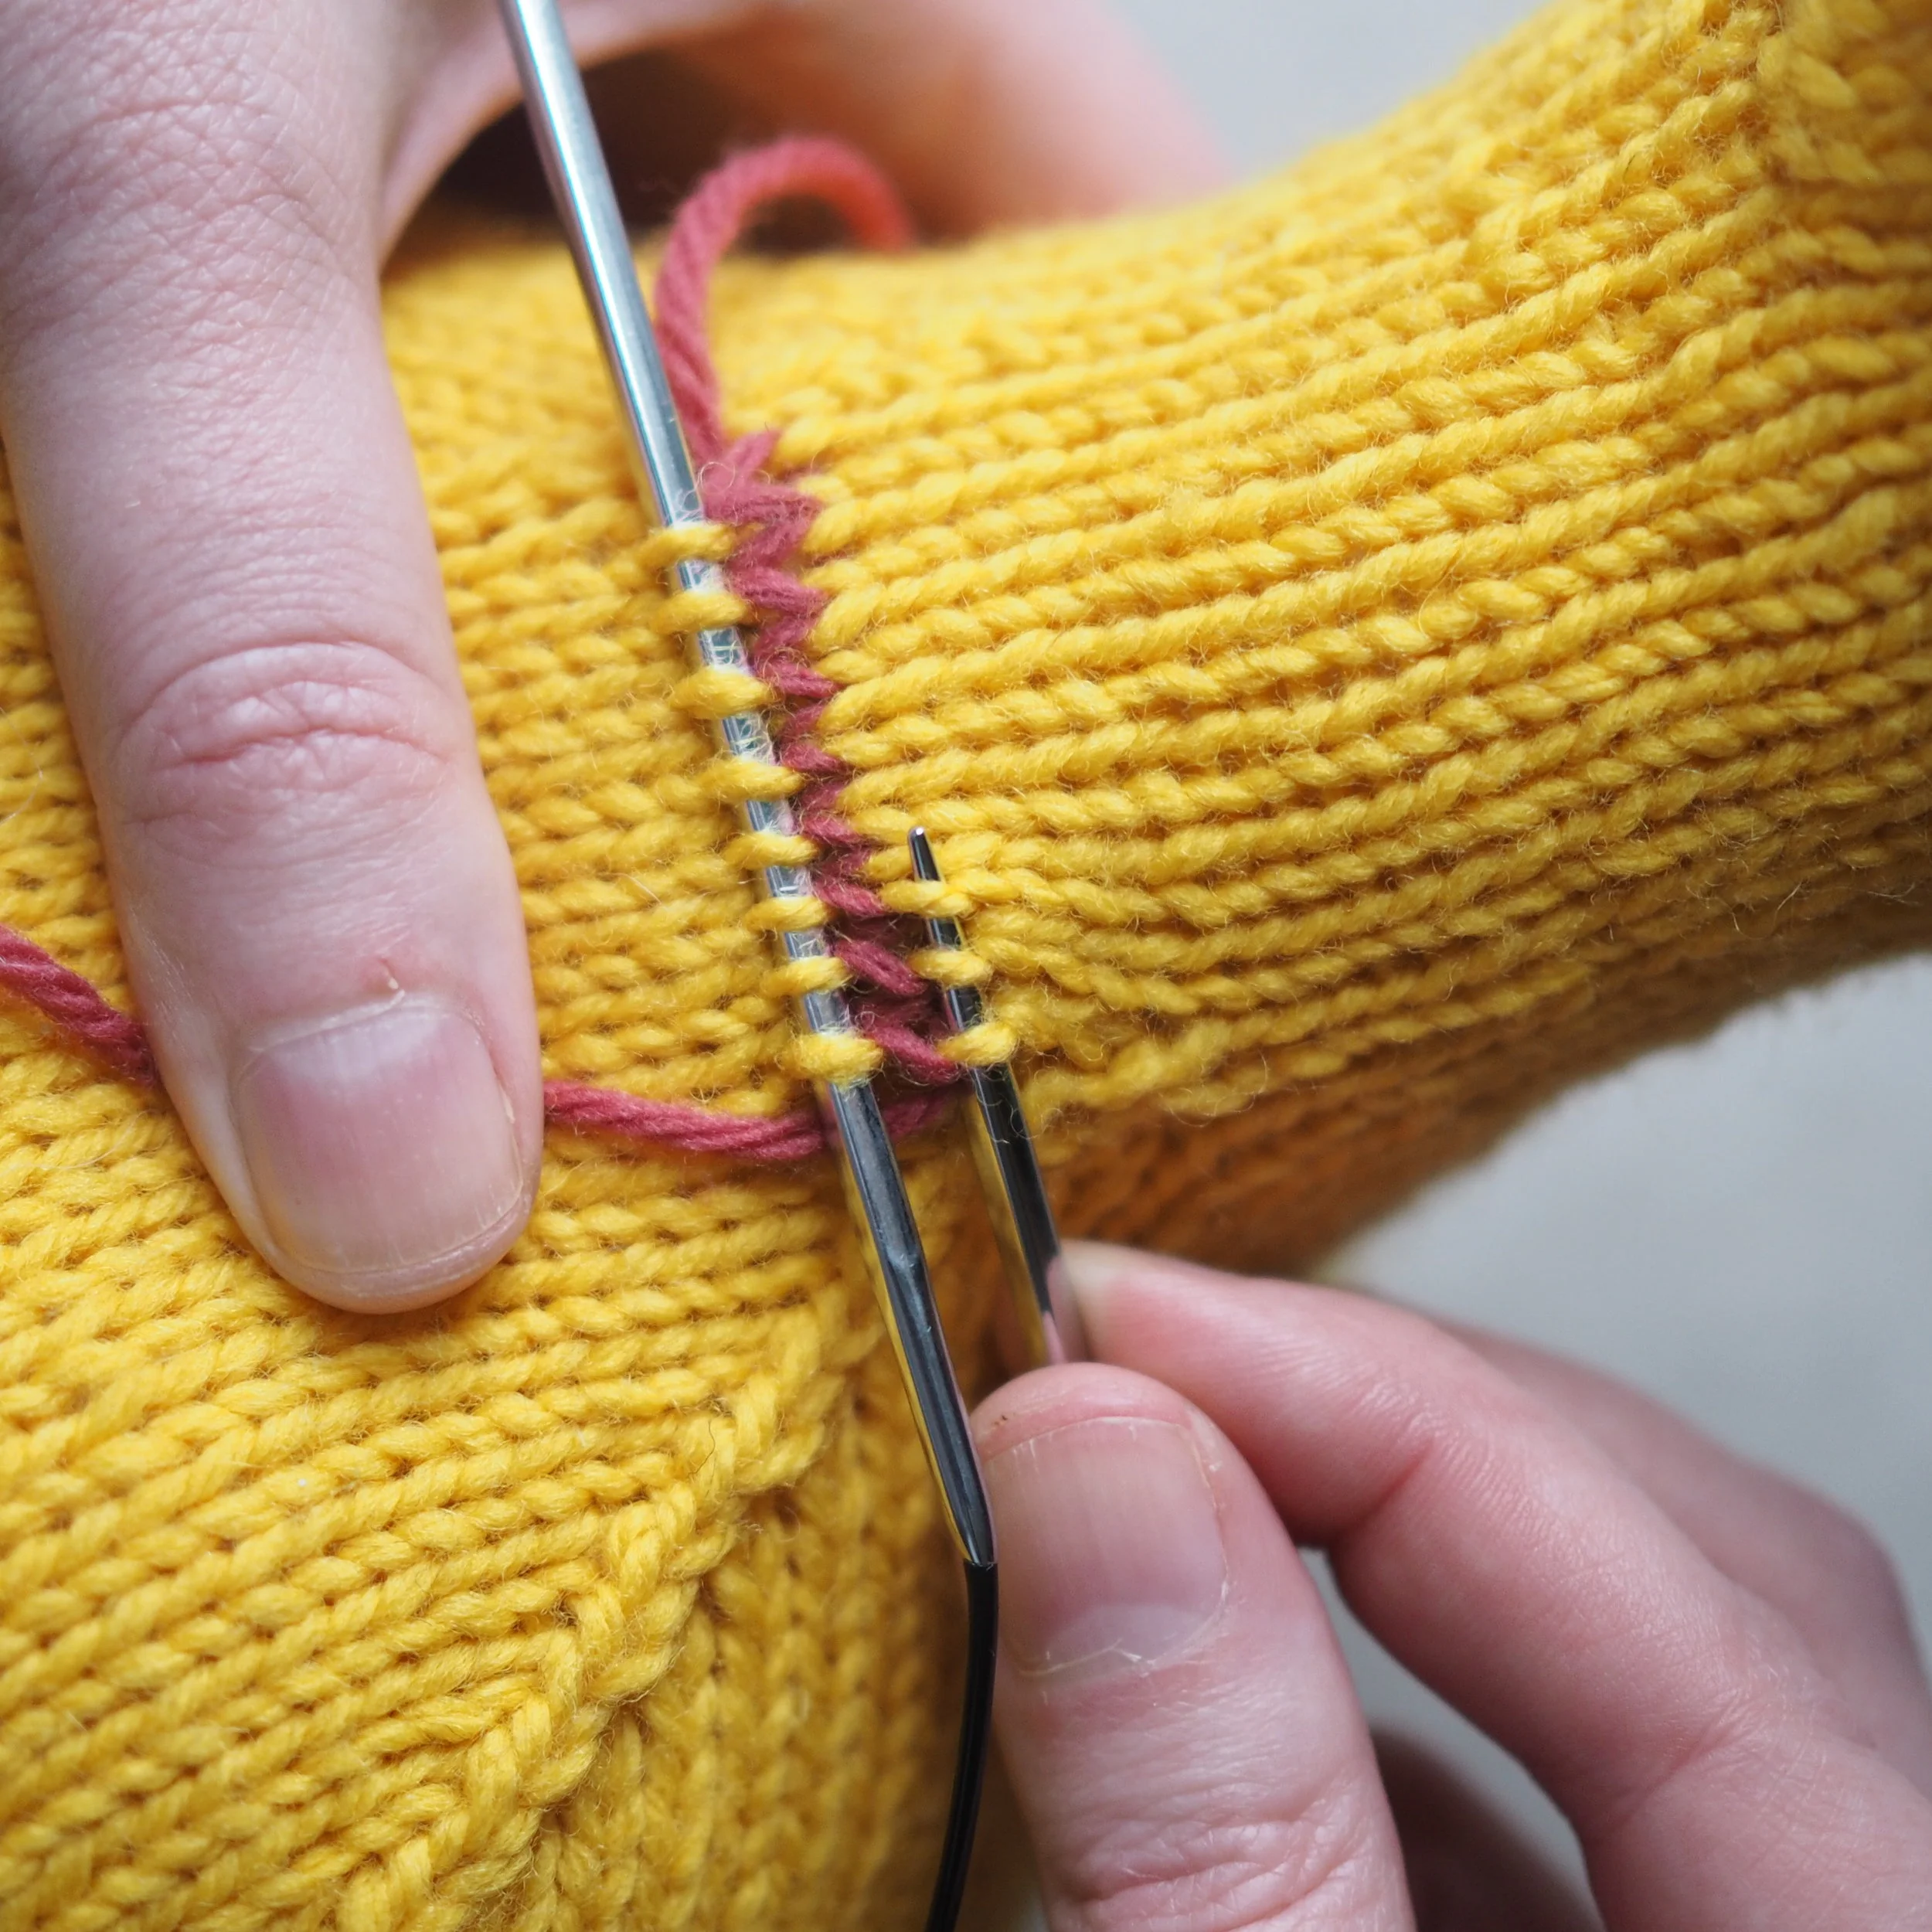
If you want some extra security when working lace, you can always put in a “lifeline.” To insert a lifeline, thread up a darning needle with some high-contrast colored yarn and slip it through the live stitches on your knitting needle, as if to put them on a holder.
But instead of removing the stitches from your knitting needle, remove the darning needle and leave the “line” in and continue knitting normally. If you make a mistake you can’t easily fix, rip out back to the lifeline which will nicely hold your stitches for your while you put them back on the knitting needle. Only insert a lifeline into a row you’re confident is correct, and if you’re going to use them, I’d recommend inserting it after every repeat or more often if the rows are really long.
RECAP
To read a lace chart go right to left and top to bottom. Before knitting, ask yourself the following three questions:
Question #1: What do these symbols mean for this pattern?
Question #2: Is this chart showing every row/round or every other row/round?
Question #3: How does this pattern repeat?
With those answered, you should be ready to tackle some charted lace!
GET KNITTING!
For some beginner-friendly lace patterns, check out the following designs:

Designed to show off a special skein of handspun or hand-dyed yarn, this simple, but gracefully cozy cowl is the perfect knit for those looking to learn lace or who just want to use a special skein. A few big buttons add an extra fun with minimal effort.
Size
- 9”/23 cm deep, 32 1/2”/82.5 cm long, unbuttoned.
Yarn
- Pink: One Lupine’s West Branch in Berry (60% Merino Wool, 40% silk; 212yd [194 m]/4.0 oz)
- White: Handspun from Highland Handmades roving in Storm Chaser (100% Falkland wool; 195 yds [178 m]/4.0 oz)
- Alternatives: approximately 200 yds [183 m] of heavy worsted to light aran-weight yarn
Gauge:
- 17 sts and 25 rows = 4”/10 cm in Lace Pattern.
- 17 sts and 26 rows = 4”/10 cm in Stockinette St.
- Adjust needle size as needed to match gauge.
Needles and Notions
- US 8 [5 mm] straight or circular needles
- Tapestry needle
- 4 – 1”/2.5 cm buttons
- Sewing needle and matching thread
Learn more about the West Branch Cowl in the Chronicles
View it on Ravelry
Photos © Bristol Ivy/Ms. Cleaver Creations
The West Branch Cowl was designed to show off a special skein of handspun or hand-dyed yarn and is a great beginner lace project - the lace is only on the right side and has a short repeat.

An autumnal shawl inspired by brick pathways and wrought iron fences.
- 52" wingspan, 23" depth
- 441 yds of Fingering weight yarn, sample shown in Quince & Co. Finch in Kumlien’s Gull 152
- 24-inch circular needle, US 6 - 4.0 mm
- 18 stitches and 30 rows = 4 inches in pattern stitch
Learn more about the Ferrous Shawl in the Chronicles
Photos © Carrie Bostick Hoge
The Ferrous Shawl uses simple motifs that are easy to memorize and was designed for the complete beginner to lace shawl knitting in the traditional triangle shape.

Just south of the Texan fields where the goats and sheep that supply Piper’s fibers graze, once flourished several rich Mesoamerican cultures. One of the best-known imprints these civilizations left behind were the stairstep temples made famous by the Mayans and Aztecs. A distinctive shape that lends itself well to knitted shawl construction.
The shawl is worked from the tip up, with a 5 stitch-wide garter stitch border. Increases are done via yarnovers at the start and end of each RS lace row, as well as with backward loop cast on sts in the garter stitch between lace sections.
Skills required : knitted cast on, backward loop cast on, increasing, decreasing, binding off.
Charts and line-by-line instructions included.
- 52 “ wingspan, 25” depth
- 610 yds of Fingering weight yarn, sample shown in Quince & Co. Piper in Avocet 610
- 32-inch circular needle, US 6 - 4.0 mm
- 18 sts and 7 rows= 4 inches in chevron lace, after blocking
Learn more about Maian in the Chronicles
Photos © Emma Sampson
The Maian shawl consists of two 4-stitch repeats and all the increases are done on the edge with a backward loop cast on, meaning you won’t get your lace yarn overs confused with your increase yarnovers.

An oceanic-inspired lace pattern provides a dramatic border to a lightweight and iridescent crescent shawl shaped with short rows.
Sizes
56” / 142 cm wide and 10.25 (12, 14.5)” / 26 (30.5, 37) cm deep; pictured in 10.25” / 26 cm depth
Yarn
String Theory Caper Sock (80% Merino/10% cashmere/10% Nylon; 400 yds / 365 m per 4 oz skein)
1 (1, 2) skein(s) in Beach Plum or approx 345 (385, 455) yds / 315 (352, 416) m of fingering weight yarn
Needles
US 5/3.75 mm circular, 32” / 80 cm or longer
Or size to obtain gauge
Notions
Stitch markers
Stitch holders or scrap yarn
Tapestry needle
Blocking pins and/or wires
Gauge
20 sts and 32 rows to 4” / 10 cm in stockinette, after wet blocking
The lace border on the Cresting Waves Shawl is only 21 stitches wide and is knit separately from the body of the shawl, so if you make a mistake, you only have to tear back a few stitches (instead of the whole body of the shawl) to fix it.
Want a little challenge?

A traditional triangle shawl featuring a flowing series of lace patterns. Inspired by the undulating forms of seaweed and the summer chills that result from overly air-conditioned offices.
Shawl begins at the long edge and ends at the point. The lace patterns used only have the yo’s and dec’s on the RS rows and all the WS rows are purled. Pattern includes both charted and row by row instructions.
Shawl size can be increased by completing additional 24-row repeats of lace patterns #1 and/or #2. Any modifications may necessitate more yarn.
- 52 “ wingspan, 25” depth
- 430-500 yds of Fingering weight yarn, sample shown in Quince & Co. Tern in Seagrass 143
- 24-inch circular needle, US 6 - 4.0 mm
- 19 stitches and 36 rows = 4 inches in lace pattern #1 blocked open
Learn more about the Alaria Shawl in the Chronicles
Photos © Carrie Bostick Hoge
Alaria uses the same construction as Ferrous, but adds some more complex motifs.

Wide and rambling lace edges a gently curving shawl or stands alone as a delicate scarf.
Size
Scarf: 8 1/2”/21.5 cm wide and 60 1/2" /153.5 cm long.
Shawl: Approximately 58 1/4”/148 cm wide along top edge and
19”/ 48 cm deep at widest point
Yarn + color(s)
Nabi Wool Studio’s 70% Superwash BFL/20% Silk/10%
Cashmere in Albertine. 437yd [400m]/ 100 g [3.53 oz]. 1 (2)
skein(s) for scarf (shawl).
Gauge
One rep of Shawl Border (57 sts and 36 rows)= 8”/20 cm wide; 5”/13 cm long
26 sts and 36 rows = 4”/10 cm in Stockinette St.
Adjust needles as needed to match gauges.
Needles & Notions
One US 4 [3.5 mm] 24-30” circulars
Tapestry needle
Stitch markers (optional)
Pattern Notes
Shawl is worked border first, with stitches picked up along flat edge and worked with short rows to shape body.
Rambling Eden uses the same construction as Cresting Waves, but with a really wide border and openwork lace.

Did you know that those little green leaves that surround a bud have a name? Bracts (or bracteoles for little ones) are specialized leaves whose primary purpose is something other than photosynthesis - in this case, protection of the newly formed buds. The beautifully protective bracts are the inspiration behind this budding lace pattern, and serve as a reminder that if you look close enough (in this case *really* close), inspiration is everywhere.
Size
8”/20.5 cm circumference. Sample shown is 10”/25.5 cm from toe to heel and 5”/12.5 from top of heel to top of cuff. To adjust circumference, adjust needle size/gauge.
Yarn + color(s)
1 set Red Sock Blue Sock Yarn Co. Sock Adventures in
Pistachio/Ava (80% Superwash Merino, 20% nylon; MC
420 yds; CC 90 yds)
Gauge
35 sts and 40 rnds= 4”/10 cm in Bract Lace and Stockinette St. Adjust needles as needed to match gauge.
Needles & Notions
US 2 [2.5mm] dpns or circular needle. NB: US 2 needles vary in size from 2.5 to 2.75 mm, double check your needle size before beginning.
Tapestry needle
Stitch marker
Pattern Notes
Sock is knit from the toe-up with a gusset and eye of partridge heel. Ribbing under the arch makes for a snug fit. CC is striped subtly throughout the lace pattern, and is easiest if carried up the inside of the foot between stripes. Sample used all of CC, so if a longer cuff or larger sock is desired, omit striping. Notes regarding length are given throughout pattern. To change width of sock, adjust stitch gauge by changing needle size up or down.
Bracteole takes lace into the round and adds some purls into the mix. (And it’s the main chart we’ve been looking at throughout this tutorial!!)