Tale of Two Skirts

It's a very rare experience for me to make a pattern twice - I made the same shirt from the Built By Wendy Sew U book twice, but that's about it. I'm changing my perspective on this though as I get more into pattern drafting and perfecting fit on commercial patterns. If I'm going through all that effort, it seems silly not to use the pattern again. And so, I give you two takes on McCall's 5591, both done, strangely enough, in fabric that reminds me of old wallpaper patterns.

Rabbit Wallpaper Skirt Victorian Wallpaper Skirt

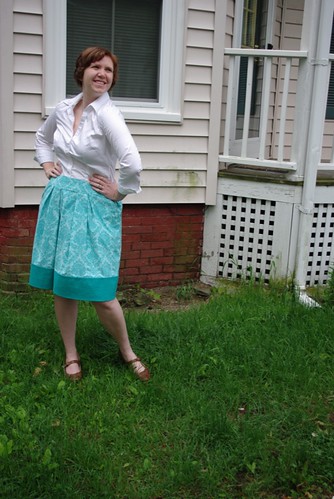
In many ways, the turquoise skirt on the left is my highly-wearable muslin. Having matched the pattern envelope measurements exactly, I cut out the pieces exactly to the pattern size suggested, with the exception that I added about 2 inches to the main body length.

Rabbit Wallpaper Skirt

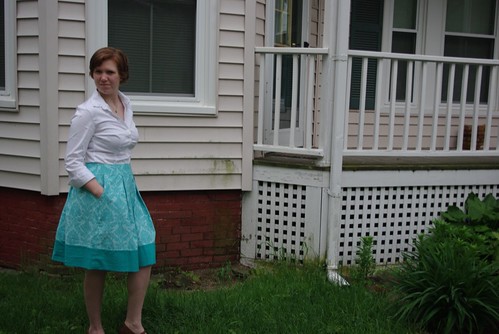
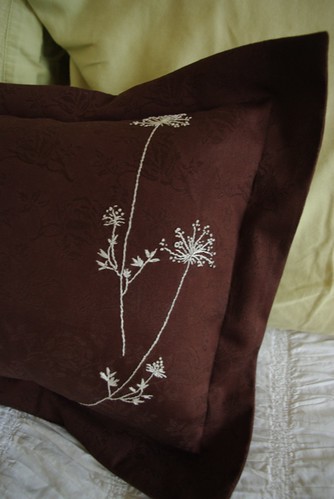
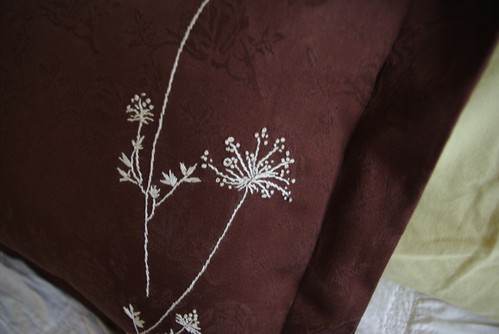
After putting it together I found the waist to have way way way too much ease in the waist, so I took it apart, then took the waist band in a few inches. (Of course, the time between taking it apart and putting it back together was about a month - I was a bit bummed). After which the waist band fit great.  I love the skirt - especially the secretly rabbitty fabric (sew below) - though I did think it hung a bit squarely from the hips down.

Bunny Fabrics

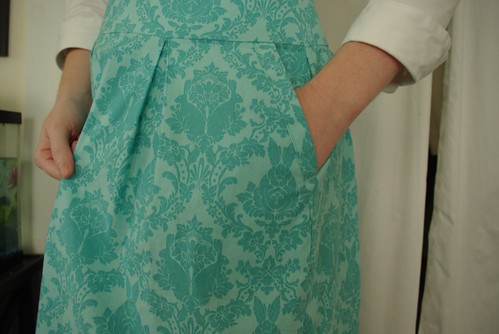
I love the skirt - especially the secretly rabbitty fabric and the look of the pocket facings- though I did think it hung a bit squarely from the hips down (see the top photo).

Slash & Spread

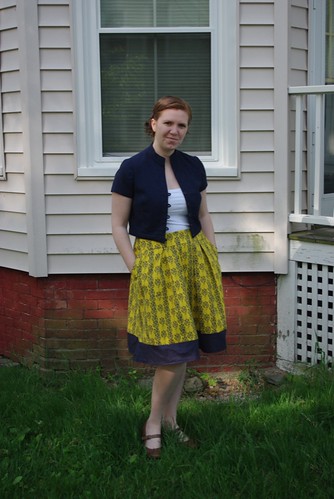
So on version 2.0 I did some skimming on the waistband pieces and did some slash & spreading on the skirt - adding a total of about 6 inches to the lower hem circumference- for a more flared look. Also, being short on contrasting fabric, I did a single layer on bottom hem, as opposed to the folded hem on the original (though I think the folded hem looks/hangs better)

Victorian Wallpaper Skirt

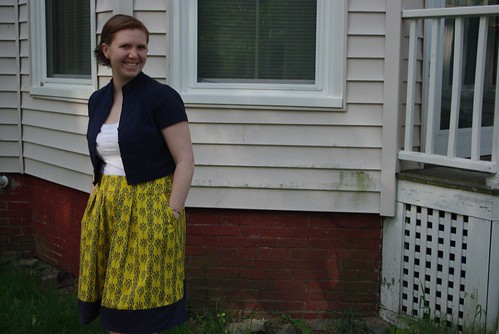
In the end, I prefer the fit of the yellow skirt, but love them both.

What about you? Do you have favorite version? Are you a once-only pattern sewer or do you find patterns you love and make them over and over?

At Least Its Not Carpal Tunnel

I feel like I haven't blogged in forever, but it looks like it's only been a week. I think it's because I generally feel behind the ball because of this:

My Wrist Rat

For about three to four weeks now, I've been suffering from limited mobility and mild pain in my right wrist. I've had it checked out by a doctor and it seems to be work-related, but thank goodness it is mild muscle strain and not carpal tunnel. That said, it's basically kept me from too much typing as well as severely limiting my knitting, embroidery, and sewing abilities. I can do all them, but not for long without making my wrist tired. Not being able to knit has been especially hard.

Organized!

So in lieu of actual crafting, I organized my fabric stash by size (and yes, that is all of it, aside from some gallon bags of scraps).

Box Bag

I also put together this little box bag this weekend, to hold my toiletries for my relatively new foray into twice-weekly lap swimming (the tutorial was from drago[knit]fly - though I'm going to admit, I wish it was a bit clearer). This was maybe pushing it a bit to do all the sewing in one day.

For someone who rarely doesn't have some project in her hands, its been difficult to have to slow down like this. Still, I'm lucky that I had my wrist checked out early and we're modifying my work station (an ergonomic keyboard is on the way), but in the meantime I'm struggling to be patient and let myself heal and not make things worse.

In any case, if things are a little quieter around here than usual, the wrist is why.

Introducing: Winterberry

Winterberry Gloves & Beret Set

I hope no one minds seeing a very woolly pattern with winter in the name in the midst of spring (at least in this hemisphere), but I'm so excited to finally get this pattern out in the world that I couldn't wait for more appropriate weather.

Winterberry Gloves & Beret Set

This hat and glove set is one of those "necessity is the mother of creation" projects. In back in late 2008(!), my dear friend Kasey requested some knitted elbow-length gloves to go with a 3/4 sleeve coat she had purchased. I was happy to oblige and even though I'd only made a pair of Nordic mittens and no gloves at all, I decided that I needed to design the gloves myself.

Frozen Winterberries

At the time I was heavily inspired by the winter berries that were adding splashes of color to the otherwise gray trees in my neighborhood and having just finished Stephanie Japel's Forecast Cardigan I was well acquainted with bobbles - all of which led up to these gloves:

Winterberry Gloves

The structure didn't change all that much from these originals, with the exception of the thumb, which was improved in the final version.  The red gloves were knit in Ultra Alpaca, which was soft and lovely, but was lacking in the stitch definition I thought the cable panel needed and the sturdiness which gloves require.

Winterberry Gloves & Beret Set

For the final version, then I chose to knit with Peace Fleece Worsted in Antarctica White, which I found to be a very flattering shade.

Winterberry Gloves & Beret Set

With both the Peace Fleece and the Ultra Alpaca, the gloves used a skein and just a teeny bit of a second skein - usually just to finish the fingers on the second hand, so I decide to work up a beret with a complimentary cable pattern. Aside from the cable, the beret is a simple knit, but is just the right size for pulling down over the ears for true warmth.

Winterberry Gloves & Beret Set

The patterns requires some cabling without a cable needle, which is fully explained in the pattern notes and the gloves utilize a 8-row cable repeat, with row counts at the end of each section to keep on track.  The gloves are fitted from elbow to wrist and the hat ribbing is knit on smaller needles to remain cozy for a multitude of head sizes.

Winterberry Gloves & Beret Set

If you're interested in making a your own Winterberry set, you can purchase the pattern in PDF form for $7.00 USD  via my Ravelry store or the PayPal link below:

Roadtrip: American Textile History Museum

Textiles are Special

On Sunday my knitting group took a field trip out to the American Textile History Museum in Lowell, Massachusetts. Tucked in the back of a former mill along with the Lowell Sun Newspaper and some loft condos, this jewelbox of a museum winds through  textile production, fashion, history, and innovation.

Our Intrepid Band

Some exhibits made more sense than others (I guess bicycle frames are a textile...), but it was a fun afternoon and I learned  how baseballs are tested and how linen goes from plant to fabric (Winnowing! Retting! Scutching! Heckling!).

Loom Room

The loom room.

Spools of color

Measuring warps.

Like Jewels

Circular Knitting Machine

A circular knitting machine.

Lacy Underthings of Other Eras

Bloomers and bustles.

Hooray!

We went to the museum specifically to catch the last day of a special exhibit "Aprons: Fifties Functional Fashion." We all wore aprons in honor of the event (and got a surprise $2 off admission!)

Apron Exhibit

The exhibit consitsted of about 50 or so aprons and I was glad to see the majority of pieces in the exhibit were homesewn, and some were quite dashing,

Want!

kitschy,

Christmas Kitsch

nostalgic,

Mrs.

or busty!

Because sometimes your apron needs boobs.

Little Things

Some things I've been making lately:

Andersonville Socks
Basil Rosemary, Mint and Camomille
New Lunchbag
Granola!

Maple Walnut Granola:

  • 3 cups rolled oats (not quick cooking)
  • 1 cup chopped walnuts (or nut of your choice)
  • 1 cup dried cranberries (or dried fruit of your choosing)
  • 1/3 cup maple syrup
  • 1/3 cup brown sugar
  • 1/4 cup vegetable oil
  • 2 Tbl warm water
  • 1/2 tsp salt

Preheat oven to 250°F.

In a large bowl, mix together syrup, sugar, oil, water and salt until throughly combined. Add in oats and nuts and and mix until coated.  Pour oat mixture unto a  lightly oiled rimmed baking sheet or pan.

Bake from 1½ to 2 hours or until oats are dry and brown. Remove from oven and cool. Stir in fruit and place in a sealed container.

Sketchbook: Designing the Carmel Clutch

As I hinted at a few posts back, I have pattern in 2010 Spring/Summer issue of Twist Collective.

It's my first professionally published pattern and I'm thrilled to be in such a great magazine in the company of designers I really admire.  I'm super excited about the whole thing, so I thought I'd talk a bit today about the Carmel Clutch came to be.

It started with a hat.

Inspiration

This hat.

Which I bought on out-of-season clearance at LL Bean a year or so ago. After I bought the hat I spent some time looking at it and realized that it was crocheted. This got me thinking, surely if you can crochet with raffia, you can knit with raffia. So I went out to a craft store on my lunch break and bought a cheap bag of raffia to give it a try.

I wanted it to have a woven looks, so I flipped through a stitch dictionary or two and came up with a swatch of herringbone stitch.

Swatch

My original swatch had a half dozen knots on the back, since the raffia from the craft store came in pieces of about 3 feet long, but it was enough to know that the concept worked.  So I worked up a sketch, named the pattern after the beach community in California that I visited a handful of times in my teenage years, sent it off to Twist, and crossed my fingers.

I got the okay from the Twist folks and we decided to work up two samples, one in raffia and one in a more standard yarn, which I was more than happy to do. While I waited for the Elann Coto Canapone to come in I ordered a few spools of raffia from Raffit Ribbons and got to work.

Carmel Clutch in Progress

Here's where you may ask, what's it like knitting with raffia? And the answer is not too bad. It's about equivalent to working with any other plant fiber yarn I've worked with (cotton, hemp, linen).

Carmel Clutch pre blocking

It's stiff off the spool and there's not a lot of give when dry and I'll admit that the purl stitches in the garter stitch sections of the bag were kinda pokey, but believe me - I've never had so much fun blocking a piece of knitting. the texture changes dramatically after it's wet and softens into something lovely!

Carmel Clutch v1.0

I had finished version 1.0 of the bag, but wasn't happy with the front flap, which was done with decreases. It was too pointy and bumpy - so I set it aside for a day to decide how to fix it. I picked up some personal knitting, and while working on a version of Laura Chau's Just Enough Ruffles Scarf, the solution presented itself to me - short rows! So I pulled out the front flap and reworked it in short rows with the addition of the garter stitch border seen in the final photos.

Around this time the Elann yarn arrived and it was Christmas and I went to California for a week and did no knitting at all so by the time I was knitting the Coto Canapone version I completely forgot to take pictures. Oops! But suffice it to say, I reworked some numbers for gauge.  We also made the second sample shorter to combat potential flopiness (which if you find is an issue with your yarn I'd suggest lining it with fabric backed with interfacing or putting a book in the bag - both work :) )

A big thanks to Twist for including me in this issue and to Caro Benna Sheridan for the lovely photos! If you have any more questions on the Carmel Clutch - let me know!

Introducing: SandDune

For a while now, I've been dreaming about starting my own little knitting pattern company, a today that little dream just got a little more real.

IMGP4096.JPG

This is SandDune, my first Ms. Cleaver Creation.

Inspired by my favorite Maine beach, SandDune is a lacy self-storing bag, perfect for gathering together your favorite items for those days by the shore that are fast approaching. Though it's cool and rainy in Portland today, I know before too long, it'll be time to head out to the ocean.

SandDune

Knit from a about 200 yards of Elsebeth Lavold Hempathy in Sunflower #14, the bag is both study and airy.  The hemp gives the bag a beautiful earthy look. Knit in the round, the bag is a quick and satisfying knit.

SandDune Hanging

The pattern can be purchased in PDF form for $5.00 USD via my Ravelry store or the store:

I'm very proud of this pattern and am happy to say this is the first of many designs on my pipeline and there'll be more surprises in the weeks and months and years to come!

SandDune Bottom

The 24-Hour Pillow

My New Pillow

When I was little, my dad had a book called How to Be Your Daughter's Daddy, and the only parts of it that I remember was a section that had a bunch of little "date" type activities for dads and daughters to do together - things like roast mini-marshmellows on toothpicks over candle flames and the stipulation that every girl needs at least three pillows on her bed.

Queen Anne's Lace Embroidery

Well, if you don't count Mr. Cleaver's pillows, I have been languishing with only two pillows for years now. Well no more, says I! I had a pillow form sitting around for about a year and this weekend I gathered all the materials together and made this throw pillow.

I drafted out a quick envelope back pillowcase and spent the majority of yesterday morning watching MR. Cleaver play his first tennis game of the season and doing the embroidery, which I had bookmarked for this pillow since it showed up on Sew, Mama, Sew! I definitely got to practice my french knots. I love the way the pillow turned out and it really ties the bedding together.  And really, it makes me feel as if I've fulfilled my girly quota on pillows.

Embroidery Close-Up