My Poufy Shirt

IMG_3594.JPG

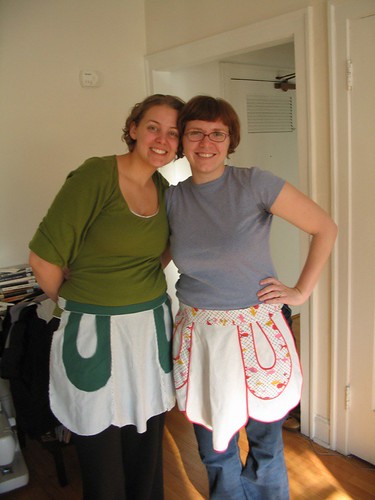
I don't know what it is about the week leading up to a big to-do that makes me want to sew so much, but it seems like whenever would be the least likely time to whip out the machine is exactly when I choose to do so. 


I'm going to admit. I'm not an everyday stitcher. I'm not even an every-week sewer, but book me a plane ticket out of the state and I'll set up the machine in the dining room.

I, of course, realize that some of this has to do with my need to show-off (seriously, I have a blog to document it all for goodness sake). Mothers and mothers-in-law are great audiences for showing-off my handmade stuff. 

For example, just before leaving for my bridal shower back last summer, I sat around hand-sewing the hem of a summer dress.  Just before I left for my wedding in October, I made this dress:

Lent Day 32

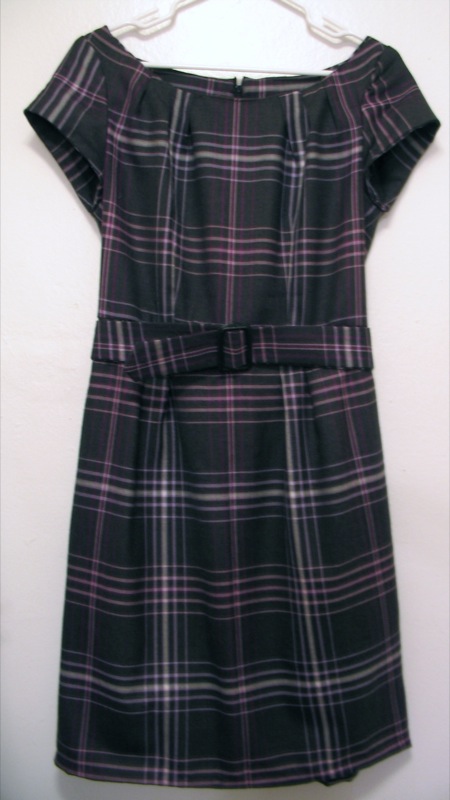
Just before I went to my mother-in-law's for Christmas I made this one:

Lent Day 31

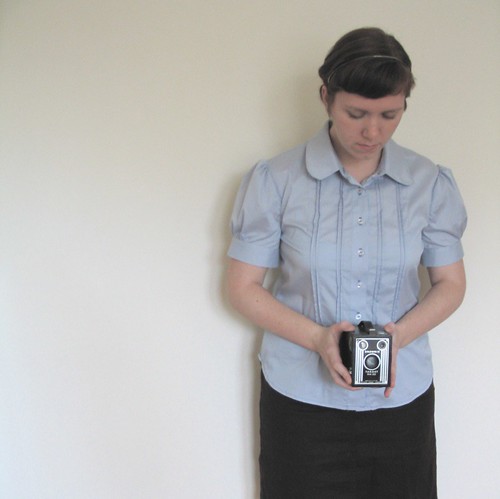
This time around, I'm doing crazy-tons of theatre stuff and I make a shirt. I know you were expecting "dress," but I'm branching out. 

IMG_3589.JPG

So yes, I made a shirt. The last time I made a shirt, I was in high school and it was a very simple, very boxy men's bowling shirt and my dad got one of the folks at his work to stitch "Miss Leah" over the pocket. I still have it, and maybe after I add some much-needed darts to it, I'll post it here.

But after a 7 year or so break from shirts, I decided to dive back in again. You see, I have this *crazy* idea about slowly crafting an entire wardrobe - except t-shirts and underwear, because I'm not that crazy.

IMG_3580.JPG

Of course, about halfway through the shirt I realized that I didn't have a clue how to make buttonholes on this machine.

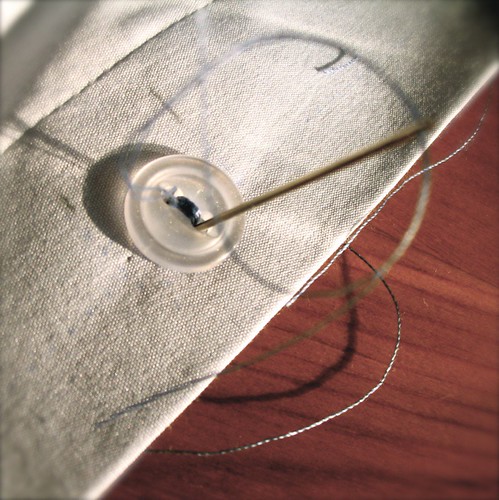
Let me say, I love the buttonholer on my machine. Love it! It made the whole process so easy I just want to run around putting buttonholes on everything. Forget cute as a button, how about cute as a buttonhole? And the more I type "buttonhole" in a row the less it sounds like I should be typing buttonhole. Also - did you know you can sew on a button with a machine? I'm so excited by this development in my life!

This was definitely A learning shirt, between the pin-tucks and lots of curved seams. But I'm super-proud of the hem and it was the best go I'm had with sleeves recently. So it's all to say I'm getting better - even if the collar on this shirt is a bit of a mess.

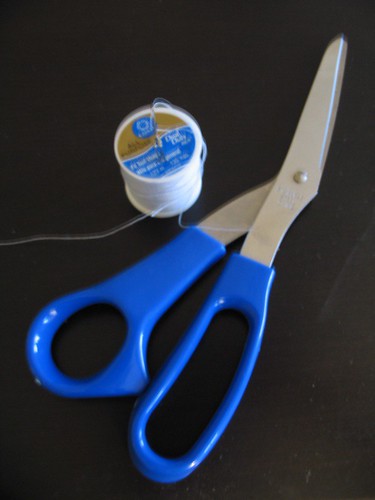
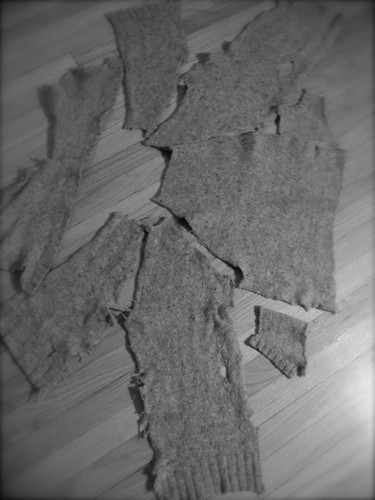
My other confession about this shirt? The contrast stitching was totally unintentional. I bought some dark blue thread for another project, which when I went to sew the shirt was the only blue thread I could find, so I assumed I got it for both projects. About halfway through the shirt I found the light blue thread. Ah well. As for that other project? I'm going to have to buy more thread, because this is ow much thread I had left at the end of this shirt:

IMG_3585.JPG


PS - for those who are curious. The pattern was McCall's M5322 version A without the trim.

Yellow + Blue = Green

With spring's arrival, I start yearning for new springier colors - namely bright yellows, blues and greens. This yearning is particularly pronounced on grey days like today, when I need pick-me-up. And so some colors that have been brightening my days recently.

Yellow Bracelet

My "Andi" bracelet from Luxcharm on etsy. I have a thing for bracelets right now. I never used to wear them (though until about a year ago when it broke I always wore a watch), but now I think they're great. This is the first in what may prove to become a bracelet collection.

Green Ipod

My green ipod. Yep, we finally gave into the ipod revolution. They lowered the price, so Mr. Cleaver and I could no longer resist. Of course I have about 10 cds on my laptop, so the music isn't too varied right now, but it does make the 45 minutes on the train go a little faster.

Blue Siscors

My blue sewing scissors. When I bought my sewing machine last summer I also bought a sewing starter kit with scissors, needles, measuring tape, chalk paper, etc and all the appropriate accessories were blue. And so is the shirt I'm currently sewing, though it is more of sky than primary blue. The needle and thread were for slipstiching the inside collar. I hate slipstitching. Actually I have a terribly small amount of patience with any finishing really. Once all the major seams are in place I start wearing the thing. Seriously, I have two dresses that I've been wearing for months that need some finishing done. Ah well...


Daffodil Socks

I did, however, completely finish my Pomatomus socks, which hey - are yellow, blue and green! And considering the number of rows I had to rip back on these socks due to inattention, it's pretty amazing that I finished them as quickly as I did. Then again, knitting also makes that 45-minute commute home much faster.


Marryin' Mac 'n' Cheese

Mac 'n' Cheese

So good, if we weren't already married, my husband would marry me for it.

Like pretty much all of America, I grew up on the Kraft "Blue Box" Mac 'n' Cheese. My first taste of the homemade stuff was when my brother attempted to make some while I was in high school. I not sure what happened, but it was notthe best, shall we say. I retrospect, I think it needed salt. 

Years later, I came across this recipe in Real Simple Magazine and thought I'd give it ago, but I was a little put off by the called for 6 cups (!) of milk, and using the full quarter cup of oil on the bread make my crackers waaaay too greasy, so I did a few mild changes, as listed below.

And its really good. This is maybe one of Mr. Cleaver's favorite things I cook, and every so often (as with the Cherry Pie), he'll just "happen" to the buy the ingredients and if I just "happen" to want to make it, it would "happen" to be swell. I love it too, so it's not too hard to convince me.  

Mac 'n' Cheese Ingredients

Mac 'n' Cheese, adapted from Real Simple, Nov. 200. 

  • 1 pound elbow macaroni
  • 5 Tablespoons unsalted butter (plus some to grease dish)
  • ½ cup all-purpose flour
  • 3-4 cups whole or low-fat milk (I use 1% it turns out plenty rich and creamy)
  • 14 oz.-16oz.  cheese of choice (I like cheddar or you could do a mix.)
  • 2 teaspoons sea salt 

Herbed-Crumb Topping

  • 1 cup or about ½ a sleeve of your favorite butter crackers (Ritz, Keebler Club) smashed
  • 3 Tablespoons olive oil
  • oregano and thyme to taste
  • 1 teaspoon salt
  • ¼ teaspoon black pepper

Heat oven to 400°F and grease a 9x13 baking dish.

Cook the macaroni for slightly less time than the package says, so it's still a little firm. Drain and rinse.

While the mac is boiling, combine cracker crumbs, oil, herbs, salt and pepper. The oil should be just enough to coat and make the crumbs slightly stick together. 

In a saucepan, melt butter. While whisking constantly, add the flour and cook for about 3 minutes. The mixture will clump. Still stirring, add the milk and cook for another 7 minutes, the mixture will start to get thick.  Add the cheese and salt and stir until all the cheese is evenly melted.

Mix together the mac and the cheese, pour into the prepared dish and sprinkle with the crumbs.

Bake for about 25 minutes or until golden and delicious.

It'll sit like the brick of cheese and pasta it is in your stomach, but it'll be so worth it. 

Reheats really well in the oven too! 

Sunny Lemon Sorbet

Lemon Sorbet

It is 5:30pm in Chicago, sunny and 58°F. This is a cause for celebration.

And there's no better way to celebrate good weather than by pulling out the ice cream maker - one of the many wonderful and incredibly useful wedding gifts Mr. Cleaver and I received. We use our ice cream maker at least once a month, even throughout the winter, so to those who think an ice cream maker is that wedding gift that gets used twice and never again, I prove you wrong in this instance.

Now in interest of full disclosure, I made this sorbet a week ago when it was 35°, but after a long Chicago winter, when it finally hits 35 people start pulling out their shorts.

I had previously made a dark chocolate sorbet from that most wonderful of food-centric websites, Chocolate and Zucchini. It definitely a make again, but the sorbet, I think is really suited to the lightness and sweetness of fresh fruit. So, to bring a ray of sunshine into my kitchen, I opted for a Sunny Lemon Sorbet.

Sorbet Ingredients

Lemon Sorbet is maybe the easiest thing to make ever.

The ingredients:

  • 1 cup of fresh lemon juice
  • 1 cup water
  • 1 cup sugar
  • 1 tablespoon lemon zest
  • That's it! I love food with a small number of ingredients.

Mix all the ingredients together in a bowl and place in the fridge for a minimum of 4 hours, again - I always let it sit over night before I put it into the ice cream maker. This will allow the sugar to dissolve and the mixture to cool, so the machine doesn't have to work as hard.

Pour sorbet mixture into the ice cream machine and churn for about 30-45 minutes for a smooth, sweet and refreshing treat! Would pair well with shortbread cookies.

Chocolate Banana Bread Cake

Chocolate Banana Bread

The way these recipes are coming, people are going to start to think that the only place I ever ate decent food was in Portland, Maine and that I don't live in a rather major U.S. culinary city these days - because, yes, today's recipe was inspired by something I ate in Portland, Maine.

The restaurant in question today is Bibo's Madd Apple Cafe. This lovely and eclectic little spot is right next door to the theatre I used to work at. Actually it's the same building. In any case, this is one of my favorite eateries in the city and exactly what I like to think a cafe should be: classier and more adventurous than a diner or sandwich/burger joint, but not so intimidating that you couldn't eat lunch there. That is, a place a low-paid twenty-something could take both her friends and her parents. The jaunty atmosphere doesn't hurt either.

The first time I went there for lunch I sprung for dessert: the ever-so-delicious Chocolate Banana Bread Pudding Cake (with a warm chocolate center and whipped cream). Now as readers of this blog may know, I love me some banana bread. I also love me chocolate. So this dessert was right up my alley.

Though my Chocolate Banana Bread Recipe isn't the same as Bibo's (frankly, I'd have to try it again to get a better feeling of the dish), I'm pretty happy with how this variation turned out. This recipe is based on the aforementioned banana bread recipes and Clotilde's Chocolate and Zucchini Cake from her cookbook. I wanted a texture that was somewhere between cake and bread and this does that pretty well. The chocolate flavor is prominent, but not overly sweet and a sprinkle of powdered sugar makes a sweet compliment. I don't know if I'm completely finished with the recipe, but I've made a lot of banana bread in the past month or so, so I'm giving it a rest for now.

Chocolate Banana Bread

Chocolate Banana Bread Cake

(inspired by Bibo's Madd Apple Cafe and Clotilde's Chocolate and Zucchini Cake)

Makes 1 medium-sized loaf

  • 2-3 overripe bananas
  • ½ cup unsalted butter, softened
  • ¼ cup milk
  • 3 eggs
  • 2 tsp lemon juice or vinegar
  • 4 oz. unsweetened baking chocolate melted and mixed with 1/2 a cup of granulated sugar (or 4 oz. of chocolate chips).
  • 1¼ cup all-purpose flour
  • ¾ cup wheat flour
  • ¾ cup brown sugar
  • 1½ tsp baking soda
  • ½ cup unsweeted cocoa
  • ½ tsp salt
  • powdered sugar (optional)

Preheat oven to 350° F

Break up the bananas and butter into a large mixing bowl. With a sturdy whisk, mash together the butter and bananas until mixed well - the butter will still be a little chunky, but should be about pea-sized. Add eggs, milk and lemon juice, adding the juice last. Pour in the melted chocolate and mix well.

In a separate bowl, mix flours, brown sugar, cocoa, soda, and salt. Add to wet ingredients and mix well. If desired, you could add some unmelted chocolate chips at this point. Pour into a greased loaf pan.

Bake 55-60 minutes, or until tester comes out clean. Dust with powdered sugar and serve.

Barbeque Chicken Pizza

BBQ Chicken Pizza

A bit blurry, but you get the idea...

Back in the day, when I was interning at the Goodman Theatre, I brought in a slice of my BBQ chicken pizza for lunch. I was walking from the microwave to the room where we were having a lunch meeting and several other interns started hovering over my lunch, as hungry interns are  often wont to do.

Now, I like to think the admiration of my pizza was due to the pizza and not just the noon-time hunger striking, but the world may never know. Unless, that is, you try out the recipe!

This is another one of those I-kinda-stole-this-from-a-Portland-restaurant recipes. For backing when I was interning in Maine (Yeah, I've done a lot of internships, five in fact. Six, if you count the two seperate summers at NVSF), my roommates and I fell in love with a pizza called the "Harbor Master" at Portland Pie. I'd never been much for chicken on pizza before, but man - this one was good.  And now that I'm approximately 1,086 miles away from a Portland Pie, I had to start making them on my own. My biggest change is the removal of a standard pizza sauce for straight-up BBQ sauce goodness.

Depending on what I have around the house this shifts around a little: sometimes they'll be bacon, sometimes basil, sometimes just chicken and cheese. Pizza's good that way.

BBQ Chicken Pizza Ingredients

BBQ Chicken Pizza (adapted from Portland Pie Co.)

  • 1 large boneless, skinless chicken boob cut into small pieces.
  • 1 package of pizza dough (mine's wheat and from Trader Joes, I've used the Pillsbury in a can quite often, and of course, you could always make your own if you're feeling fancy)
  • corn meal for the pan/stone
  • barbeque sauce - my ultimate favorite is the Chicago-based Sweet Baby Ray's, but as Mr. Cleaver and I learned when we tried to bring some to his mom as a gift, it's available all over the USA now.
  • ½ white onion, diced (optional)
  • 3 strips bacon, chopped (optional)
  • basil (fresh or dried or optional)
  • cheese (so not optional) I usually use a whole bag of the italian mix, but again, you could get all fancy and grate you own.

Preheat the oven to 400-425°F.  Sprinkle your pizza pan/stone/cookie sheet with some cornmeal to prevent sticking and place rolled out dough on top.

If using, brown the diced onions in a little butter, just enough to the the raw taste off. Remove onions and cook bacon in same pan.

At this point, I usually put the crust (sans anything) into the oven to pre-bake for about 5 minutes.

After the bacon is cooked, remove and drain any fat. Cook the chicken bits until throughly cooked through. Shred any large chicken pieces with a fork. Coat the shreed chicken with BBQ sauce.

Take your pre-baked crust and cover with BBQ sauce like you would any thin pizza sauce. (see below).

BBQ Chicken Pizza

Once you're all sauced up, add the cheese. Then top with the chicken, bacon, onion, and basil, and maybe a little more cheese (I never said this was healthy). Put it all back in the oven and cook for another 5-7 minutes or until the cheese is all good and melty.

Let cool a tad (I'm notoriously bad for burning my mouth on food), slice and serve.

And see if a couple of interns don't start sniffing their way over :)

BBQ Chicken Pizza

Abercrombie & Stitch: a Sweater Adventure

Abercrombie Soft Box

The summer of 2001, my mother and I went to the mall in search of wool sweaters. I was about to go to college in Oregon and word on the street was it was cold there, so my sandal-shod self, flip-flopped my way through the American Eagles and Pac-Suns of the Fairfield mall in search of pac-northwest worthy garb.

For reasons still unknown to me, I made my way into Abercrombie & Fitch. Now, were this 1901, it would make sense, when it was an outdoor outfitters, more akin to the L.L. Bean than the Gap. However, it being 2001, Abercrombie was home to pre-frayed baseball hats and photos of men with hardly any clothing on, which always seemed like a terrible way to sell clothing to me.

Regardless of any disregard I may have for the store, in I went and purchased my favorite sweater for the next 6½ years: a grey wool, zip-up hoodie.

WinCo Pumpkin Patch Adventure

Me and my sweater on a "pumpkin patch" adventure in 2004.

I loved that sweater, but the years of wear were starting to show. First the wrists started to unravel and loosen. Then the holes started to appear at the seams. When Mr. Cleaver pointed out a nearly two-inch hole in the right arm pit, I had to admit it was time to retire the thing. But having immersed myself in the world of craft blogs, I knew this was not the end. Yes, my old sweater could have a second life -- felted.

Now, my blogosphere doppleganger beat to me to the punch with this post on sweater felting/crafting, but I figured after 6½ years of warmth, my sweater deserves a blog entry as a send off.

IMG_2969.JPG

RIP old sweater...

I was first inspired by these coasters I saw on Design*Sponge. Then I saw this fabric box linked on Sew Mama Sew and thought it would would be awesome in felt (like I said, I read a lot of blogs, my work day is slow). Yes, I decided coasters would be a dignified end for my favorite sweater.

Felted Sweater

Original sweater on the left, felted on the right. Wasn't this thing supposed to shrink?

But before I could make coasters I had to felt the sweater. This proved more difficult than one would think. I mean, everyone is always saying "Don't put your sweater in the washer or dryer or it will only be fit for your Chihuahua!" The first two times I washed and dried this (both on high temps, mind you) it just got clean and fluffy. On the third try, it got a little felted. At this point I gave in and did it by hand, with the above results.

Sweater Coasters

Coasters in action.

With the felting done, I cut out my pieces, used my sewing machine to add some decorative stitching and I was in business. I have to say, my old sweater works excellently as both coasters and a change bowl/box. Best part? I still have over half the sweater left and I just might have an idea of what to do with it....

Abercrombie Soft Box

I don't have a stick blender, so that makes it "Rustic"

Rustic Potato Soup

See that texture? It's "rustic." And making me hungry.

As in, "Rustic Potato Soup."

When it comes to cooking, I have a number of solid family-inherited recipes that I use (many posted here) and as I get more adventurous I've begun to add some of my own, like the Chicken Satay. My process for making up new recipes, pretty much always follows the same pattern.

  1. I eat something in a restaurant, see something on tv, or read about something that seems super-tasty
  2. I pull out my trusty copy of The Joy of Cooking and see if they have anything similar.
  3. I roam over to ye olde internet and look at epicurious.com and then search for recipes on blogs.
  4. I write down the ingredients that seem to make sense or overlap from these sources and go shopping.
  5. I cook using memory and whatever ingredients I have purchased.
  6. I fiddle.
  7. I enjoy.

And that's pretty much the process. A month or so ago I decided that I needed to try my hand at making soup. Mr. Cleaver makes a lovely chicken/turkey soup/stew whenever we roast a bird, but I had yet to delve into this food category myself. I decided to start with one of my favorites, potato soup.

Here's what I came up with, please note that it owes a lot, like a lot a lot to this recipe from Nook & Pantry.

Rustic Potato Soup Ingredients

I love it when there are so few ingredients, it's like that 5-or-fewer episode of Everyday Food. I also love cooking shows on PBS.

Rustic Potato Soup (serves 4-6)

  • 5-6 potatoes, washed and peeled (keep the peels)
  • 4 slices of bacon, chopped in to bits
  • ½ onion, diced
  • 1½-2 cups chicken broth
  • 2 cups milk
  • salt and pepper
  • shredded cheese of choice for garnish (I like cheddar)

In a large stockpot, cook the bacon bits. At this point you can either cook the potato peels in the bacon fat for crunchy potato skins or you can drain the fat.

Chop the potatoes into about 1-inch cubes. Toss the potatoes, diced onion and half the bacon bits into stockpot and add the chicken broth. Add enough broth so it just covers the potatoes. Boil the potatoes until soft about 6-7 minutes. I usually test the potatoes by sticking a fork into the largest potato piece and if it slides off it's good.

Mash the potatoes with a whisk or a potato masher. Add the milk, stir and boil until the soup thickens some. The potatoes are so starchy that it's totally unnecessary to use any thickener (ie flour).

Divide into bowl sand top with cheese and remaining bacon bits, or other garnish of choice.

This soup is rib-sticking good and Mr. Cleaver-approved!

Sewing Update or The Seven-Year Itchy Wool Dress Part II

So I'm still playing post-Christmas catch-up here, but if I keep my nose to the grindstone, I figure I might get all caught up by the end of January. 

That said, here is the sewing-centric companion to last week's knitting update.

Project #1: Christmas Apron

I wasn't one of the many bloggers who made the handmade pledge because I already knew what I wanted to get my husband, and while part of it was handmade by me (record bowls) and part of it handmade by someone else (Wilco silkscreen), the rest was not and it wasn't really an idea I wanted to give up. 

Mr. Cleaver's Presents

Not entirely handmade, but certainly appreciated by the recipient. 

That said, I did do some additional hand-made gifting, namely the apron below (on left). The pattern was based on a vintage apron I had (on the right). This was pattern-making at its, uh, well it involved some paper bags, a lot of folding and some high-class technical eye-balling and guesswork. 

Apron Buddies 

Apron buddies! 

I didn't have enough material or know-how to make bias tape for the edging, so instead I did some decorative zig-zagging. All in all,  I think it turned out fairly well.  

Apron detail

Lord love the zig-zag stitch. 

And what did I get? In an awesome "Gift-of-the Magi"-but-in-a-totally-better-way turn of events, Kasey got me The Apron Book!

Apron book

That is 100% Pure Excitement there. 

 Project #2: Plaid Wool Dress

 It took seven years to get the dress made, so it's no surprise that it's taken me so long to post about the completion of this project.

I finished the dress about a week and half before Christmas and have worn it several times since then, including for my Breakfast at Tiffany's book club meeting, but every time I wore it I forgot to take a picture. Hopefully I'll remember next time and can post a photo of the dress actually on me, but for now, I leave you with this:

Completed Plaid Dress

Knit Extravaganza!

I have no problem taking pictures of the food I cook, but for some reason, I totally have a brain fart when it comes to photographing my more craft-orientated projects. So I'm going to do a few quick posts to catch up on my current and recently completed projects. Today's post focus on the knitting, the next will focus on the sewing projects.

Project #1 - Salina Sweater from Rowan's Vintage Knits.

Salina Sweater - Collar

Pretty much the entirety of my Christmas vacation in Maine was spent working on the front portion of this sweater. I was a little iffy about the color at first - I bought it off the internet and it wassuppossedly a pale blue, but in reality is a very pale grey with a lovely rainbow tweed flecks. In any case, it will be something different in the sea of green sweaters Iam no longer allowed to buy/make.

I haven't casted on the sleeves yet, because I'm taking/took a break to work on two items I actually need/needed.  See projects #2 and #3.

 Project #2 - MK Carroll's Tillie Cloche 

 Tillie Hat Millie Hat - assemetrical brim in back

A week before Christmas, I lost my favorite warm hat to the CTA. It was a lovely maroon crocheted bobbly thing that was purchased at a church craft fair as a Christmas gift by a family friend several years ago. But alas, it is no more. It is, however, still cold in Chicago and my windowpane-style beret, wasn't cutting it in the wind. So I needed a new hat, fast.

Thanks to the beauty that is Ravelry I was able to find an excellent cloche pattern by MK Carroll.  Thanks to the awesomeness that is Mr. Cleaver I got some lovely yarn for Christmas and pretty much instantaneously went to knitting it up. I made it through the crown and half of the brim before we even left Maine.

But the brim, oh boy, did I have trouble with that brim. Which is no one's  fault but my own.

First - I did not use any of the suggest yarns, instead I used Reynold's Lite Lopi, but I did do gauge check and adjusted accordingly. My problem was that I arbitrarily decided that after the initial decrease and increase on the brim that I would say "to hell!" with the pattern and just eyeball the length. Let us just say that this decision did not work out well and was woefully long on the first and second attempts. There was much grafting, ungrafting, weeping and gnashing of teeth.

In the end however, my ears are warm and I really like the hat. It's not 100% done in the above photos. I haven't blocked it lacking a head form other than my own and I haven't added the i-cord trim, but it's cold outside and like all my projects minute finishing can wait until I've worn the thing a half dozen times.

Project #3 - Hello Yarn's Squirrel and Oak Leaf Mittens 

Squirrel Mitten

I lost my warm hat and a month later I had made a new one. I lost my warm gloves and it's taken me oh, eight months to replace them.

That's because the last pair of mittens I made were so disastrous that I refuse to display them here. Well, since Mr. Cleaver was getting me yarn for a hat, I batted my eyelids, looked at him with sad puppy eyes and got a few more skeins for a pair of  mittens to match the hat.

Now I still look at those two skeins of yarn in the photo above and think - surely those would be sufficently contrasting to make a pair of Norwegian-style mittens, surely! The purple is so bright and the grey is so, well, grey! However, as is evidenced in the same above photo this is clearly not the case. So my squirrel mittens are subtle.

But I'm okay with this, figuring that since this is my first colorwork pattern (which I'm really enjoying) it's okay to be subtle, since the mistakes will be less obvious. And as, one of the ladies in my knitting group said on Tuesday - they're like "Magic Eye" mittens, stare long enough and you'll see the image. And I quite like that idea.