Sorbetto and Soft Serve

Mags and I got together for some sewing fun on Saturday and had a surprising role-reversal, in which she worked on a detailed wrap-dress and I whipped out two shirts (and a muslin for some pants, which need a lot of work), one of which ended up as a pajama top because the fabric was crummy, and then there's this one: Sorbetto

The Little Folks voile was the perfect weight and drape for this top. The pattern is the Colette patterns freebie, Sorbetto, which has been making the sewing blog rounds for good reason, as it's quick, easy, and flattering.

SorbettoA few pattern notes:

  • With some careful cutting, I got this out of less than a yard of 54" fabric near the top end of the size range.
  • I added about 2 inches to the hem when I cut it out
  • Like others have mentioned, the bust dart could probably be 1/2 inch lower.

I think this pattern would look great in a silky solid too. Pretty much anything drapey will work well.

In other ice-cream related news that I'm mostly posting about for my brother, at Maggie's instistance I grabbed a Blizzard at the local Dairy Queen (DQ) this weekend (and supported a local dog rescue).

For the first time in 15 years.

The Return to DQ

I've avoided DQ's for the the past decade and half due to a overload on an extended roadtrip through the heartlands with my Grandparents at age 12.

So how was the break fast Blizzard? Not bad.  Not great. But not bad.

Just don't make me get the "Hot Eats" ;)

Print Friendly and PDF Follow
follow us in feedly

Off to the Races

I've been reading the Sew Weekly for a few months now (even won a pincushion!), but as we know, I am far from the fastest sewer ever, so I've yet to participate in one of the challenges, until today. Ascot Blouse

This week's theme was "At the Races" and was to be a garment inspired by the Ascot scene in My Fair Lady.

[youtube=http://www.youtube.com/watch?v=hYMSvyqHHwA]

Ascot Blouse

I had already planned on making this tie-neck blouse, but I made one small change to fit the challenge. When I think of the Ascot Scene, I think of how Eliza looks all lady-like and demure, before busting out "C'mon Dover, move your bloomin' arse!" So I took this demure blouse and added a little secret.

Pink Buttons!

Very bright pink buttons that you only catch glimpse of beneath the tie. Buttons, that depending on the light, look either magenta or the hottest of hot pinks.

Off to the Races

Oh and we're supposed to wear a hat, so here's the cloche again.

The Facts

Fabric: About $3-4 worth from Denver Fabrics Pattern: Burdastyle Ute - Variation B Year: modern Notions: 5 pink buttons Time to complete: two days First worn: June 2011 Wear again: Yes!

Total Cost: $8-10

I like this pattern a lot, but if you're not familiar with shirt construction, the directions are a bit vague, particularly when it comes to attaching the tie collar (the best part). I'd also recommend using more smaller buttons, than the fie large ones the pattern recommends.  There appears to be some pulling at the buttons in the photos, which would largely go away if there were less space between the buttons (though I'd probably sew this with a tad more ease a second time around too).

I like that this shirt is both dressy and cool, and I'm going to get a lot of wear with it this summer.

Print Friendly and PDF Follow
follow us in feedly

Reveal # 1

Straw Cloche - Side View

So here's the first of those projects I teased in the last post. As Leigh guessed, I was crocheting in raffia - specifically, the leftovers from the Carmel Clutch.

Straw Cloche

I've been toying with the idea of crocheting a a straw hat for a while and  it really kicked in when I discovered this hat on Ravelry. I decided I really needed a straw cloche.

Straw Cloche

Crochet isn't particularly my strong suit, but the whole thing came together in about a week, and I only had to redo the brim three times!! (For construction details, see my Ravelry project page.)

Whipstitch on Brim

I finished it off with a wide striped grosgrain ribbon and a whip-stitched brim.

Straw Cloche

Now if it would only get sunny enough to require a sun hat!!

Print Friendly and PDF Follow
follow us in feedly

Knit Extravaganza!

I have no problem taking pictures of the food I cook, but for some reason, I totally have a brain fart when it comes to photographing my more craft-orientated projects. So I'm going to do a few quick posts to catch up on my current and recently completed projects. Today's post focus on the knitting, the next will focus on the sewing projects.

Project #1 - Salina Sweater from Rowan's Vintage Knits.

Salina Sweater - Collar

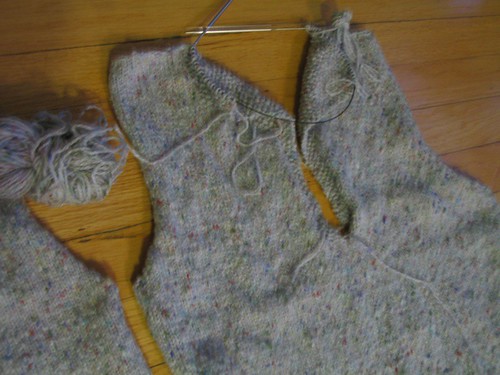
Pretty much the entirety of my Christmas vacation in Maine was spent working on the front portion of this sweater. I was a little iffy about the color at first - I bought it off the internet and it wassuppossedly a pale blue, but in reality is a very pale grey with a lovely rainbow tweed flecks. In any case, it will be something different in the sea of green sweaters Iam no longer allowed to buy/make.

I haven't casted on the sleeves yet, because I'm taking/took a break to work on two items I actually need/needed.  See projects #2 and #3.

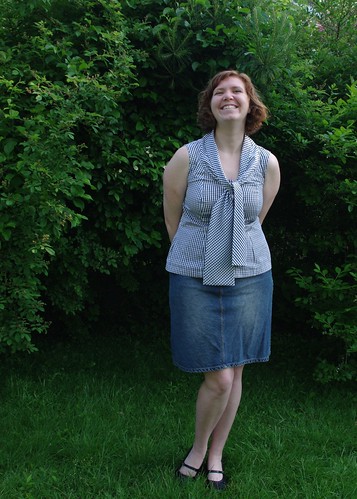
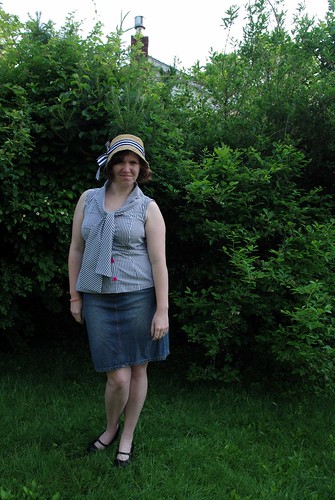
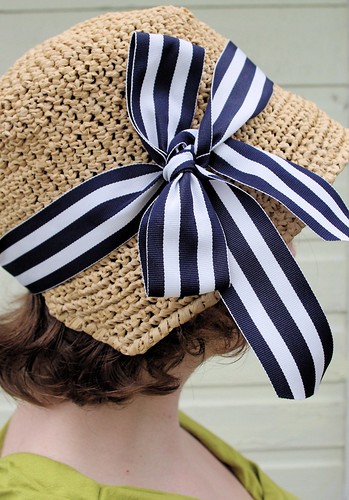
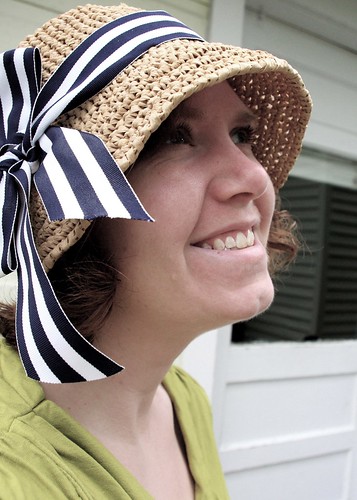
 Project #2 - MK Carroll's Tillie Cloche 

 Tillie Hat Millie Hat - assemetrical brim in back

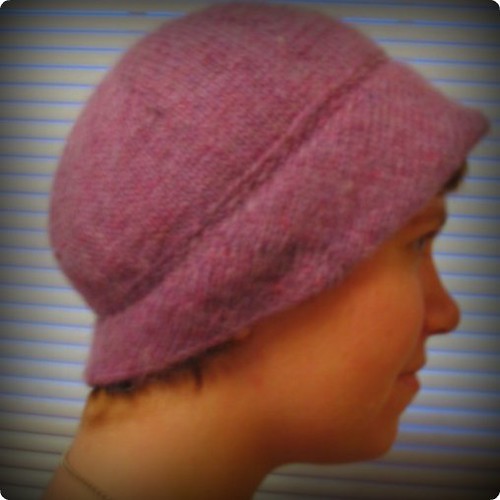
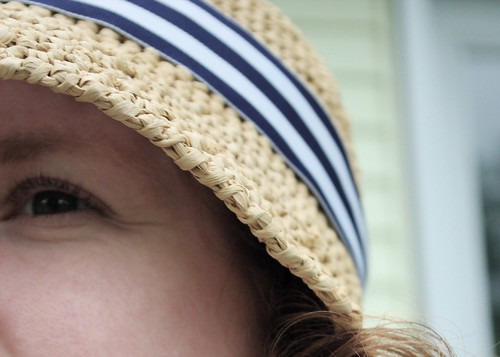
A week before Christmas, I lost my favorite warm hat to the CTA. It was a lovely maroon crocheted bobbly thing that was purchased at a church craft fair as a Christmas gift by a family friend several years ago. But alas, it is no more. It is, however, still cold in Chicago and my windowpane-style beret, wasn't cutting it in the wind. So I needed a new hat, fast.

Thanks to the beauty that is Ravelry I was able to find an excellent cloche pattern by MK Carroll.  Thanks to the awesomeness that is Mr. Cleaver I got some lovely yarn for Christmas and pretty much instantaneously went to knitting it up. I made it through the crown and half of the brim before we even left Maine.

But the brim, oh boy, did I have trouble with that brim. Which is no one's  fault but my own.

First - I did not use any of the suggest yarns, instead I used Reynold's Lite Lopi, but I did do gauge check and adjusted accordingly. My problem was that I arbitrarily decided that after the initial decrease and increase on the brim that I would say "to hell!" with the pattern and just eyeball the length. Let us just say that this decision did not work out well and was woefully long on the first and second attempts. There was much grafting, ungrafting, weeping and gnashing of teeth.

In the end however, my ears are warm and I really like the hat. It's not 100% done in the above photos. I haven't blocked it lacking a head form other than my own and I haven't added the i-cord trim, but it's cold outside and like all my projects minute finishing can wait until I've worn the thing a half dozen times.

Project #3 - Hello Yarn's Squirrel and Oak Leaf Mittens 

Squirrel Mitten

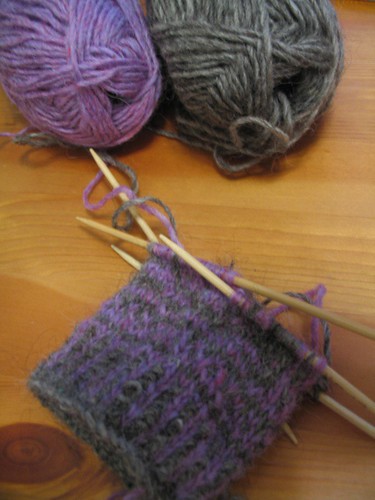
I lost my warm hat and a month later I had made a new one. I lost my warm gloves and it's taken me oh, eight months to replace them.

That's because the last pair of mittens I made were so disastrous that I refuse to display them here. Well, since Mr. Cleaver was getting me yarn for a hat, I batted my eyelids, looked at him with sad puppy eyes and got a few more skeins for a pair of  mittens to match the hat.

Now I still look at those two skeins of yarn in the photo above and think - surely those would be sufficently contrasting to make a pair of Norwegian-style mittens, surely! The purple is so bright and the grey is so, well, grey! However, as is evidenced in the same above photo this is clearly not the case. So my squirrel mittens are subtle.

But I'm okay with this, figuring that since this is my first colorwork pattern (which I'm really enjoying) it's okay to be subtle, since the mistakes will be less obvious. And as, one of the ladies in my knitting group said on Tuesday - they're like "Magic Eye" mittens, stare long enough and you'll see the image. And I quite like that idea.

Print Friendly and PDF Follow
follow us in feedly