Watercolor Memories

IMGP2759.JPG

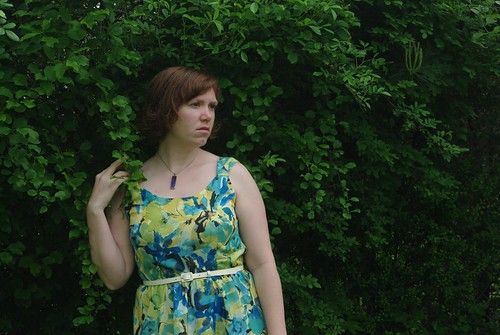
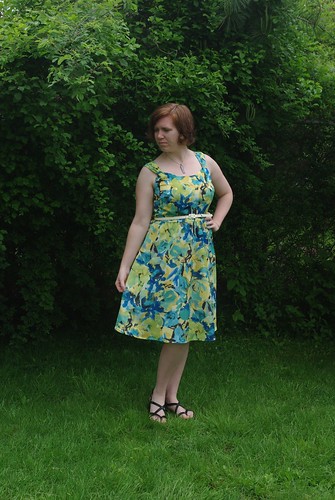
I know I said my next sewing project would be a blouse, but I got distracted and had to make this dress first instead. I feel that the finished project is very Anthropologie-looking, so I tried to do my best Anthro-model impression above.

IMGP2763.JPG

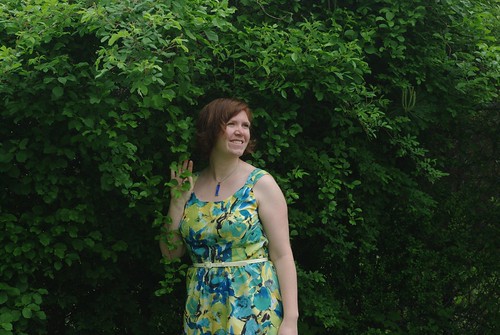
I've been loving watercolor florals for some time now, and when I saw this silky print at JoAnn's on my last visit I had to pick it up. I combined the fabric with Butterick 5028, a pattern that's been languishing in my stash for at least four years, waiting for the right 6o-inch fabric.

IMGP2765.JPG

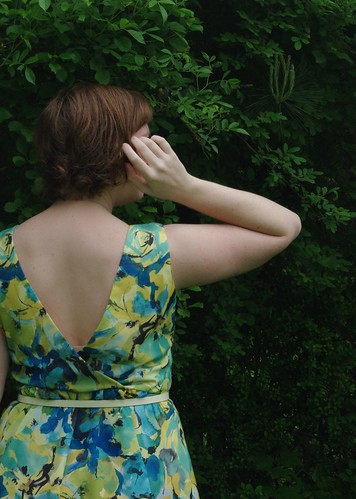
The pattern is all of three pieces, but I made a few mods, including lengthening the hem by about 1.5" and changing the neckline to a scoop neck. Later when I remembered I don't like scoop necks on me, I added the fabric loops to the front straps to change it up just enough to my liking. I still need to tack the loops down so they don't slide up, but I'm very happy with the finished project.

IMGP2751.JPG

The fabric is nice and drapey, and despite being polyester (lined with yellow gingham in the bodice) it's very breezy and comfortable. I will say that my last two experiences with poly (this and my Lady Grey lining) have not been the best for my machine. They're so tightly woven that a very sharp needle is necessary. Lesson learned: universals no, sharps yes.

I also did my first attempt at a lapped side zipper using the instructions that came with the zipper, which I found very clear. My zipper's a bit wonky at the top, but that's because I didn't line it up the best and this fabric didn't deal well with seam ripping. I'd definitely do it again on another project.

IMGP2762.JPG

I definitely loved this pattern, and I think if I could find the right white 60-inch eyelet fabric I'd make another in a heartbeat, probably with the original v-neck front and sash.

IMGP2748.JPG

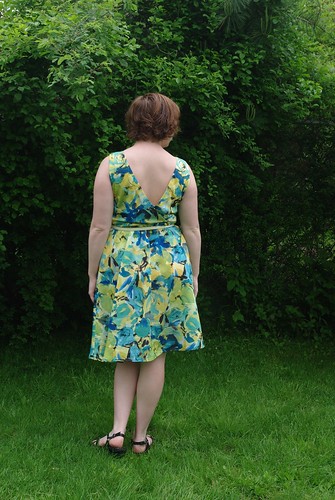
Another note, I like the drapy-ness of the back bodice on this one, but if you were concerned about bra straps showing, you could tack it together at the cross over point for something more stable. The back hem looks a little weird in this photo, I think because the weight of the fabric isn't enough to counteract the pull of bodice or it's static-y  or I could be standing funny- I'm not sure.

IMGP2756.JPG

Dress: Me-made

Butterfly-Wing Necklace: Birthday gift

Belt: from shirt I no longer have

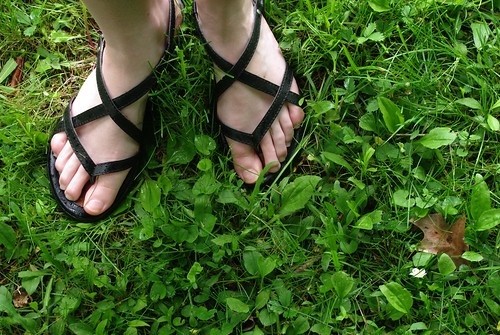
Sandals: Born Concept

Print Friendly and PDF Follow
follow us in feedly

Sewing Fever

I bought it when I saw it at Mardens

As I mentioned before, one of my 2010 goals is to make more time for sewing. Part of the reason for my renewed enthusiasm is that my friend Maggie just started sewing and there is nothing more contagious than the enthusiasm of a new sewer.

Friday after work be drove out to Stanford and visited the newly-expanded fabric section of Marden's (a local surplus/salvage chain). Rows upon rows of fabric, most priced at $2.99 a yard. Let us just say that our cart was pretty fully by the time we hit the cutting table. I whedled my selection down to the five pieces above.  I already have plans for a few of the cuts (from left to right):

The green on the bottom I hope to make into the Ceylon pattern from Collette Patterns.

Some kind of dress, but I'm sure yet- any suggestions are welcome!

The next two pieces will likely be tops of some sort.

The yellow piece second from the top is going to be a flouncy skirt of some kind, with a dark navy contrast

The flowered piece on the top I'd like to make into a version of this top.

I also just finished drafting a simple A-line skirt from my new favorite craft book - Design It Yourself Clothes, I'm hoping to work my way through the book over the course of the year. Now I just need to solve that pesky sewing machine problem 9 but the research is on!)

Print Friendly and PDF Follow
follow us in feedly

My First Sweater: An Adaptation

Ponderous

Last night I finished my first sweater, just in time to show it off at my Tuesday night knitting circle.

It an adaptation of the "Anthropologie-Inspired Capelet" from peonyknits.blogspot.com. The numbers were a significant departure from the original, which was designed for bulky weight yarn, so I thought I'd post the pattern below for anyone interested in doing the pattern in DK-weight yarn. But I take no claim for this awesome pattern. All the glory goes to peonyknits.blogspot.com.

Honeymoon Mini-Cardi

Peony Knit’s “AnthropoIogie Inspired-Capelet” Adapted for two colors and DK weight yarn.

What I Used: Size 5 (24 inch) circular and one set of size 5 double-pointed needles. MC 2 skeins Green Mountain Spinnery “Sylvan Spirit” in Peridot CC 1 skein Green Mountain Spinnery “Sylvan Spirit” in Blue Opal

Sizing: Gauge= 22 st over 4” Note: I made mine to fit a 36-37” bust and 12” arm circumference

What I Did: CO 90 st (Note: If I had to make one change, I would have cast on a few more and had the front pieces be a bit wider) Knit in CC 2 x 2 rib for 2 inches to create neckline

Raglan Increases: (you will need 4 stitch markers to separate the body into 5 sections: left front, left sleeve, back, right sleeve, right front)

MC: Row 1, RS: k3, p11, yo, place marker, p2, yo, p13, yo, place marker, p2, yo, p28, yo, place marker, p2, yo, p13, yo, place marker, p2, yo, p11, k3 Row 2 and all WS rows: knit all stitches Row 3 and all RS rows: k3, *p to next marker, yo, slide marker, p2, yo* repeat from * 3 more times, p until last 3 st, k3 Continue raglan increases until sleeve measures the circumference of your upper arm. End with a WS row.

Split sleeves and body: MC: RS: k3, p to 1st marker, move all st from 1st to 2nd marker onto scrap yarn (right sleeve). P to 3rd marker. Move all st from 3rd to 4th marker onto another piece of scrap yarn (left sleeve). P to last 3 st, k3. WS: Knit all st Continue in reverse stockinette stitch (with k3 at each edge of the row) until desired length, ending with a RS row (I went until I ran out of MC)

CC: Knit 1 row. Switch to 2 x 2 rib, for two inches. BO all st

Sleeves: CC: Pick up all st unto doubled pointed needles, one sleeve at a time, from scrap yarn. Knit 1 row. Switch to 2 x 2 rib, for two inches. BO all st Repeat for second sleeve.

Finishing Weave in all ends. Add a button/pin as desired and enjoy!

Please note that all patterns and tutorials are for personal use only and should not be distributed or produced for sale without the written consent of the author.

Happy Thanksgiving everyone!

Honeymoon Mini-Cardi
Print Friendly and PDF Follow
follow us in feedly