
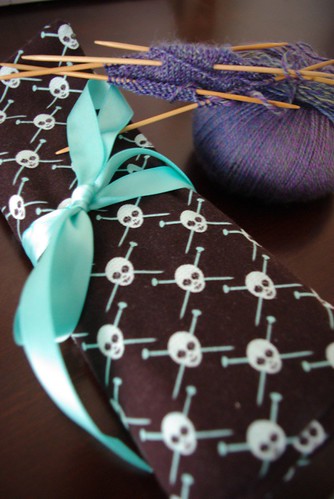
The day before I started my new job, I sat down at the machine and sewed. In preparation for my soon-to-be-condensed crafty scheduled. I designed, cut and sewing this little project in about an hour (research time not included). This is a new land-speed sewing project record for me.
I had picked up a 1/2 yard of this amazing Michael Miller fabric several month ago thinking to make something knitted-related in the future. I wasn't sure what, but with my growing frustration with my growing doubled-pointed needle collection, I knew I had to make a DPN roll.
I trolled blogs, etsy, and flickr looking for inspiration and then dumped out all my needles on the bed, pulled out a ruler, made a few guesses and came up with this:
I didn't take pictures while I was making it because it was too dark ad I was speedy along, but here's a somewhat tutorial for the roll.
Materials:
- 1/3 yd main fabric (in this case, the skulls)
- 1/3 yd contrasting fabric
- 1/3 yd fusible interfacing
- 1/3 yd ribbon
- note: I had a 1/2 yd of each and could make two from that amount.
Cut List (all measurements in inches):
Main Fabric
- 1 - 9.5"x16.5" - body
- 1 - 5.5" x 16.5" - pocket
- 1 - 2.5"x 16.5" - upper flap
Contrasting Fabric
- 1 - 9.5"x16.5" - body
- 1 - 5.5" x 16.5" - pocket
- 1 - 2.5"x 16.5" - upper flap
Interfacing
- 1 - 9.5"x16.5" - main body
Directions:
All seam allowances are 1/2". Press after each seam.
- Iron fusible interfacing to the back of the contrasting body piece.
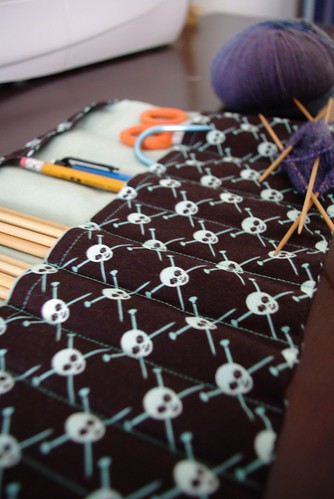
- With right sides facing, sew together top of pocket. Turn piece right side out and top-stitch the edge. Do the same with the upper flap pieces.
- With the right side of contrasting body and the main fabric of the pocket of facing you, baste sides and bottom of pocket unto the contrasting body.
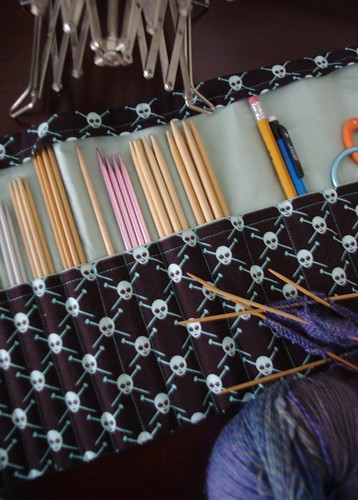
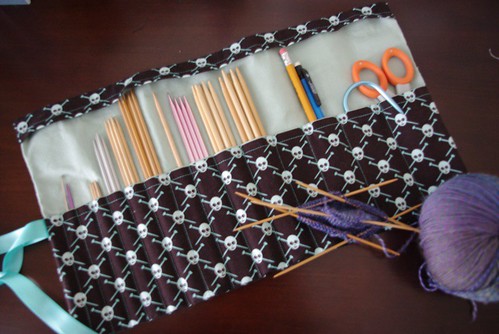
- Stitch divisions into the pocket. Make sure to begin measuring 1/2" away from the fabric edge. The pocket widths from left to right are as follows (there will be 15 pockets total):
- 5/8"
- 5/8"
- 5/8"
- 5/8"
- 3/4"
- 3/4"
- 7/8"
- 7/8"
- 1"
- 1 1/8"
- 1 1/4"
- 1 1/4"
- 1 1/2"
- 1 3/4"
- With the right side of contrasting body and the main fabric of the pocket of facing you, baste sides and top of upper flap unto the contrasting body.
- Fold ribbon in half and pin center of ribbon to the left side of the pocket, alining with the top of the pocket (see photos above). Pin the ribbon unto the pocket so you don't accidentally stitch it down.
- With right sides facings, sew the main body piece and the contrasting body piece together, leaving a gap out to turn right side out.
- Turn piece right side out, making the corners nice and sharp and hand stitch the gap closed. Un-pin ribbon and trim length if necessary.
- Fill with needles and enjoy!
(PS - if you have any issues with this tutorial feel free to email me with questions : ms.cleaver(at)gmail.com)